Showing posts with label cake. Show all posts

Wednesday, 16 April 2014

Birthday Bars

You know, I never understood the tradition of taking sweet treats into school or work on your birthday. I know it's the done thing, but why? Surely people should be bringing you cake on your birthday, rather than the other way around!?


Anyway, today is my birthday, so I decided to conform and bake something to take into work. However, my plan for the evening is to go to a restaurant with a bunch of my friends and have pudding. Not dinner, just pudding. I'm hoping we can just order a couple of everything, and a bunch of spoons, and then when it all arrives we just tuck in. That's the plan.


When it came to making something to take into work, I thought I should try and make something light and easy going, bearing in mind my plans for the evening. The result of that thinking was a tasty little tray bake, packed full of smarties, chocolate chips and sprinkles, topped with a light meringue frosting and more sprinkles (it is my birthday, after all...)

Ingredients:
75g margarine
75g low-fat Greek style yogurt (I used Alpro Soy Yogurt)
50g caster sugar
6 tbsp granulated sweetener
20ml milk
1 medium egg
2 tsps vanilla extract
150g self-raising flour
1/2 tsp baking powder
38g (1 tube) smarties
10g polka dot sprinkles
30g chocolate chips

For the frosting:
1 egg white
50g caster sugar
3tbsp water
1 tsp vanilla extract
splash of pink food colouring
30g icing sugar
More sprinkles

Prep time: 20 mins
Cook time: 20 mins
Serves: 15


  1. Pre-heat the oven to 180 and line a square baking pan with greaseproof paper
  2. Add the margarine, yogurt, sugar, sweetener, egg, milk and vanilla extract to a large mixing bowl, and whisk until smooth.
  3. Tip the flour, baking powder, smarties, sprinkles and chocolate chips on top of the cake mixture, and fold in until combined. (Adding the "extras" with the flour like this gives them a nice coating of flour which helps to stop them from sinking to the bottom... :-) )
  4. Pour the batter into the prepared cake tin and bake for 20 minutes, until the top is lightly golden and a skewer inserted into the cake comes out clean. Allow the cake to cool in the pan for a couple of minutes before turning out onto a wire rack.
  5. Move on to the frosting. Whisk the egg white to stiff peaks and put to one side. Pop the sugar and water into a heavy based pan over a low heat. Stir until the sugar has melted, then bring the syrup to the boil for a minute or so - be careful not to let this turn to caramel, though! Remove the syrup from the heat, and, whilst whisking, pour it into the egg whites. Once your sugar syrup is well incorporated, add the vanilla extract, food colouring and icing sugar to the mixture and continue to whisk until these have dissolved and you are left with a fluffy, glossy frosting.
  6. Spread the frosting over the tray-bake and top with the remaining sprinkles. Cut into 15 slices, and serve.


Happy Thoughts

x

Friday, 7 February 2014

Sticky Toffee Cake

So, he didn't want a big fuss made but today is my boyfriend's 30th birthday, and I think that deserves a fuss, so I'm dedicating today's blog post to him and his birthday cake. Ali absolutely loves sticky toffee pudding, but also loves cakes with lashings of buttercream, so for his birthday cake I decided to try and mix the two. This is what I came up with (a layer for each decade!!)


I got the recipe for the sponge cake from good old BBC Good Food, but switched in some dark muscovado sugar for a rich sticky toffee taste. The buttercream is just my standard recipe with caramel flavouring instead of vanilla!

Ingredients:
For the cake:
200g margarine
200g golden syrup
pinch of salt
300g self raising flour
200g dark muscovado sugar
30ml milk
3 medium eggs
1 tsp vanilla extract

For the buttercream:
250g butter
500g icing sugar
2tsp caramel flavouring
1-2tsp milk, if needed
One diam bar, to decorate (optional)

Prep time: 20 minutes
Cook time: 25-30 minutes
Serves: 12-16

  1. Preheat the oven to 150 degrees, and grease the cake tins.
  2. Pop the margarine, golden syrup and salt into a saucepan and melt over a low heat, stirring occasionally. Put to one side to cool.
  3. Sift the flour and the sugar into a large bowl. I know it seems weird to sift sugar, but I find that when using muscovado sugar this is the only way to ensure that you can all the lumps out!
  4. Tip the milk, eggs and vanilla into a jug and whisk until combined.
  5. Stir the cooled butter and syrup mixture into the flour, then stir in the milk and egg mixture until it all comes together to make a smooth, runny batter.
  6. Share the batter evenly between the three cake tins and bake for 25-30 minutes until springy to touch. remove from the oven and allow to cool in the tin for 5 minutes before turning out onto a wire rack to cool completely.
  7. Once the cake have cooled, make your buttercream. If you're using a stand mixer, just pop all of the ingredients into you mixer, turn it on and come back in a few minutes. If, like me, you prefer to mix up your buttercream by hand, you might find it easier to add the icing sugar to the butter around 150g at a time. Beat in the flavouring, and the milk if needed to make the icing a spreadable consistency.
  8. Place one of the cakes onto your serving plate, and leave the other two on the cooling rack. Divide the buttercream evenly between the three cakes and spread the the edges before carefully stacking the cakes. Sprinkle crushed up diam bar onto the top tier, and Robert's your father's brother!
  9. Make sure to inhale a lot of the yummy toffee whiff that this cake gives off before eating. Seriously, it smells good!!

Happy Thoughts
x

Wednesday, 5 June 2013

Cake'n'Bake Wednesday: Champagne Victoria Sponge

Our June 2012 meeting was the day after the double bank holiday for the Queen's Diamond Jubilee, so we thought it was only fair to thank our ma'am for the extra day off work by paying homage to her in baked form. When tasked with baking a cake to celebrate Britishness and the Queen's Diamond Jubilee, for me it could only ever have been a Victoria Sponge. A special, spruced up for a party kind of Victoria Sponge. So I decided to sandwich some home made strawberry and champagne jam with some champagne flavoured butter cream in between two layers of deliciously light almond sponge.

I also entered this recipe into a couple of Jubilee baking competitions, and whilst I wasn't a prize winner in the Times' Jubilee Bake Off, I did get 1st prize in the Natural Selection Foods Jubilee Baking Competition


Strawberry and Champagne Jam

Ideally the jam should be made at least a day in advance so that it has time to set, however to save time it can be made in advance. The jam will keep in the fridge for 6-8 weeks (if it lasts that long!)

Prep time: 10 minutes
Cook time: 45 minutes to 1 hour
Makes two medium sized jars (around 400g)

Ingredients:
300g fresh British strawberries
250g jam-making sugar (sugar with added pectin)
1 tbsp unsalted butter
100ml pink champagne
1 tsp lemon juice


  1. Place a heavy-based saucepan on the hob on the lowest heat. Wash, hull and chop the strawberries into small pieces, then add these to the pan with the sugar, butter and champagne. Gently stir until the butter has melted and the sugar has dissolved, then leave the jam to cook on the lowest heat for a while, stirring regularly.
  2. Meanwhile, place a saucer into the freezer to use later when it come to test whether or not the jam will set.
  3. Once the jam begins to bubble and simmer, add the lemon juice. The liquid should have reduced and thickened slightly. After around 45 minutes, test the jam for set by taking your saucer from the freezer and dropping a teaspoon of jam onto it. After 30 seconds on the saucer the jam should be set - if not add a little more lemon juice and cook for a little longer.
  4. Once the jam is ready, remove from heat and pour into sterilised jars. Leave to cool completely before placing in the fridge to set overnight. Removed from the fridge 30 minutes before serving to allow the jam to return to room temperature.

Champagne Victoria Sponge

Prep time: 20 minutes
Cook time: 30-35 minutes
Makes 18 slices

Ingredients:
600g margarine
600g caster sugar
6 large free range eggs
50ml milk
A few drops of natural vanilla extract
600g self raising flour
1tsp baking powder


For the filling:
250g unsalted butter
500g icing sugar
1 tbsp milk
A few drops of champagne flavouring (to taste)
4-5 tbsp strawberry and champagne jam
Extra icing sugar for dusting.

  1. Preheat the oven to Gas Mark 5 / 190 Degrees, and grease and line two 9" springform cake tins
  2. Beat the butter and sugar together in a large bowl until light and fluffy. In a small bowl or jug, beat together the eggs, milk and vanilla extract and put to one side. Sift the flour, almonds and baking powder together into another bowl. Beat a third of the wet mixture into the butter and sugar, then fold in a third of the dry mixture. Continue in the order until all of the ingredients have combined to form a smooth batter. 
  3. Divide the batter between the two prepared cake-tins and level with the back of a spoon. Bake for 30-35 minutes until golden brown and springy to the touch. Allow the cakes to cool in their tins for 5 minutes before turning out onto a wire rack to cool completely.
  4. Whilst the cakes are cooling, prepare the butter cream. Beat the butter, icing sugar and milk together until smooth and creamy, then add a little champagne flavouring at a time until you reach your desired taste. Put the butter cream into a piping bag fitted with a large star shaped nozzle, and place in the fridge until ready to use.
  5. Once the cakes have completely cooled, assemble the sponge. Place one of the sponge layers onto a serving plate, and spread the jam over this. Pipe the butter cream on top of the jam in swirls, and then place the second sponge gently on top of this. Dust the cake with icing sugar to finish.

Happy Thoughts
x

Friday, 24 May 2013

Easy Chocolate Cream Cake

It's no secret that when it comes to chocolate cake, my preferred (and go-to) sponge recipe is the devils food cake sponge I used for my Chocolate Fudge Cake (and Rapunzel's Tower, and Creme Egg Cupcakes...), however that one is very, VERY chocolaty. But sometimes, you fancy something a little lighter, and that's where this recipe comes in. It's not as rich, or as dense as the devils food cake sponge, and coupled with whipped cream it makes a lovely light dessert.


Not only that, but it's quick and easy to make, too! (And has much less washing up ;-) )

Ingredients:
200g margarine
200g caster sugar
2 medium eggs
2 tbsp almond milk
40g cocoa powder
160g self raising flour
double cream, or Elmlea
100g milk chocolate, to decorate (optional)
20g white chocolate, to decorate (optional)

Prep time: 10 minutes
Cook time: 20 minutes
Makes 8 slices

  1. Preheat the oven to gas mark 5 and grease ad line two 6 inch cake tins.
  2. Beat the margarine and caster sugar together until smooth and creamy, then beat in the eggs and milk until the mixture is light and fluffy. 
  3. Gently fold in the cocoa powder and self raising flour, then pour the batter into the prepared cake tins. Bake for 20 minutes or until the tops of the cakes are cool to touch. Leave to cool in the tins for 5 minutes before turning out onto a wire wrack to cool completely.
  4. Once the cakes have cooled, whip the cream until thick and billowy, then use this to sandwich the two cakes.
  5. Melt the milk chocolate and leave to one side to cool slightly whilst you melt the white chocolate. (The cooler the chocolate is when you pour it onto your cakes, the less likely it is to run down the sides!) Spread the milk chocolate over the top of the cake, then put the white chocolate into a piping bag and pipe circles onto the milk chocolate. Before the chocolate sets, gently drag a cocktail stick though the chocolate to create a decorative pattern. (I alternated going from the centre to the edge, then back from the edge into the centre.)
  6. Keep refrigerated until ready to serve.


Happy Thoughts
x

Tuesday, 16 April 2013

The Massive Rainbow Birthday Cake (of doom!!)

Cake'n'Bake Recipe? But it's a Tuesday! Well, yes. But I ran out of time to post this one last November, and today is actually my birthday, so I thought it would be a good idea to post it today.


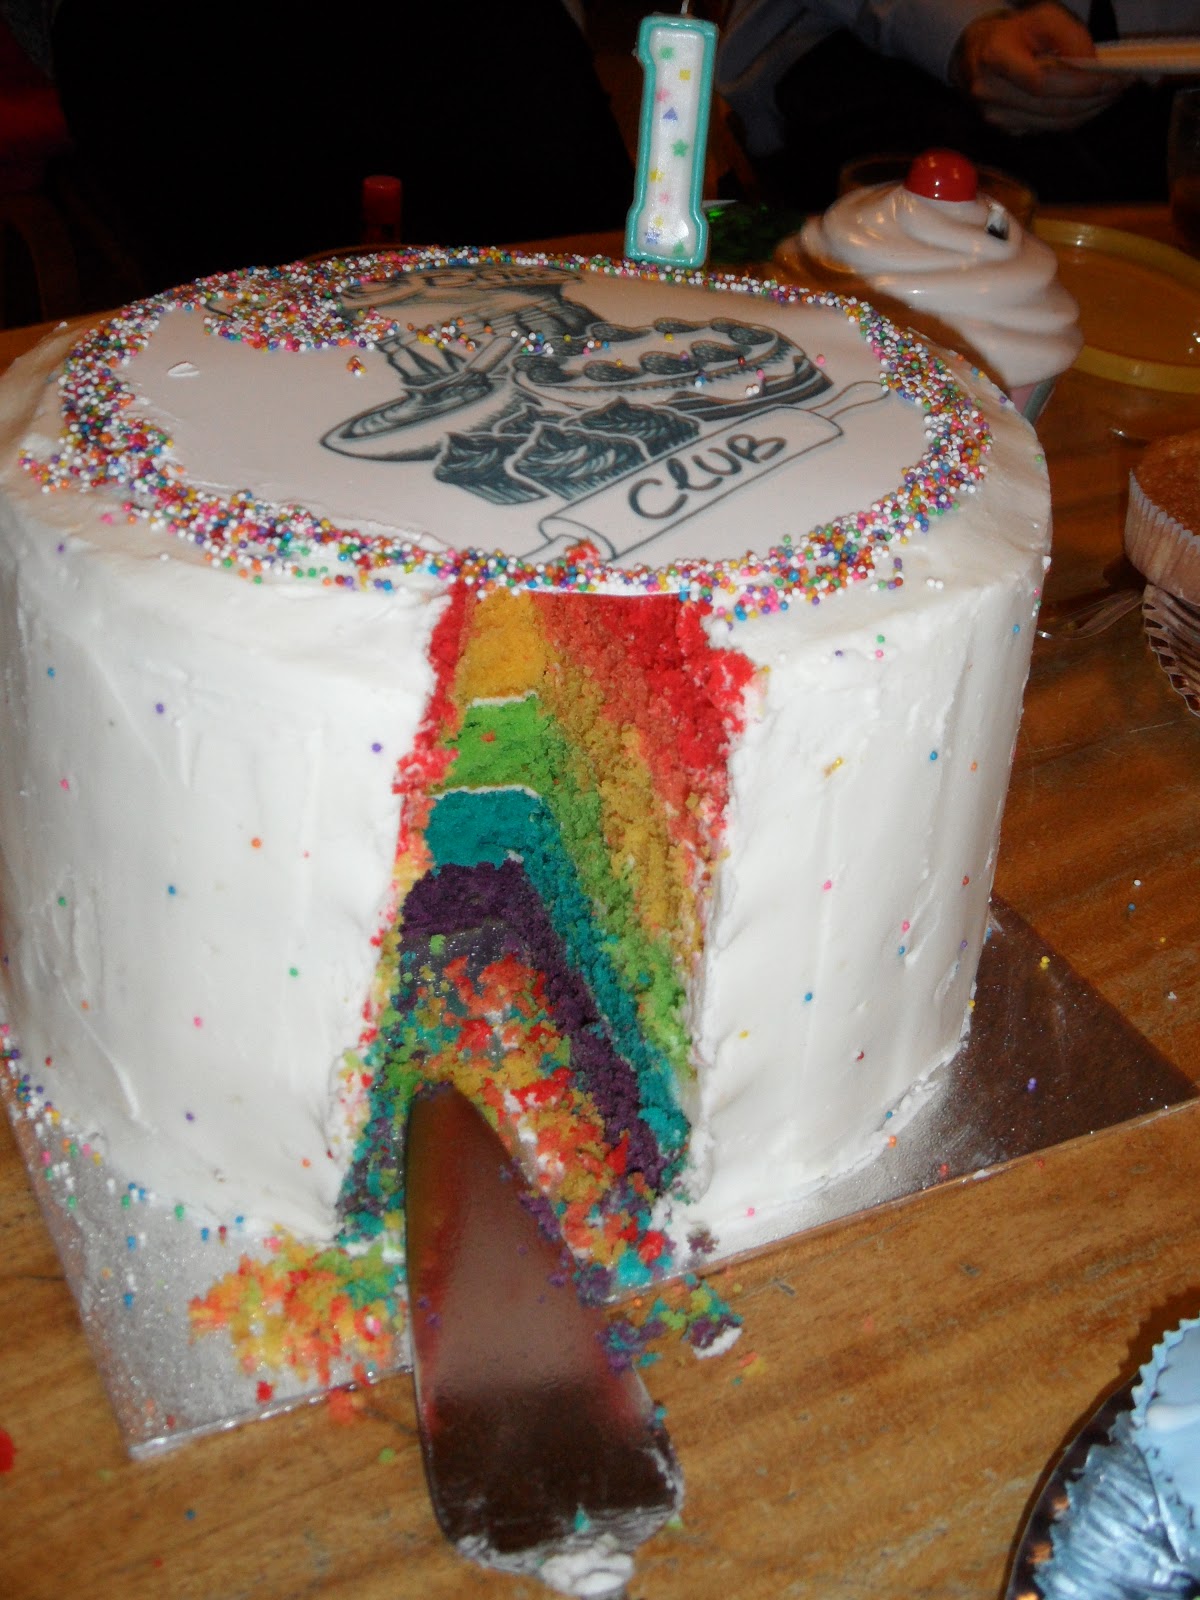
I made this birthday cake for Cake'n'Bake Club's first birthday party in November 2012 - the theme being "Birthday Party". I knew I wanted to do a rainbow cake, mostly because I love making rainbow cake and hadn't done one in ages, but also because I'd made a rainbow cake for our first ever meeting a year before, and it seemed fitting. So I had my heart set on making a rainbow cake, but this time with the Cake'n'Bake Club logo on the top. That's kind of where it all went a bit wrong. You see, the topper I ordered was too wide to fit on top of a cake in the 6" cake pan I was planning to use. (Schoolboy error!) So I had the use a bigger cake tin. Normally, this wouldn't be a problem, as I'd just make the cake shorter by doing less layers to compensate for it being wider. But this was a RAINBOW cake, so I couldn't get rid of a layer, because then it wouldn't be a rainbow. I mean I already merged Indigo and Violet into simply "purple" - I don't think I could get away with loosing more colours!

So I made 6 layers of cake in my 9" cake tine, and covered it all in frosting, and sprinkles, and my edible icing with the Cake'n'Bake logo on it.

This one slice fed 5 people. Not joking.
In the end it was 8" tall, 9" wide, and weighed 9lbs. If you fancy making a 9lb giant birthday cake of doom, the recipe and quantities are below. If you'd like to make a smaller one (the 6" pan) use 100g of margarine, sugar and flour and 1 egg per layer.

Ingredients:

for the cake:
900g margarine (no joke)
900g caster sugar
9 medium sized eggs
150ml milk
900g self raising flour
3 tbsp vanilla extract
Food colouring in red, orange, yellow, green, blue and purple

for the icing:
500g vegetable shortening (Trex)
1kg icing sugar (still not joking!!)
2 tbsp vanilla extract

to decorate:
hundreds and thousands of hundred and thousands
an edible cake topper of your choice (optional)

  1.  Preheat the oven to gas mark 5, and grease and line two baking tins. 
  2. Unless you're using your kitchen sink as a mixing bowl, you're probably going to want to make this in batches. I made my batter in three batches, splitting each batch into two layers of cake. 
  3. Start off by beating 300g margarine with 300g caster sugar in a large mixing bowl until light and creamy. Beat in three of the eggs, one at a time, followed by 50mls of the milk and 1tbsp of the vanilla extract. By the time you've beat all that in, your mixture should be light and fluffy.
  4. Measure out 300g of the flour, then fold this into the cake batter a little at a time, until the ingredients combine to form a smooth batter. Scoop half of the batter into a separate bowl, and use the food colourings to create a red batter and an orange batter. I always start with red as it's the worst colour to mix. If you don't use enough blue or green colouring, you just end up with light blue or light green. If you don't use enough red food colouring, you don't get light red. Oh no, my friend. You get pink. So you need to use a fair amount of red food colouring to get a red sponge. Don't forget though, that the colours will be more vibrant and a little darker once baked.
  5. Pour the batters into the prepared cake tins, and bake for 25-30 minutes until firm but spongy to touch. Allow the cakes to cool in their tins for 5 minutes before turning out onto a wire rack to cool completely.
  6. Repeat steps 4 and 5 to create your yellow, green, blue and purple layers. (Optional extra: make yourself a cup of tea and try to figure out how you're going to get this massive hunk of cakey goodness from your kitchen to the venue!!)
  7. Once all the layers are baked and cooled, mix up your frosting by beating the shortening and icing sugar together. I used an electric mixer for this to save time.
  8. Place your purple layer onto your serving plate, and spread a thin layer (roughly 1 tbsp) of the frosting over the top of this. Place your blue layer on top of this and repeat. Repeat also with the green, yellow, orange and red layers.
  9. Once all of your layers are stacked, crumb coat the cake. A crumb coat is a thin layer of icing that goes onto your cake and is left to set before you put your actual icing on. It's like cake underpants. Crumb coating is a very good idea when making rainbow cake, as one of the purposes of a crumb coat is to stick the crumbs to the cake so they don't get into your outer layer of frosting. Rainbow cake crumbs stand out against white icing, so crumb coating is good. Plus it's fun to say: crumb coat. Anyways... once you've covered your cake in a thin layer of frosting, pop it into the fridge for an hour or so to allow the crumb coat to set completely.
  10. Once the crumb coat has set, ice your cake with the remaining white icing. Top your cake with the edible topper, and use sprinkles to hide the seam between the cake topper and your frosting. I also poked sprinkles into the side of my cake to look like polka dots. I'm not really sure why I did that, it was just a whim. I thought it looked pretty at any rate.
  11. Invite that guy from Man VS Food over, promising him a t-shirt and eternal glory if he can eat the whole thing in 45 minutes. Alternatively, share the cake with lots of friends and family, and lots of tea! 


Happy Thoughts
x

Friday, 16 November 2012

Chocolate Fudge Cake

Who doesn't love chocolate cake? I do, but for I while I had a hard time finding a chocolate cake recipe that I really, really liked. I've tried recipes that have had good chocolate cake before, but the icing isn't quite there. And I've tried some pretty amazing chocolate icing recipes, but the cake left something to be desired. This time, though, this time I think I've done it!


The recipe for the sponge cake is based on the sponge used in this recipe for Creme Egg Cupcakes on Peabody's blog, which I tried for Chicken Little. The chocolate fudge icing I sort of made up as I went along, drawing on my icing, ganache and fudge-making experiences. I also had a bit of Nigella's salted caramel sauce left-over in the fridge, so decided to chuck that in as well. It was a good day.

Ingredients:
For the cake:
130g Cocoa powder
200g plain flour
pinch of salt
1 tsp bicarbonate of soda
1 tsp baking powder
120 ml water
120ml milk
150g butter
300g light brown sugar
2 medium eggs

For the fudge icing:
200ml double cream
400g dark chocolate
50g butter (cubed)
100g icing sugar

3-4tbsps Nigella's Salted Caramel Sauce (Optional)

Prep time: 25 minutes
Cook time: 30 minutes
Makes 10-12 slices

  1.  Preheat the oven to gas mark 5 and grease and line two 8" cake tins.
  2. Sift the cocoa powder, flour, salt, bicarbonate of soda and baking powder together into a bowl and put to one side. In a second bowl or jug, mix together the water and milk.
  3. Beat together the butter and sugar until fluffy, then add the eggs and beat until combined.
  4. Stir half of the dry ingredients mixture into the butter and sugar, then add the milk and water, followed by the remaining dry ingredients, beating until combined between each addition.
  5. Pour the mixture into the prepared cake tins and smooth down the top with the back of a spoon. Bake for 25-30 minutes until springy to touch. Turn out onto a wire rack and leave to cool.
  6. Meanwhile, make the fudge icing by heating the cream, chocolate and butter in a bowl over a pan of boiling water. Stir until the chocolate and butter have melted, then remove from the heat. Allow the mixture to cool slightly before adding the icing sugar, then whisk for around 5 minutes using a hand held electric whisk. By the time you're done, the mixture should be thick, glossy, smooth and delicious.
  7. If you're skipping the salted caramel sauce, then skip this step. If using the salted caramel,  place the bottom layer of sponge onto a serving plate and pipe a ring of fudge icing around the outside to create a barrier which will stop the caramel from oozing out too much. (it will probably still ooze out a little, that caramel is deliciously oozy!) Spoon the caramel onto the cake, trying to keep it inside the barrier you created.
  8. Spread just under half of the fudge icing over the bottom layer (on top of the caramel, if using) then place in the fridge for 5 minutes to set slightly. This will help create a nice thick layer of fudge between you cakes! After 5 minutes, removed the cake from the fridge and gently place the second chocolate sponge on top. Spread the remaining icing over the top of the cake, and try to resist all temptation to gobble the whole lot!


Now, this cake is amazingly delicious and chocolatey as is, but, if you feel the urge to die and go to a warm chocolate fudgey heaven, I'd suggest sticking your slice of fudge cake into the microwave for 10 seconds before eating it. Don't say I didn't warn you.

Happy Thoughts
x

Wednesday, 7 November 2012

Cake'n'Bake Wednesday: Rainbow Cake


Hello folks, and welcome to the latest feature of The Princess and the Cake: Cake'n'Bake Wednesdays! Back in October of last year, I decided to reach out to like-minded bake-a-holics in my local area, and to cut a long story short, the Cambridge Cake'n'Bake Club was born. We're a group of bakers, mostly amateur, some early-stage professionals, who get together once a month to share recipes, hints and baking tips whilst scoffing our faces full of the baked treats we've made. Simple really!

Anyway, we have a shared blog where we post our recipes (www.camcakeclub.blogspot.co.uk if you're interested) but since I decided to move the focus of this blog away from the movie challenges and make it more about my baking in general, I thought I'd start sharing my Cake'n'Bake Club recipes here also. Cake'n'Bake Club meetings take place on the first Wednesday of every month (in fact, it's our first birthday party tonight!) so I decided to turn the same day into my Cake'n'Bake Club feature on this blog - thus Cake'n'Bake Wednesdays! Some months there will only be one post, some months there will be more - it depends how many things I baked for any given month! I think that's enough jibber jabber for now, so if you want to find out more about Cambridge Cake'n'Bake Club, please click on the tab above, and if you'd like to see my recipe, please read on!

For our first ever club meeting in November 2011, we went with the "Signature Bake" as a theme - that is, bakers were asked to bake and bring something they thought represented them - either the first recipe they ever bakes, or one they'd come to be renowned for, and for me it could only ever be one thing:


Rainbow cake!

Firstly, I apologise from the poopy photos - I had no idea we'd be publishing a blog (never mind two blogs!!) so I didn't really give the cake photography the time and effort it deserves. Secondly, I wanted to point out that my cake got a bit squished in transit - please ignore the bottom half of the frosting in the first photo!

OK, before I type the recipe, time for a little cake-science. The reason the colours of the cake curl around each other is purely down to the fact it was baked in a bowl! when baking in a Pyrex bowl it's the bottom and sides that cook first, and as they cook they also rise, forcing the top colours down into the middle of the bowl - pretty cool, right? If you were to bake this recipe in a flat tin, your lines would all be even and you wouldn't get the swirls (the cake would still look and taste great though!)

Ingredients

For the cake:
300g margarine
300g caster sugar
3 medium eggs
300g self raising flour
2 tbsp lemon juice
red, yellow, and blue food colourings (I used gel food colourings as I find you get a vibrant colour without watering down your mixture!)

For the frosting:
150g shortening
300g icing sugar
3 tbsp lemon juice
black food colouring
edible glitter (I used "white hologram")

Prep time: 30 mins
Bake time: 50-60mins
Serves 8-10

  1. Preheat the oven to gas mark 4 and line a round Pyrex (or other oven-proof) bowl with foil.
  2. Beat the margarine and sugar together until creamy. Beat in one of the eggs until well combined, then fold in a third of the flour. Repeat until all of the eggs and flour have been used up and you have a thick, smooth batter. Gently fold in the lemon juice.
  3. Separate the mixture into 6 even portions, and colour each red, orange, yellow, blue, green and purple. (In cake-land, indigo and violet merge to become "purple".) As a reminder, you mix a red and yellow to make orange, blue and yellow to make green and blue and red to make purple!
  4. Carefully place the red mixture into the bottom of the bowl and level with the back of a spoon. Layer each mixture on top of the other, spreading gently to the edges after each layer.
  5. Bake for 50 - 60 mins, or until a skewer inserted in the centre of the cake comes out clean. Allow to cool in the bowl for 10 minutes before transferring to a wire rack to cool completely.
  6. Once the cake has cooled prepare the frosting. Mix the icing sugar into the shortening a little at a time until a smooth paste has formed. Mix in the lemon juice to taste, then spread evenly onto the cake. Place a little black food dye into the remaining frosting, then pipe a line across the cake. Add another drop of black colouring into the remaining frosting, and pipe a second line next to the third. Repeat for another two lines so you end up with a grey-scale rainbow. Sprinkle with the edible glitter to finish then serve!

Happy Thoughts
x

Friday, 2 November 2012

Bonfire Cake

I absolutely LOVE this time of year. Don't get me wrong - I love the summer, sunshine and heat, but there's just something special about those wintry nights. It starts off with Halloween, closely followed by Bonfire Night, and then it's pretty much Christmas! (Did I mention I will usually celebrate Christmas at least twice in December... I'll tell you about it sometime!)


I know it's not Guy Fawkes Night until Monday, but I wanted to post this spiced-orange bonfire cake today to give you chance to make it over the weekend - trust me, after spending a chilly night out watching the fireworks and bonfire displays, this makes an extra special treat to come back to!


Ingredients:

For the cake:
1 large orange
300g margarine
300g light brown sugar
3 medium eggs
250g self-raising flour
50g ground almond
1/2 tsp baking powder
1tsp mixed spice


To decorate:
200g icing sugar
Orange food colouring
2 tsp orange juice (reserved from cake)
A few tsp water (as needed)
Orange flavoured chocolate sticks (I used just over one box of Matchsticks)

Prep time: 20 minutes
Cook time: 45-50 minutes
Makes 8-10 slices

  1. Preheat the oven to gas mark 4 and grease a round oven proof pyrex bowl.
  2. Zest the orange and squeeze the juice. Put around 2 tsp of the juice to one side for the icing - the rest will be added to the cake.
  3. Beat together the margarine and sugar until light and fluffy, then beat in the eggs one at a time. Sift the flour, ground almonds, baking powder and mixed spice into the bowl and fold into the mixture. Add the zest and juice of the orange to the mixture and beat well.
  4. Tip the batter into the prepared bowl, then bake for 45-50 minutes, or until a skewer inserted into the centre of the cake comes out clean. Remove the cake from the oven and leave to cool in the bowl.
  5. Once the cake has completely cooled, turn in out onto a serving plate and carve the edges to achieve a more cone-like shape (see the photo above - you want it to look like a bonfire!). With the carved off bits, you could either eat these now, just to make sure they're OK, or you could freeze them and use the for cake pops later on!
  6. To prepare the icing, tip the icing sugar into a bowl with the orange food colouring and reserved orange juice, and mix well. You want the icing to be thick but spreadable and ever so slightly runny to make sure you can coat your cake evenly. If you need to, add one teaspoon of water at a time to the icing and stir in until you have the right consistency.
  7. Spoon the icing onto the top of you bonfire cake, then use a palette knife to spread this around the edges. Place the chocolate sticks around the cake, overlapping ever so often, to look like the branches of your bonfire. Break a few of the chocolate sticks onto the top of the cake.
  8. Note - the chocolate sticks make it a little tricky to carve this cake, so you may find it helpful to take one or two off to help you with slicing.
Happy Thoughts
x

Sunday, 22 January 2012

And We All Lived Happily...

Disney Classic # 50 - Tangled


This post has been a long time coming, I know. The final Disney Night was actually held at the end of July 2011, but unfortunately shortly after that a very close family member became seriously ill and subsequently passed away at the end of August, so I never got round to finishing this post, or publishing it. However, I'm not one to leave things unfinished, so here's the post - better late than never!


With Tangled being the 50th and final Disney Classic (to date) I wanted to make something a bit special. Not only would it be our last Disney Movie Night, but it would mark the end of 16 months of hard work. 50(ish) cakes for 50 films is a huge achievement, so I wanted to make this one the best. This would be what Cinderella's Castle Cake should have been - a yumtastic WOW didyoureallymakethat?? type cake. So I decided on Rapunzel's Tower. ^_^ (and we had a fancy-dress BBQ and let off sky lanterns and everything!! Pics below!)


Now, this cake took me the best part of two days and was a lot of work, which makes for an awfully long and possibly confusing post so you'll have to accept my apologies!

The cake took 2 days in total (but I was doing other things too so it's probably could be cut down to 1 day) and created 48 slices.

Ingredients:

For the cake:

250g cocoa powder
400g plain flour
pinch of salt
1 heaped tsp bicarbonate of soda
1 heaped tsp baking powder
200ml milk
200ml water
300g butter
500g granulated sugar
4 eggs


For the frosting:

1kg vegetable shortening (Trex)
2kg icing sugar
2-3tbsp milk (as required)
vanilla essence (to taste)
brown, yellow, purple and green food colouring


You will also need a large round cookie cutter, an extra large round cookie cutter (around an inch bigger than the other), a large cake board, 3 smaller cake boards, a 16 inch dowel, plus a number of smaller dowels (the size of these does not matter too much as they will be trimmed to size.)
  1. Pre-heat the oven to gas mark 4 and grease 3 square baking tins.
  2. Sift the cocoa powder, flour, salt, bicarbonate of soda and baking powder into a bowl and put this to one side. In a separate bowl or jug, mix together the milk and water. In a third (very large) bowl, beat the butter and sugar together until creamy, the add the eggs one at a time until the mixture is light and fluffy.
  3. Fold a third of the dry mixture into the batter, followed by half of the wet mixture. Repeat until all of the ingredients are combined (always ending with dry ingredients so as not to over-beat!) 
  4. Share the batter evenly between the three baking tins and bake for 25-30 minutes, or until a skewer inserted into the centre of each layer comes out clean. Allow the cakes to cool in the pan for 5 minutes before turning out onto a wire rack to cool completely.
  5. While the cakes are cooling, trim your cake boards down to size. The large one will be used for the base, so leave that how it is. However, this cake will be made of 4 parts, and three of these will need custom-cut boards under the, so get trimming those boards! You'll need one board to be the size of your smaller cookie cutter, one to be the size of your larger cookie cutter, and the third to be about an inch wider than the larger cookie cutter. Create a hole in the centre of all three boards for the dowel to go through.
  6. Prepare the icing. In a very large bowl (I had to do this in two batches!) mix the shortening, icing sugar, a splash of milk and vanilla extract together until smooth and creamy. Add more milk to soften the mixture if needed, but try not to make it too runny. Colour around 1/4 or the mixture green, 1/8 lilac, 1/8 dark brown and the rest a pale cream/beige colour.
  7. Once the cakes have cooled, cut out your shapes. You'll need 5 of the smaller sized circles and 3 large circles. Do not discard the leftover cake yet, as you'll be using this for the roof!
  8. Note: here's where it might get a bit confusing! start to assemble the cake by creating four "sections" as follows:
    1. Section one - the base of the tower. Place one of the larger circles onto a plate and spread a thin layer of icing on the top. Place 2 of the small circles on top of this (sandwiched with icing), then carve into the larger circle at an angle to give a "trapeze" type shape. (See pics for reference!)
    2. Section two - the tower. Place one of the smaller circles of cake onto the smallest cake board you trimmed down. Spread a thin layer of icing on top of this, then place another small circle on top of this one. Again place a thin layer of icing on top, followed by the final small circle.
    3. Section three - the house. Sandwich the two remaining large circles of cake together with a little frosting, then place onto the middle-sized board you cut earlier.
    4. Section 4 - the roof. After cutting your circles out of the square cake, you should find you have a number of almost triangular shaped pieces remaining. Use these to create the roof on the largest of the boards you cut. (You may have to stick some pieces together with icing to achieve the correct shape.)
  9. Once you have your four sections assemble, give each one a "crumb coat". That is, spread a thin layer of icing over each one to help stick the crumbs to the cake, and to give a smooth surface for your icing. Once you've crumb coated each section, pop it in the fridge for at least an hour to set. Note: sections 1, 2 and 3 will be iced in the cream/beige colour, and section 4 (the roof) will be iced lilac, so it's probably best to use these colours for your crumb coat!
  10. Whilst your crumb coat is setting, you can prepare your serving board by covering it in a layer of green frosting. Press the flat side of a spatula onto the frosting and lift up to create texture.
  11. Once the crumb coats have set, removed the sections from the fridge as you need them for icing and assembly. Start with the base of the tower (section 1) Spread a smooth layer of cream/beige icing on this, then place it onto the prepared cake board. Place your large 16 inch dowel into the middle of this, then add four smaller dowels (around 5mm taller than the cake) around this, as if you were pin pointing N, S, E and W.
  12. Remove the tower (section 2) from the fridge, and again spread a smooth layer of the cream/beige coloured icing around this. Using the hole you create in the middle of the cake board as a guide, ease this onto the large dowel in the centre of the cake. The cake board at the bottom of this section should rest comfortably on the shorter dowels placed in the base. You'll probably have to touch up the icing at this stage (I know mine had a big hand-print in it!) so just run a little more icing over the two section to hide the seam. (I failed at this - you can clearly see on my cake where the joint was!) Again add four dowels that are slightly taller than the cake, although this time try to pin-point NE, NW, SE and SW.
  13. Next work on section 3, the house. Ice this all over with the cream/beige icing, then pipe on some of the wood detail. Like with the last section, use the hole you made in the centre of the cake board to place this cake on top of the other, and over the centre dowel. The board at the bottom will rest against the smaller dowels to prevent the cake collapsing under it's own weight, and the large dowel in the centre will prevent the four sections from slipping off one another. Again you'll need to put 4 small dowels into this section of the cake, this time going back to pin-pointing N, S, E and W.
  14. Finally take out the roof and give this a layer of lilac icing. Like the previous sections, place this cake on top of the other, using the hole in the centre of the board to slot onto the large dowel. You'll probably find that your dowel stick out of the top of the cake a little - this is intentional, just cover it with icing and use this as the point at the top of the tower. (I had to do this as there was no way I could have got my cake that thin without it breaking!) 
  15. Now your cake is fully assembled, go back and pipe the remaining details. I fund that I needed to g over all of my "woodwork" details to make them stand out, and I also piped on the "beams" under the "house" part of the tower. Pipe on green frosting to give the impression of climbing ivy. Et voila - Rapunzel's tower!

So, if I was going to do this again I would probably decorate it with fondant icing, as I'm not very neat with butter cream/frosting. This was actually a sort of trial run for the wedding cake which I was asked to make for a friend, as they wanted one of their towers to be chocolate, and for butter cream frosting. I'd also spend more time on finishing touches, like adding flowers and maybe a little fondant Pascal, but after two days of baking at the same time as making my own version of Belle's ball gown and preparing a BBQ, I was quite happy to leave it as it was. Would I make it again? Definitely. And I'll post the pics here if I do!

Well... If I'm right that makes all 50 films in the Disney Classic collection to date baked! It has been one hell of a journey, and with so many hiccoughs along the way it took almost twice as long as we originally expected it to. But I had a blast, and I think the others did too!


    L-R: Maleficent, Minnie Mouse, Roger Radcliffe, Tom Selleck, Hades and Belle


    Happy Thoughts
    x

    Wednesday, 29 June 2011

    I Have a Big Head and Little Arms

    Disney Classic # 47 - Meet the Robinsons


    Note: I apologise for the quality of the photographs on this and the next post. My camera died and was sent in for repair so I was using my phone/Angel's phone camera. Sorry!
    Meet the Robinsons was another of the Disney films released in the 2000s which I hadn't seen before, so it's not surprising it ended up being the last movie I came up with an idea for. And to be honest, I didn't really come up with the idea. How it happened:

    Scene: My living room, Fantasia 2000 Disney Night, sitting drinking tea before the film starts.
    Me: OK guys, before I start the film I really need your help. I've now got ideas for all but one of the films, but I cannot for the life of me think of a cake to make for Meet The Robinsons
    Craig: I've not seen it...
    Me: Neither have I!
    Mike: What about a T-Rex cake?
    Me: Is there a T-Rex in the film?
    Mike and Angel: Yup
    Me: OK, fantastic, T-Rex cake it is!


    So, with a lot of help from Angel, I set out to build a t-rex out of Rice Krispies, marshmallows and chocolate! We started off by building a skeleton out of cake dowels, which we were very pleased with!


    Unfortunately, the day that we were making this cake was the hottest day since records began* so our marshmallow krispie Dino body wouldn't stick to the skeleton or set!

    * Not based on any actual records, but on the fact that it was so hot that we almost forgot we were in the UK and wonder when and how we'd reached Africa. Seriously... it was THAT hot.

    So we moved on to plan number two - truffle-rex! The truffle initially worked MUCH better than the krispies, until we added the torso, which was much too heavy for the frame and our poor Dino went extinct once more.


    So we decided to have one last attempt - again we turned to the Rice Krispies, but this time we ditched the skeleton and decided to mould/model each body part, wrap it in cling film and leave it in the fridge to set. Once all of our Dino-parts were completely set we would just construct them using cake wire and cocktail sticks and hey presto... we'd have our T-Rex!


    And this one almost, almost worked. Our only problem was that once the firm Dino-parts left the fridge for 30 seconds, they completely melted and were firm no more...


    Angel didn't know whether to laugh or cry


    So when watching Meet the Robinsons we ate chocolate Rice Krispies chunks and truffles and sighed at our lack of dinosaur. I let out another sigh when I realised that had I watched the film before I could and would have made a PBJ based dessert... considering that's Lewis' thing.

    Anyways, when it came to writing the blog (the day after our Dino-disaster) I decided that I didn't work so damn hard to find a dessert for every Disney Classic so far to then churn out a dessert-less post for number 47... so I decided to make some PBJ sandwiches - cake style! (Which would be served when we met to watch Bolt... a bit of a peanut-butter overload but tasty nonetheless!)

    I decided to make Angel food cake for the sponge, as the colour and consistency looks more like bread than normal vanilla sponge, and used a recipe found here. The "jelly" part of my sandwich was a simple layer of mixed fruit jam, and I made peanut-butter frosting by using my standard butter-cream recipe, but substituting the butter for 1/2 peanut-butter and 1/2 shortening. (My rational for this was that peanut-butter is runnier than normal butter, but shortening is stiffer, so combining the two in theory should leave me with a similar consistency the butter-cream... it made sense in my head and worked in practise so all good!)

    Prep time: 20 minutes
    Cook time: 30 minutes
    Serves: 10
    Ingredients:

    60g plain flour
    190g caster sugar
    6 medium egg whites
    half teaspoon of cream of tartar
    half teaspoon of vanilla extract
    half teaspoon of lemon juice
    2 tbsp mixed fruit jam
    50g shortening
    100g crunchy peanut butter
    250g icing sugar
    Milk, as required

    1. Preheat the oven to gas mark 5 and line a square baking pan with greaseproof paper (but do not grease!)
    2. Sift the flour into a bowl and stir in half of the sugar, set to one side.
    3. Using an electric mixer, beat the egg whites and cream of tartar until thick and fluffy. Add the remaining sugar to the egg white a little at a time, beating continuously until the mixture is glossy.
    4. Fold in the lemon juice, vanilla and flour mixture, then pour the mixture into the cake tin. Bake for 30 to 35 minutes until springy. Place on a wire rack to cool.
    5. Whilst cooling, prepare the peanut butter frosting. In a large bowl, beat together the shortening and peanut butter. Add the icing sugar and beat until combined, adding as much milk as required to reach the desired consistency.
    6. Once cooled, cut the cake in half down the middle. Spread the jam over one of the halves and place the other sponge half on top. Spread a generous amount of peanut butter frosting over the top of the cake, cut into fingers slices and serve!


    Next time we're watching Bolt, and I'll be making some doggy biscuits!

    Happy Thoughts
    x

    Wednesday, 1 June 2011

    Well Gee, eh, You're One Big Beaver

    Disney Classic # 43 - Brother Bear


    So originally I was thinking I could sorta maybe try an Inuit recipe, and that yes, it may be a little unusual, but it has been fun trying out recipes I usually wouldn't throughout the Disney movie nights, so I went ahead a did a google search for "Inuit dessert". It turns out that there aren't many Inuit desserts, but one that did crop up every so often was Akutaq, or Eskimo ice-cream. "Perfect!" I thought, as I opened the recipe.

    I'm sorry to say that I absolutely draw the line at serving and/or eating whipped reindeer fat and seal oil. Besides, I struggle to find simple things like shortening, pumpkins and hominy here in Cambridge - where on earth does one even buy reindeer fat (from the back) and seal oil?? So Akutaq was a complete no-go.

    I tried to have a think about other aspects of the movie, and thought for a while about doing some sort of salmon cake (relating to the bears' time at the Salmon Run), but then I thought about my favourite scene from the film, when Kenai and Koda are looking at a cave painting of a human hunter and a bear, and Koda says "Those monsters are real scary" and Kenai looks at the painting of the bear but then Koda continues "Especially with those sticks" and the Kenai looks at the picture again and starts to see that from the bear's perspective the humans are the monsters, and not the bears as he had originally thought. Basically this scene:


    So I decided to decorate a cake using that scene as my inspiration. I've made a lot of vanilla cakes and very few chocolate cakes throughout this series, so I figured I'd make a nice white chocolate cake underneath all of my pretty decoration, with the same yummy chocolate frosting I'd made last week for Treasure Planet (original recipe found here.)


    Prep time: 20 mins (including frosting)
    Cook time: 40 mins
    Makes 12 slices
    Ingredients:

    For the cake:
    300g margarine
    300g caster sugar
    3 medium eggs
    300g self raising flour
    200g white chocolate

    For the frosting:

    120 ml milk
    2 tbsp plain flour
    pinch of salt
    120g dark chocolate
    100g butter
    150g icing sugar
    1 tbsp cocoa powder
    1 tsp vanilla extract

    For decoration:
    300g ready to roll white icing
    Brown food colouring
    1tsp icing sugar
    Drop of vanilla extract

    1. Preheat the oven to gas mark 5, and grease a round baking tin.
    2. Melt the white chocolate in the microwave or in a bowl over a pan of simmering water, then put to one side to cool slightly.
    3. Beat the margarine and caster sugar together until smooth and creamy. Add the eggs, one at a time, beat until the mixture is light and fluffy. Add the melted, cooled white chocolate to the mixture and fold in gently, before tipping in the flour. Continue to fold until all the ingredients combine to a smooth mixture.
    4. Pour the mixture into the prepared baking tine and bake for 40 minutes, until the cake is springy to touch, or a skewer inserted into the centre comes out clean. Remove from the oven and allow to rest in the tin for 5-10 minutes before turning out onto a wire rack to cool completely.
    5. Whilst the cake is cooling, prepare the decorations. To make the frosting, whisk the milk, flour and salt in a small saucepan over a medium heat until the mixture thickens. Place this into a small bowl to cool. Melt the chocolate and place to one side to cool. Grate the butter into a large bowl, then add the icing sugar and cocoa powder. Beat with an electric mixer on a low speed for 1-2 minutes, than add the milk mixture, followed by the cooled, melted chocolate. Continue to whisk for 5 minutes until smooth and creamy. (Tip: placing the frosting in the fridge to set for 20-30 minutes before use will make it firmer and easier to manage.)
    6. To prepare the covering, knead the ready to roll icing until pliable. Create a well in the centre of the icing and place a drop of brown food colouring. Knead the colour into the icing, stopping when the icing is mostly coloured but still shows signs of marbling. Wrap tightly in clingfilm until ready to use.
    7. Once the cake has fully cooled, cut into three layers. Sandwich the cake layers with the chocolate frosting, and spread a thin layer of frosting over the top and sides of the cake to help stick the ready to roll icing down.
    8. Roll the rtr icing to the desired thickness and place over the cake smoothing gently with your hands, then trim the edges.
    9. Dip a cocktail stick into the brown food colouring and carefully draw your designs around the edge of the cake by making small dots and dashes with the cocktail stick. Mix a drop of brown food colouring with 1tsp of icing sugar and a drop of vanilla extract to create an edible paint. Paint the design on the top of the cake, then smudge the edges slightly with your brush. Leave the colouring to dry for 10-15 minutes before cutting into slices and serving. (this one is especially good with a cuppa!)


    Next time we're watching Home on the Range and I'll be making a giant Wagon Wheel.

    Happy Thoughts
    x

    Wednesday, 23 February 2011

    Slimy, Yet Satisfying

    Disney Classic # 32 - The Lion King


    I've got to be honest... this one wasn't my idea (or creation). Way back in July 2010 when I was first admitted to hospital, Zoe and Mike came to visit me one day, with flowers and a plan. The Disney Night idea was still only a couple of months old, and I hadn't yet thought of ideas for many of the later films, and had been asking my friends to share any ideas they had. Well, on this day in hospital in July, Mike came to me and said he'd been think about his favourite Disney film, The Lion King, and trying to remember scenes in which they eat something. The most memorable scene for Mike was during the Hakuna Matata song, where Timon and Pumba start looking around for grubs to feed Simba.


    Mike's idea to transform this into cake was to make a chocolate log, and make a few creepy crawlies to go on/in/under it, which I thought sounded fantastic. So that's what we went with. Mike took the lead on this one, making the chocolate log and adding a few of the crawlies, and I contributed by making a couple of crawlies myself.

    My jelly worms were based on an idea I found on this Halloween website back in October, and I got the recipe for marshmallow here. And now I'm going to hand over to Mike...

    Chocolate Log

    Chocolate Log: I originally came across Delia's recipe for Buche de Noel, which attracted me by its flourless creation and the promise of nutty depth of flavour. Creme de Marrons was unavailable, however, so I resigned myself to making her less special chocolate log, until I realised that a) I didn't have enough chocolate for the recipe and b) there was a jar of nutella right by my hand. So this is a Delia recipe adapated heavily by me to make use of what limited ingredients I had.

    Prep Time: 20 mins [60 mins if you lack a whisk]
    Cooking Time: 20 mins
    Serves: 6, as part of a whole
    Ingredients -

    For the cake:
    6 large eggs, separated
    150g caster sugar
    75g cocoa powder

    For the filling:
    100g dark chocolate
    2 eggs, separated
    200g nutella
    50g unsalted butter

    First melt the chocolate in a bain marie to avoid over heating. Then add the 2 beaten egg yolks and combine until glossy.

    Add nutella at some stage, along with the melted butter. Beat the egg white until stiff and fold into your slightly *cooled* chocolate mixture. Chill.

    In the mean time, whisk the eggs yolks in a bowl and then add the caster sugar, whisking until the mixture begins to thicken slightly. Sift in the cocoa powder, and gently but thoroughly fold in the egg whites, having whisked them to soft peaks. Place in a baking tray lined with baking parchment and bake at 180 for 20 minutes. The cake will rise quite a lot, but will fall back, as designed.

    After it has cooled, turn it out onto a new square of baking parchment and remove the original baking parchment [note - using foil cause serious issues at this point, I do not recommend]. Spread cooled filling evenly over the surface, then use the parchment to roll the cake into a log shape. Finished! Garnish with various grubs, and use chocolate clusters to suggest leaves, detritus etc around the base.
    Marshmallow Grubs


    Prep time: 45 mins       Cook time: at least 2 hours to set              Serves: 8
    Ingredients:
    1 tbsp icing sugar
    1 tbsp cornflour
    125ml boiling water
    pink and yellow food colouring

    1tsp vanilla extract
    25g gelatine powder
    250ml cold water
    500g granulated sugar
    2 egg whites
    1. Mix the icing sugar and cornflour together in a small bowl and put to one side.
    2. Add the food colouring to the boiling water as required, and mix in the vanilla extract. Sprinkle the gelatine powder on top and stir until all of the gelatine has dissolved.
    3. Put the sugar and 250ml water in a medium sized saucepan over a low heat, stirring until all of the sugar has dissolved. Bring to the boil without stirring until the temperature reaches 122°C. Remove from the heat and stir in the gelatine mixture.

    4. Pour the egg whites into a large bowl and beat until stiff. Using an electric mixer on a low speed, carefully pour the sugar syrup into the egg whites. Continue to beat for around 5 minutes, until the mixture becomes thick and pillowy.
    5. Dust a sheet of greaseproof paper with the icing sugar/cornflour mixture. Pour roughly 1/4 of the marshmallow mixture along one edge of the greaseproof paper and quickly roll the paper over itself to create a sausage like shape. Tie off both ends with string, and tie string at various intervals along the middle, to create the segments. Repeat with the remaining mixture.
    6. Leave to set in a cool place for at least 2 hours (do not refrigerate)
    7. Once set, cut the strings and discard them. Rub a little of the icing sugar and cornflour mixture onto your hands, and carefully unroll the greaseproof paper and remove the marshmallow. The marshmallow will be quite sticky in places, so it is a good idea to sprinkle a little of the icing sugar/cornflour mixture over it.
    8. To serve, tear chunks off the grubs and enjoy ^_^
    Jelly Worms

    Prep time: 5 minutes      Cook time: none, but needs to set in the fridge overnight       Serves: 15

    Ingredients:
    One pack of strawberry jelly
    6oz boiling water
    2oz milk
    green food colouring

    1. First thing you will need to do is cut the straws down to match the size of your glass. I used jumbo straws for this, so that my worms were fatter, but any plastic straws work just as well. Cut the straws to be slightly longer than the glass you are using, then stand the straws in the glass. Tip - make sure the straws are really compact as this will help to stop the jelly falling out the bottom of them!
    2. Break the jelly into cubes in a jug. Add 6oz of boiling water and stir well until all of the jelly cubes have dissolved. Add the milk and stir well.
    3. Stir in a drop of green food colouring, to achieve an earth-wormy type of colour.
    4. Carefully pour the jelly mixture into the straws, and place in the fridge to set for at least 3 hours, but preferably overnight.
    5. To remove the jelly worms from the straws, hold each straw under the hot tap for a few seconds to loosen the jelly, then squeeze the end of the straw gently to push the jelly out.
    6. Place on a plate and serve!

    Next time we're watching Pocahontas, and I'll be making a Pumpkin Pie.

    Happy Thoughts
    x

    Wednesday, 12 January 2011

    Les Poissons, Les Poissons, hee-hee-hee, ho-ho-ho!

    Disney Classic # 28 - The Little Mermaid


    The Little Mermaid was the first Disney movie I ever saw... it got me hooked! Unfortunately though, I struggled for ideas for a little while. My friend Becky asked me if I would be willing to make a wedding cake for her... so for a short while I decided that what I would do was make a plain sponge cake, ice it in fondant, and then decorate it with fondant sea-creatures, as a sort of practice wedding style cake. (Of course, when it came to the wedding cake, the sea-creatures would be replaced with fondant flowers, or butterflies, or something more weddingy.) Anyways, a couple of weeks before The Little Mermaid, Big Mike asked me what cake I was doing, and I told him. "Oh," he said, "I thought you'd do another jellyfish cake." AH!! How could I be so stupid!!

    A little history on the jellyfish cake... my friend Helen LOVES jellyfish. Or rather, anything that lives under the sea. So for her birthday back in February last year I decided to make her a cake in the shape of a jellyfish. I made a stand with iridescent tentacles, covered the cake in iridescent glitter, and the inside... well the inside had to be rainbow cake.

    A little more history for you - rainbow cake (cake with a multicoloured sponge) is like my speciality cake. Before starting the Disney nights, I made it all the time and my friends were always like "oh wow that's amazing!! I love it so much!" And I love it so much.. in fact, I'm thinking of having a rainbow wedding cake myself. How could you not love something that looks like this:


    But anyways, I'm off topic. Jellyfish cake was such an obvious choice for The Little Mermaid, I was hitting myself for not thinking of it straight away. Big Mike came to the rescue, and jellyfish cake happened yet again.


    I didn't think crab cakes would go down so well...

    Not really any references for this one; it uses my usual vanilla sponge recipe, and the design came to me in a random stroke of inspiration when walking to Sarah's house one day.

    Prep time: 30-40 mins           Cook time: 45mins        Serves: 10

    Ingredients:
    300g margarine
    300g caster sugar
    300g self raising flour
    3 eggs
    2 tsps vanilla extract
    various food colourings
    150g unsalted butter
    350g icing sugar (plus extra for dusting)
    splash of milk
    300g ready to roll white fondant icing
    edible glitter (I used white hologram)

    You will also need:
    A cake board
    A tall stand (I used a oil burner stand, but a pint glass would probably work just as well. Anything you can stand the cake on stably)
    iridescent gift wrap (I bought mine from Clinton's)
    Scissors
    Sellotape

    1. Before starting, make sure that your cake board is the same size that the cake will be. If it's too big, trim it down to size.
    2. Preheat the oven to gas mark 4, and line a Pyrex (or ovenproof) bowl with foil.
    3. In a large bowl, beat together the margarine and sugar until creamy. Sift in roughly 1/3rd of the flour and mix. Add one egg and beat into the mixture. Repeat this process until all of the egg and flour have been incorporated. Add 2tsps vanilla essence.
    4. Divide the cake mixture evenly between 7 bowls. Use the food dye to colour the bowls of cake mixture into different colours: red, orange, yellow, green, blue, purple and pink.
    5. Carefully pour the red mixture into the Pyrex bowl, and level the top with the back of a spoon. Next carefully add the orange mixture on top of the red, again smoothing gently with the back of the spoon. Repeat until all the cake mixture has been used.
    6. Bake in the oven for around 45-50 minutes, or until a skewer inserted into the centre of the cake comes out clean. Once cooked, remove from oven and leave to cool in the bowl for one hour before transferring to a wire rack to cool completely.
    7. Whilst the cake is cooking, it's time to get crafty and create the tentacles! Cut the iridescent cellophane wrap into strip, and stick these around the edge of the underside of the cake board. When you lay the cake board on the stand, these should be long enough to completely conceal the stand.
    8. Once the cake has cooled, prepare the butter icing. In a large bowl, beat the butter until soft. Add the icing sugar, the vanilla extract and a splash of milk and mix until smooth. Add a little purple food colouring and mix well.
    9. Place the cooled cake onto the prepared cake board, and cover with the purple butter cream.
    10. Dust the work surface with a little icing sugar, and roll out the fondant icing to around 3mm thickness. Place this carefully over the cake and smooth down. Trim the edges a little longer than they need to be, then pinch, crumple and push up the edges to make the bottom of the cake look wobbly/jelllyfishlike. (That is a terrible description - but if you look at the pictures you'll see what I mean.)
    11. Make a little syrupy-icing mix, using 1 tsp icing sugar and 3tsps water. Use a pastry brush to brush the syrup all over the cake. Dip the pastry brush in the edible glitter and the dab this onto the cake, all over.
    12. Place the cake on the stand, and there you have your very own jellyfish! Cut into slices, ogle for a bit and then enjoy!


    Next time we're watching The Rescuers Down Under, and I'll be honouring the classy heroine Bianca by attempting a traditional Hungarian Dobos Torte (or Dobosh Torta).

    Happy Thoughts
    x

    Wednesday, 29 December 2010

    If this is Torture, Chain Me to the Wall

    Disney Classic # 27 - Oliver and Company


    I really enjoyed Oliver and Company - like many of the lesser-known Disney Classics, it's completely underrated. I'd decided quite early on that I would be basing this weeks cake on the appearance of one of the main characters in the film: a ginger cake for the ginger kitty Oliver. Simple as that really.


    I used a recipe in my trusted Good Food's 101 Cakes and Bakes. I have to admit that I had a bit of a problem with the timing of this cake... the original recipe said to bake the cake at gas mark 3 for 30-35 minutes, but I thought no way a cake of this size would bake that quickly at such a low temperature, so I decided to put my cake in at gas mark 4 for 45 minutes. It ended up taking an hour and a half to cook!! In the end the cake was still warm when served and the icing started to melt... but the movie had ended and we were still waiting for the cake to cool! Nightmare! I'd recommend trying to bake this cake at gas mark 5 for 45 minutes, and see where that gets you... just give yourself a lot of time to play with!

    Prep time: 20 mins           Cook time: 1 hour 30 mins           Serves: 8-10 slices

    Ingredients:
    200g margarine
    175g dark molasses sugar
    3tbsp honey
    150ml milk
    2 large eggs
    4 pieces stem ginger, drained from their syrup
    300g self-raising flour
    1 tbsp ground ginger
    4 tbsp ginger syrup, drained from the jar
    300g icing sugar
    150g unsalted butter
    2 tsp lemon juice

    1.  Preheat the oven to gas mark 4 and grease and line a baking tin.
    2. In a large saucepan, gently melt the butter, sugar and honey over a low heat then leave to cool for 10 minutes.
    3. Whilst the butter mixture is cooling, chop the stem ginger into very small pieces and place to one side. Beat the eggs in a small bowl.
    4. Once sufficiently cool, stir the milk into the butter/sugar mixture, followed by the beaten eggs and the chopped stem ginger.
    5. Sift the flour and ground ginger into the mixture and combine thoroughly.
    6. Spoon the mixture into the tin and level the surface with the back of the spoon. Place in the preheated oven for around 1 hour 15 minutes - 1 hour 30 minutes, but check after 1 hour. When a skewer inserted into the centre of the cake comes out clean the cake is done. Remove from the oven and leave to cool in the tin for 1 hour before transferring to a wire rack to cool completely.
    7. Once cool, skewer the top of the cake in various places and pour 2 tbsp of the ginger syrup all over.
    8. Beat together the remaining syrup, icing sugar, butter and lemon juice until thick and smooth and spread this over the top of the cake. Cut into slices and serve ^_^

    Next time it's The Little Mermaid - my first EVER Disney movie, and to celebrate I'll be trying my hand at baking and decorating a sea-themed novelty cake!
    Happy Thoughts
    x