Showing posts with label birthday. Show all posts

Wednesday, 16 April 2014

Birthday Bars

You know, I never understood the tradition of taking sweet treats into school or work on your birthday. I know it's the done thing, but why? Surely people should be bringing you cake on your birthday, rather than the other way around!?


Anyway, today is my birthday, so I decided to conform and bake something to take into work. However, my plan for the evening is to go to a restaurant with a bunch of my friends and have pudding. Not dinner, just pudding. I'm hoping we can just order a couple of everything, and a bunch of spoons, and then when it all arrives we just tuck in. That's the plan.


When it came to making something to take into work, I thought I should try and make something light and easy going, bearing in mind my plans for the evening. The result of that thinking was a tasty little tray bake, packed full of smarties, chocolate chips and sprinkles, topped with a light meringue frosting and more sprinkles (it is my birthday, after all...)

Ingredients:
75g margarine
75g low-fat Greek style yogurt (I used Alpro Soy Yogurt)
50g caster sugar
6 tbsp granulated sweetener
20ml milk
1 medium egg
2 tsps vanilla extract
150g self-raising flour
1/2 tsp baking powder
38g (1 tube) smarties
10g polka dot sprinkles
30g chocolate chips

For the frosting:
1 egg white
50g caster sugar
3tbsp water
1 tsp vanilla extract
splash of pink food colouring
30g icing sugar
More sprinkles

Prep time: 20 mins
Cook time: 20 mins
Serves: 15


  1. Pre-heat the oven to 180 and line a square baking pan with greaseproof paper
  2. Add the margarine, yogurt, sugar, sweetener, egg, milk and vanilla extract to a large mixing bowl, and whisk until smooth.
  3. Tip the flour, baking powder, smarties, sprinkles and chocolate chips on top of the cake mixture, and fold in until combined. (Adding the "extras" with the flour like this gives them a nice coating of flour which helps to stop them from sinking to the bottom... :-) )
  4. Pour the batter into the prepared cake tin and bake for 20 minutes, until the top is lightly golden and a skewer inserted into the cake comes out clean. Allow the cake to cool in the pan for a couple of minutes before turning out onto a wire rack.
  5. Move on to the frosting. Whisk the egg white to stiff peaks and put to one side. Pop the sugar and water into a heavy based pan over a low heat. Stir until the sugar has melted, then bring the syrup to the boil for a minute or so - be careful not to let this turn to caramel, though! Remove the syrup from the heat, and, whilst whisking, pour it into the egg whites. Once your sugar syrup is well incorporated, add the vanilla extract, food colouring and icing sugar to the mixture and continue to whisk until these have dissolved and you are left with a fluffy, glossy frosting.
  6. Spread the frosting over the tray-bake and top with the remaining sprinkles. Cut into 15 slices, and serve.


Happy Thoughts

x

Friday, 7 February 2014

Sticky Toffee Cake

So, he didn't want a big fuss made but today is my boyfriend's 30th birthday, and I think that deserves a fuss, so I'm dedicating today's blog post to him and his birthday cake. Ali absolutely loves sticky toffee pudding, but also loves cakes with lashings of buttercream, so for his birthday cake I decided to try and mix the two. This is what I came up with (a layer for each decade!!)


I got the recipe for the sponge cake from good old BBC Good Food, but switched in some dark muscovado sugar for a rich sticky toffee taste. The buttercream is just my standard recipe with caramel flavouring instead of vanilla!

Ingredients:
For the cake:
200g margarine
200g golden syrup
pinch of salt
300g self raising flour
200g dark muscovado sugar
30ml milk
3 medium eggs
1 tsp vanilla extract

For the buttercream:
250g butter
500g icing sugar
2tsp caramel flavouring
1-2tsp milk, if needed
One diam bar, to decorate (optional)

Prep time: 20 minutes
Cook time: 25-30 minutes
Serves: 12-16

  1. Preheat the oven to 150 degrees, and grease the cake tins.
  2. Pop the margarine, golden syrup and salt into a saucepan and melt over a low heat, stirring occasionally. Put to one side to cool.
  3. Sift the flour and the sugar into a large bowl. I know it seems weird to sift sugar, but I find that when using muscovado sugar this is the only way to ensure that you can all the lumps out!
  4. Tip the milk, eggs and vanilla into a jug and whisk until combined.
  5. Stir the cooled butter and syrup mixture into the flour, then stir in the milk and egg mixture until it all comes together to make a smooth, runny batter.
  6. Share the batter evenly between the three cake tins and bake for 25-30 minutes until springy to touch. remove from the oven and allow to cool in the tin for 5 minutes before turning out onto a wire rack to cool completely.
  7. Once the cake have cooled, make your buttercream. If you're using a stand mixer, just pop all of the ingredients into you mixer, turn it on and come back in a few minutes. If, like me, you prefer to mix up your buttercream by hand, you might find it easier to add the icing sugar to the butter around 150g at a time. Beat in the flavouring, and the milk if needed to make the icing a spreadable consistency.
  8. Place one of the cakes onto your serving plate, and leave the other two on the cooling rack. Divide the buttercream evenly between the three cakes and spread the the edges before carefully stacking the cakes. Sprinkle crushed up diam bar onto the top tier, and Robert's your father's brother!
  9. Make sure to inhale a lot of the yummy toffee whiff that this cake gives off before eating. Seriously, it smells good!!

Happy Thoughts
x

Friday, 14 June 2013

Individual Bailey's Cheesecakes (and a very special birthday...)

This post is dedicated to my Mum. The lady who taught me how to bake (and so much more than that!!) The lady who loves Bailey's, and loves cheesecake. Today is my Mum's birthday, so this recipe is especially for her.

Mum and I, circa 1988


There's actually a funny story around this post... you see, although I now live in Cambridge, I grew up in Derby, and that's where my Mum still lives. I only get to go back to Derby 3 or 4 times a year, but Mum's a real opportunist, so whenever I'm back she puts me to work. This could be sewing felt onto jumpers for some festive fun, or adding glitter accents to figurines to make decorations for her Disney Christmas tree (yes, Mum has a Disney Christmas tree, in addition to her traditional Christmas tree. Well, what did you expect!?), but usually she puts me to work in the kitchen. And her favourite thing to get me working on is cheesecake.

So, there was one such weekend I was back in Derby, and I was tasked with making a Bailey's cheesecake for Mum to take into her office on her last day of work before starting a new job. So I set to work, giving just one condition: when Mum got to work the next day and put her cheesecake onto a serving plate there, she would take a photograph for me to use on the blog. She agreed, and an epic, 10-12 slice cheesecake filled with chocolate and Bailey's swirls was created. I quickly jotted down the ingredients and quantities that I'd used, and came back to Cambridge. A few days later, I text Mum to ask how the cheesecake went down, and if she could send me the photos. She replied to say it was really yummy, but she forgot to take a photo. Head, meet desk.

I could have just made another Bailey's cheesecake and taken a photo of that, but I'm strictly tee-total these days, and even when I did drink I didn't like Bailey's, so I couldn't justify making a cheesecake that wouldn't be eaten just to take a photo. I love my blog and my readers, really, I do, but that is a bit too much for me! So the recipe got put on the shelf until the opportunity next arose (i.e. I was next at Mum's house and she wanted another Bailey's cheesecake!!)

Anyway, getting back to the point... the opportunity next arose at Christmas. I couldn't make a whole Bailey's cheesecake as it wasn't completely family friendly. But, I'd recently ventured into the realms of individual desserts with my Individual Malty Malteser Cheesecakes, so I knew just what to do.


Individual Bailey's Cheesecakes!! OK, I think I've prattled on long enough now so just one last thing to say before I get on with the recipe:


Ingredients:
30g melted butter
6 digestive biscuits
60ml double cream
60g cream cheese
30g icing sugar
1tbsp baileys
Grated chocolate, to decorate

Prep time: 15 minutes
Chill time: at least 1 hour
Makes 2 individual Cheesecakes


  1. Melt the butter in the microwave, then pop to one side to cool slightly.
  2. Put the digestive biscuits into the blender, and whizz until they resemble fine crumbs. Tip the crushed biscuits into the melted margarine and stir until evenly coated. Split the biscuit mixture evenly between the two ramekins, and press down with the back of a spoon. Pop in the fridge to set whilst you prepare the filling.
  3. Pour the cream into a small bowl and whisk until thick and pillowy. Add the cream cheese, icing sugar, and Baileys and whisk until all combined to a thick and creamy mixture. 
  4. Spread half of the mixture over each biscuit base. Sprinkle a generous amount of grated chocolate over each cheesecake, then pop back in the fridge until ready to serve!
Happy Thoughts
x

Friday, 17 May 2013

Over the Rainbow Cupcakes

I've been saving this recipe up especially for this today, as not only would it have been Frank L. Baum's 157th birthday on 15th May, but it's also The Wizard of Oz's 113th birthday today! (That is, The Wizard of Oz was first published on 17th May 1900.)


Anyways, these cupcakes came to life for a different birthday to the two listed above – that of my best friend Victoria. For Vix's 25th birthday, I got her a pair of tickets to go see The Wizard of Oz at the London Palladium, but the show wasn't until a few weeks after her birthday and I knew the tickets wouldn't arrive in time. So, in lieu of a physical gift, I made these cupcakes and posted them to her along with a little postcard which had a picture of Dorothy, Scarecrow, Tin-man and Lion and the words “we're off to see the wizard!” on the front, and the date, time and venue of the show on the back. I hope you like them!

(PS – you might recognise parts of this recipe from an earlier one I posted!)

Ingredients:

For the cupcakes:
200g butter or margarine
200g caster sugar
2 medium eggs
200g self raising flour
1tsp vanilla extract
Food colourings in red, yellow, green, blue and purple (or at least red, yellow and blue – you can mix the other colours if you need to!)

For the butter cream:
150g slightly salted butter
300g icing sugar
Vanilla extract, to taste
A little milk, if necessary

For the decorations:
30g red sugar paste
30g yellow sugar paste
20g light green sugar paste
20g dark green sugar paste
edible glitter in red, green and white hologram
edible glue

Prep time: 45 minutes
Cook time: 12 – 15 minutes
Makes 18 cupcakes

  1. Preheat the oven to gas mark 5 and line a bun tray with cupcake cases.
  2. Beat the margarine and sugar together until light and fluffy, then beat in the eggs, one at a time. Tip the flour into the bowl along with the vanilla extract, and fold into the mixture until just combined. (Be careful not to over mix here, as you'll be doing a lot of mixing when you add the colours!)
  3. Split the mixture into 5 even portions, then use your food colourings to colour the batter red, yellow, green, blue and purple. I use Sugarflair paste food colourings, as I find you can get a really vibrant colour without using too much. I'd be wary of using liquid colourings, as in order to achieve a vibrant colour you will have to use a lot of liquid, which could effect the taste and texture of your cakes.
  4. Place half a teaspoon of purple batter into the bottom of each cupcake case, and spread this evenly across the bottom of the case with the back of a spoon. Next, add half a teaspoon of the blue batter on top of the purple batter, smoothly gently with the back of the spoon. You want to cover the whole of the purple layer, but not mix it in, so try not to put too much pressure on the cake – just flatten it down as quickly and lightly as you can. Repeat the process adding half a teaspoon of green batter next, then half a teaspoon of yellow, finally adding half a teaspoon of the red batter.
  5. Bake for 12-15 minutes until firm and springy to touch. Remove from the oven and place on a wire rack to cool completely.
  6. Meanwhile, make the decorations for the top of the cupcakes. Start with the yellow brick road as that's the easiest. Roll out the yellow sugar paste to 3mm thick and then cut out a wiggly path that starts big at the bottom and gets small at the top (see the picture for reference, as what I just wrote makes very little sense!) Paint edible glue over each of your YBR's then sprinkle the white hologram edible glitter over them and leave to dry. Next, the ruby red slippers! Roll out the red sugar paste, again to around 3mm thick, then cut out shoe shapes. It's probably easiest to use a cookie cutter for this, but I didn't have one so just freestyled it with a sharp knife (hence why they are all different shapes!) once you're happy with your shoe shapes, paint a little edible glitter over each and then sprinkle with the red edible glitter and put to one side to dry. Finally, make your mini-Emerald cities! Roll the two green sugar pastes into long thin sausages, then fol over and trim into different length “buildings”. Use a little glue to stick a few “buildings” together, mixing up the sizes and colours to create the illusion of depth. Spread a little more edible glue over the top of each Emerald City, and sprinkle with the green edible glitter. Once all of your decorations are dry, shake any excess glitter back into the relevant pot, and place the decoration to one side until ready to use.
  7. I imagine that by now your cakes have completely cooled, so it's time to make the butter cream! Beat together the butter, icing sugar and vanilla extract until smooth and cream, adding a little milk to the mixture if necessary to achieve a good piping consistency. Place the icing into a piping bag fitted with a star nozzle, and then pipe the butter cream onto the cupcakes in a spiral. Place one of the decorations onto each cupcake, and dust with a little more white hologram edible glitter to finish!


Happy Thoughts
x

Tuesday, 16 April 2013

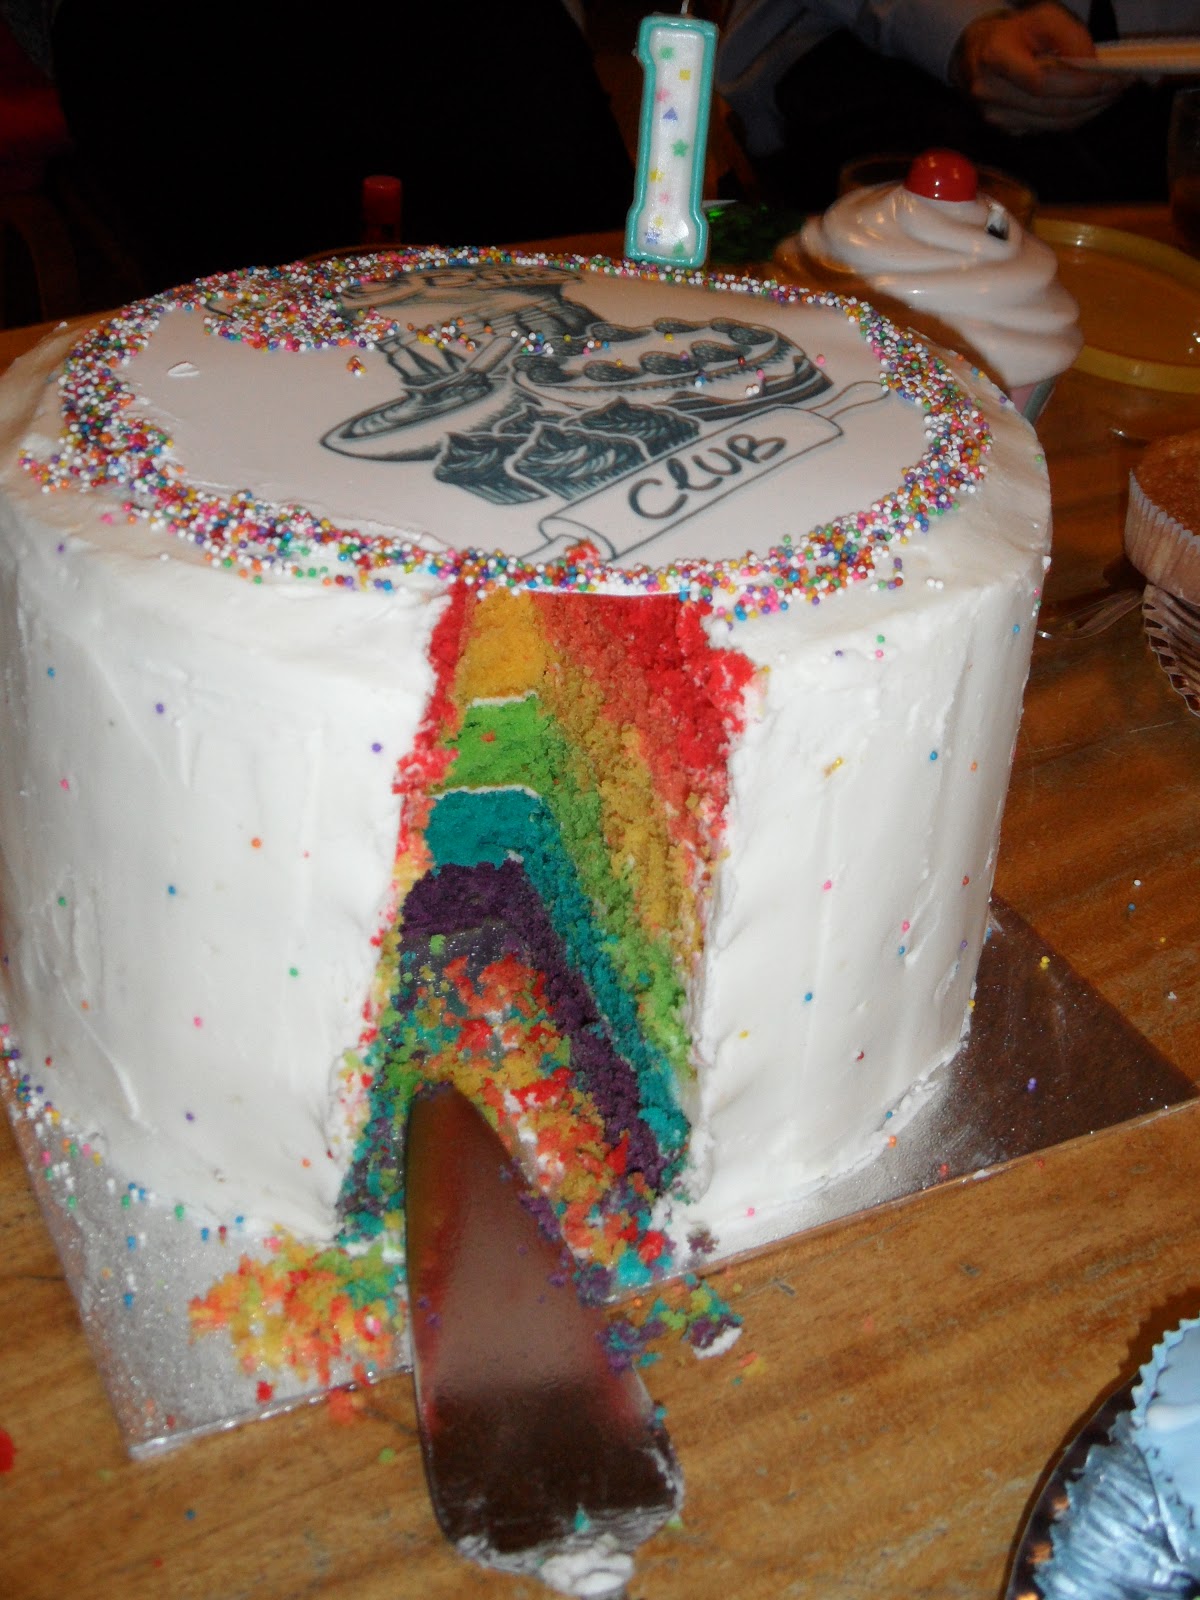
The Massive Rainbow Birthday Cake (of doom!!)

Cake'n'Bake Recipe? But it's a Tuesday! Well, yes. But I ran out of time to post this one last November, and today is actually my birthday, so I thought it would be a good idea to post it today.


I made this birthday cake for Cake'n'Bake Club's first birthday party in November 2012 - the theme being "Birthday Party". I knew I wanted to do a rainbow cake, mostly because I love making rainbow cake and hadn't done one in ages, but also because I'd made a rainbow cake for our first ever meeting a year before, and it seemed fitting. So I had my heart set on making a rainbow cake, but this time with the Cake'n'Bake Club logo on the top. That's kind of where it all went a bit wrong. You see, the topper I ordered was too wide to fit on top of a cake in the 6" cake pan I was planning to use. (Schoolboy error!) So I had the use a bigger cake tin. Normally, this wouldn't be a problem, as I'd just make the cake shorter by doing less layers to compensate for it being wider. But this was a RAINBOW cake, so I couldn't get rid of a layer, because then it wouldn't be a rainbow. I mean I already merged Indigo and Violet into simply "purple" - I don't think I could get away with loosing more colours!

So I made 6 layers of cake in my 9" cake tine, and covered it all in frosting, and sprinkles, and my edible icing with the Cake'n'Bake logo on it.

This one slice fed 5 people. Not joking.
In the end it was 8" tall, 9" wide, and weighed 9lbs. If you fancy making a 9lb giant birthday cake of doom, the recipe and quantities are below. If you'd like to make a smaller one (the 6" pan) use 100g of margarine, sugar and flour and 1 egg per layer.

Ingredients:

for the cake:
900g margarine (no joke)
900g caster sugar
9 medium sized eggs
150ml milk
900g self raising flour
3 tbsp vanilla extract
Food colouring in red, orange, yellow, green, blue and purple

for the icing:
500g vegetable shortening (Trex)
1kg icing sugar (still not joking!!)
2 tbsp vanilla extract

to decorate:
hundreds and thousands of hundred and thousands
an edible cake topper of your choice (optional)

  1.  Preheat the oven to gas mark 5, and grease and line two baking tins. 
  2. Unless you're using your kitchen sink as a mixing bowl, you're probably going to want to make this in batches. I made my batter in three batches, splitting each batch into two layers of cake. 
  3. Start off by beating 300g margarine with 300g caster sugar in a large mixing bowl until light and creamy. Beat in three of the eggs, one at a time, followed by 50mls of the milk and 1tbsp of the vanilla extract. By the time you've beat all that in, your mixture should be light and fluffy.
  4. Measure out 300g of the flour, then fold this into the cake batter a little at a time, until the ingredients combine to form a smooth batter. Scoop half of the batter into a separate bowl, and use the food colourings to create a red batter and an orange batter. I always start with red as it's the worst colour to mix. If you don't use enough blue or green colouring, you just end up with light blue or light green. If you don't use enough red food colouring, you don't get light red. Oh no, my friend. You get pink. So you need to use a fair amount of red food colouring to get a red sponge. Don't forget though, that the colours will be more vibrant and a little darker once baked.
  5. Pour the batters into the prepared cake tins, and bake for 25-30 minutes until firm but spongy to touch. Allow the cakes to cool in their tins for 5 minutes before turning out onto a wire rack to cool completely.
  6. Repeat steps 4 and 5 to create your yellow, green, blue and purple layers. (Optional extra: make yourself a cup of tea and try to figure out how you're going to get this massive hunk of cakey goodness from your kitchen to the venue!!)
  7. Once all the layers are baked and cooled, mix up your frosting by beating the shortening and icing sugar together. I used an electric mixer for this to save time.
  8. Place your purple layer onto your serving plate, and spread a thin layer (roughly 1 tbsp) of the frosting over the top of this. Place your blue layer on top of this and repeat. Repeat also with the green, yellow, orange and red layers.
  9. Once all of your layers are stacked, crumb coat the cake. A crumb coat is a thin layer of icing that goes onto your cake and is left to set before you put your actual icing on. It's like cake underpants. Crumb coating is a very good idea when making rainbow cake, as one of the purposes of a crumb coat is to stick the crumbs to the cake so they don't get into your outer layer of frosting. Rainbow cake crumbs stand out against white icing, so crumb coating is good. Plus it's fun to say: crumb coat. Anyways... once you've covered your cake in a thin layer of frosting, pop it into the fridge for an hour or so to allow the crumb coat to set completely.
  10. Once the crumb coat has set, ice your cake with the remaining white icing. Top your cake with the edible topper, and use sprinkles to hide the seam between the cake topper and your frosting. I also poked sprinkles into the side of my cake to look like polka dots. I'm not really sure why I did that, it was just a whim. I thought it looked pretty at any rate.
  11. Invite that guy from Man VS Food over, promising him a t-shirt and eternal glory if he can eat the whole thing in 45 minutes. Alternatively, share the cake with lots of friends and family, and lots of tea! 


Happy Thoughts
x