Showing posts with label Cake'n'Bake Wednesday. Show all posts

Wednesday, 11 December 2013

Cake'n'Bake Wedensday: Bailey's Blondies

These Blondies are also known as "Monica Geller's" because they came to be due to my uncontrollable need to please people.


What happened was this: on the day of our December meeting we had a few last minute cancellations, which under normal circumstances wouldn't pose a problem, but because of the Secret Santa theme we had in December 2012 it meant that some bakers would not receive their "gift" (i.e. have their word baked) and that simply wouldn't do.

I generally finish work at 5pm, and on club nights aim to get to the Friends Meeting House by 7pm to start setting up. Usually I take my bake club things to work with me in the morning, stay at work until 6:30pm and go straight from there, as work is about halfway between my house and the meeting house. This time, however, to ensure that everyone got their words baked, I left work bang on 5pm, ran to the supermarket to buy some ingredients, ran home, and started baking like a mad-woman! Anyway, I ended up getting a taxi up to the meeting house, and the brownies were still lovely and warm by the time I got there. Thankfully, Ruth had arrived before I did and started setting up shop :-) We then sat and ate some of the gooier brownies with spoons. It was a good day.

Anyway, the words that needed to be baked were Bailey's, Stars and Red. so below is my recipe for Bailey's Blondies with white chocolate stars and red edible glitter to decorate!


Ingredients:
200g slightly salted butter
100g white chocolate
2 medium eggs
135g caster sugar
100ml Bailey's Irish Cream
300g plain flour
Edible glitter and white chocolate stars to decorate (optional)

Prep Time: 10 minutes
Cook Time: 35 - 40 minutes
Makes 16 blondies

  1. Preheat the oven to gas mark 5 and line a square tin with baking paper.
  2. Put the butter into a small microwavable bowl and melt in the microwave. Place this to one side to cool.
  3. Melt the white chocolate, either in the microwave in 20 second blasts, or in a bowl over a pan of simmering water. Once melted, place to one side to cool.
  4. Put the eggs and caster sugar into a large mixing bowl and beat until frothy. Beat in the cooled melted butter, Baileys and white chocolate. Finally add the flour to the mixture and fold in until just combined.
  5. Pour the batter into the prepare cake tin, then sprinkle on the edible glitter and white chocolate stars, if using, to decorate.
  6. Bake for 35-40 minutes, until golden brown in colour, and springy but still moist to touch. Remove from the oven and allow to cool in the pan before turning out and cutting into 16 gorgeous, gooey brownies! (Blondies...!)

Happy Thoughts
x

Wednesday, 4 December 2013

Cake'n'Bake Wednesday: Ginger and White Chocolate Cheesecake

The club had decided to try not to repeat themes from the previous year, but we also decided that we couldn't NOT do Christmas in December, so we put a Secret Santa spin on it. Each member had to put a word or phrase which made them think of Christmas into a hat, and then the words were drawn out at random for another member to use as baking inspiration.

The word I drew out of the hat was "Ginger". Originally I was planning to bake a gingerbread house that we could assemble together at the meeting, but as I did the draw I knew that another member had gingerbread, so I decided to go for something a little bit different. A ginger and white chocolate cheesecake!


Ingredients:
200g gingernut biscuits
100g margarine
30g crystallised ginger, plus extra to decorate
150g white chocolate
300ml double cream
300g cream cheese
150g icing sugar
A little bronze lustre dust
Gold edible shimmer spray

Prep time: 20 minutes
Chill time: 3 hours (minimum)
Serves 8-10

  1. Crush the gingernut biscuits into fine crumbs, either by putting in a blender, or by bashing with a rolling pin the old fashioned way.
  2. Melt the margarine and mix into the biscuit crumbs. Pour the biscuit mixture into the cake tin you are using (I used a 7 inch springform pan) and press down with the back of a spoon to flatten. Pop the tin in the fridge to allow the biscuit base to set whilst you make the cheesecake filling.
  3. Start by chopping the crystallised ginger into teeny tiny small pieces, and put these to one side. Melt the white chocolate - either in the microwave or in a bowl over hot water - and put this to one side to cool.
  4. In a large bowl, whisk the double cream to soft peaks, then whisk in the cream cheese and icing sugar. Separate 250g (approximately 1/3) of the filling into a smaller bowl, and stir in the chopped ginger and bronze lustre dust. Put this to one side.
  5. Whisk the cooled white chocolate into the remaining cheesecake mixture.
  6. Remove the biscuit base from the fridge and start to layer the cheesecake fillings on top of this, making sure to level the top of the cheesecake between each layer. Start with half of the white chocolate filling, then all of the ginger filling, then the remaining white chocolate filling.  
  7. Spray the top of the cheesecake with the gold shimmer spray, then place one or two pieces of ginger in the centre to decorate. Pop the cheesecake in the fridge for at least 3 hours to set before serving. (It's best to leave it overnight, if you can!)

Happy Thoughts
x

Wednesday, 16 October 2013

Cake'n'Bake Wednesday: Meringue Ghosts


Here's the final of my "Trick or Treat" themed bakes from Cake'n'Bake Club's October 2012 meeting. I had some egg whites leftover from my pumpkin pie mixture that I needed to use up, and thought that these meringue ghosts would be a great way to do just that. And I really like baking things for Halloween. So here are my meringue ghosts!


Prep time: 15 minutes
Cook time: 1 hour 30 minutes
Makes 18 ghosts

Ingredients:
2 egg whites, room temperature
60g golden caster sugar
60g icing sugar
Coloured sugar ball decorations for the eyes


  1. Preheat the oven to gas mark 1, and line a baking sheet with greaseproof paper.
  2. Whisk the egg whites to stiff peaks, then add the caster sugar a little at a time, whisking well between each addition to ensure the sugar has dissolved. By the time you've whisked in all of the caster sugar, you should have a really thick, pillowy and glossy meringue.
  3. Gently fold in the icing sugar with a spatula until it's all mixed in, then spoon the meringue into a large piping bag. 
  4. Snip of the end of the piping bag and pipe hap-hazard spirals onto the baking sheet, about 2 inches tall. Carefully stick two sugar balls into each meringue pile for eyes.
  5. Bake the meringues for 1 hour 30 minutes, then turn off the oven and allow them to come to room temperature with the oven door still closed. This will ensure you have super crisp, super yummy meringues!


Happy Thoughts
x

Wednesday, 9 October 2013

Cake'n'Bake Wednesday: Mummified Mini-Pizza


Here's the second recipe I baked for Cake'n'Bake Club's October 2012 meeting - Mummified Mini-Pizzas. I ended up making quite a lot for the Halloween themed meeting, simply because I love Halloween bakes! I'd recommend eating these warm straight from the oven, as they are then REALLY tasty.


Prep time: 1 hour 30 minutes
Cook time: 25 - 30 minutes
Makes 16 mini pizzas

Ingredients:

For the pizza base:
3g (1/2 packet) dried yeast
1tbsp sugar (any kind)
2 tbsp olive oil
150ml warm water

175g white bread flour
75g wholemeal bread flour
Pinch of salt

For the topping:
50g tomato puree
One red pepper
Half a bag of grated mozzarella (can also use cheese strings, but I find that grated mozzarella tastes nicer!)

  1. Start by making your pizza dough. tip the yeast, sugar and olive oil into a jug with the warm water and stir well. Put this to one side for a few minutes to allow the yeast to start working.
  2. Tip both kinds of flour and the salt into a large mixing bowl, and mix together with your hands. Make a well in the centre of the bowl of flour and pour in your liquid mixture. Stir the flour from the sides of the bowl into the wet mixture with a fork until a rough dough forms. Tip this out onto a lightly floured surface a knead for a good 10 minutes before returning to the mixing bowl and covering with clingfilm. Leave in a warm place for an hour to prove.
  3. After an hour the bread should have double in size. Preheat the oven to gas mark 5 and line a baking tray with greaseproof paper. 
  4. Tip the bread dough out onto a lightly floured surface and knead lightly for a minute or so to knock out the air. Roll the dough out to around 0.5cm, then cut circles out of it with a cookie cutter. Place these circular pizza bases onto the baking tray and bake for 10 minutes before removing from the oven to cool slightly before adding the toppings.
  5. Meanwhile, cut small "eyes" out of the red pepper. Was the pizza bases are cool enough to handle, spread a little tomato puree on each one. Give each pizza two red pepper eyes, and then arrange the grated cheese around the eyes, leaving gaps in between to look like bandages.
  6. Bake for a further 15 - 20 minutes until the cheese has melted and started to brown, and the underside of the pizza is completely cooked. Serve immediately - we don't want those Mummies to escape!


Happy Thoughts
x

Wednesday, 2 October 2013

Cake'n'Bake Wednesday: Mini Pumpkin Pies

I LOVE pumpkin pie! So when "Trick or Treat" was selected as the theme for our October 2012 meeting, I simply HAD to make pumpkin pie. I decided to make individually sized portions of pie for club as they are just that little bit easier to share.


I followed one of the other members' recipes for pastry, and so glad I did as it was my most successful attempt at making pastry to date! Long-term readers of the blog will know that pastry is my weakness...

Ingredients

For the pastry cases:
200g slightly salted butter, chilled and cubed.
400g plain flour
80g icing sugar
2 medium eggs, beaten

Note: you could always use store bought pastry, if you wanted to. Mary Berry said it was OK. If using store bought pastry, skip to step 3.

For the pumpkin filling:
1 large egg, plus 1 yolk
125ml double cream
200g condensed milk
220g pureed pumpkin
1tsp ground cinnamon

Makes 16 - 18 tarts, depending on the size of you pan (I made mine in a muffin pan)


  1. Start by NOT preheating the oven. You want the kitchen to be as cold as possible whilst you're making the pastry. Tip the cold, cubed butter and the flour into a large mixing bowl, and rub in between your fingers until it resembles fine bread crumbs. 
  2. Mix in the icing sugar by hand, then cut in the beaten egg with a knife until the mixture starts to come together to form a dough. Press the mixture together into a ball, wrap in cling film and put in the fridge for 30 minutes to chill.
  3. Whilst the pastry is in the fridge, prepare your pie filling. Start by whisking the egg and egg yolk together until light and frothy. Add the cream, condensed milk, pureed pumpkin and cinnamon and continue to whisk for 3-4 minutes, until the ingredients combined to form a custard-like consistency.
  4. Preheat the oven to gas mark 4, and grease a deep muffin pan.
  5. Turn the pastry out onto a lightly floured surface and knead it lightly, before rolling out as thinly as possible. Cut circles out of the pastry and place this into the muffin pan, using the end of a rolling pin to help you push the pastry into the muffin holes. Prick the pastry cases all over with a fork, then blind bake for 15 minutes.
  6. Take the pastry cases from the oven, and carefully remove the foil and baking beans used for the blind bake. Fill each pastry case with 2tbsp of the pie filling, then return to the oven for another 30 minutes, until the pie filling is completely set (you can test with a cocktail stick, if you'd like to.) You'll noticed that the pie filling has risen into a dome shape - this will deflate as the pie cools. Don't worry, this happens to mine all of the time and as far as I can tell it's normal. At the very least - they still taste good!
  7. Allow the pies to cool in the muffin pan, then keep refrigerated.

Happy Thoughts
x

Wednesday, 11 September 2013

Cake'n'Bake Wednesday: Raspberry Meringues

This is another recipe I baked for September 2012's "Five-a-Day" theme, and it's one of my favourite EVER recipes. The meringues take a long time to cook, but are SO worth the wait. You can use either fresh or frozen raspberries.


4 large egg-whites (room temperature)
1tsp cream of tartar
115g caster sugar
115g icing sugar
50g raspberries

Prep time: 15-20 minutes
Cook time: 1hour 30 minutes
Makes 18 meringues

  1. Preheat the oven to gas mark 1 and line a baking tray with greaseproof paper. Chop the raspberries into small pieces.
  2. Whisk the egg whites and cream of tartar together until the egg whites are thick, opaque, and stand in stiff peaks.
  3. Whisk the caster sugar into the egg whites one tbsp at a time, being sure to whisk well between each addition. If your sugar doesn’t dissolve into the egg whites properly at this stage you will end up with weepy meringues later! When all of the caster sugar has been added you should be left with a mixture that is stiff, smooth and glossy.
  4. Gently fold half of the icing sugar into the meringue mixture until combined, but be careful not to beat out too much of the air you’ve whipped in! Add the remaining icing sugar and the raspberries to the meringue bowl, and fold these in gently.
  5. Scoop the meringue mixture onto the baking tray using two tablespoons to shape into rough ovals, then bake for around 1 hour 30 minutes until golden brown and crispy on top.  Turn off the oven, but allow the meringues to cool inside the oven – this will create meringues which have a really crispy outer-layer, and a really gooey inside! Once completely cool, store in an airtight container until ready to serve.
Happy Thoughts,
x

Wednesday, 4 September 2013

Cake'n'Bake Wednesday: Honey and Apricot Scones

Our theme for September 2012 was "Five-a-Day", or fruit and veg. The rule this month was simple - anything you baked had to contain at least one item from the fruit or vegetable family.

I had previously entered my Champagne Victoria Sponge recipe into a competition run by Natural Selection Foods and won a whole bunch of their dried fruits, so I wanted to use some in my baking for fruit and veg month. I chose the apricots as they were lovely and sweet, and really complemented the honey in this recipe.


225g plain flour
1tsp baking powder
50g butter or margarine
50g chopped apricots
2tbsp clear “runny” honey
100ml buttermilk
Beaten egg, to glaze

Prep time: 15 minutes
Cook time: 15-20 minutes
Makes 12 small scones

  1. Preheat the oven to gas mark 6 and line a baking tray with greaseproof paper.
  2. Tip the flour and baking powder into a large bowl and mix together by hand. Add the butter and rub this into the flour until the mixture resembles fine breadcrumbs.
  3. Add the chopped apricot, honey and buttermilk to the mixture and stir with a spoon until the mixture comes together to form a dough. Tip the dough out onto a lightly floured surface and knead lightly for a few minutes, until the dough is soft and smooth.
  4. Roll the dough out to around an inch thick, cut out small scones using a round cutter, then place these on the prepared baking tray, leaving a space between each. Brush with the beaten egg to glaze, then bake for 15-20 minutes until golden brown on top.
  5. Remove from the oven and place on a cooling rack to cool – although scones are always best eaten slightly warm!
  6. Eat as they are, or serve with jam and cream.
Happy Thoughts
x

Wednesday, 14 August 2013

Cake'n'Bake Wednesday: Ploughman's Picnic Rolls

This was my "main" bake for Cake'n'Bake Club's Perfect Picnic themed month back in August 2012. These picnic rolls are great for outdoor eating as the filling is baked inside them. The recipe below is for my ploughman's picnic rolls, but you could do almost any filling, sweet or savoury! There also really good for packed-lunches. Just bake a batch at the weekend, leave them to cool, wrap them well and store them in the freezer. When ready to use, remove from the freezer and place in the oven at gas mark 4 for around 10 minutes to re-fresh - delish!


Prep-time: 1hour 45 minutes
Cook time: 25 - 30 minutes
Makes 8 picnic rolls

Ingredients:

For the dough:
300ml warm water
1tbsp brown sugar
2tbsp olive oil
7g sachet of dried yeast
500g strong white bread flour
Pinch of salt

For the filling:
2-3tbsp Branston Pickle (I used the small chunk variety)
4 slices of good quality ham
150g mature cheddar

1 small egg, beaten, to glaze
A little extra grated cheese, to decorate (optional)

  1. Place the water, sugar, olive oil and yeast into a jug a stir well. Leave this to one side for a few minutes. Meanwhile, sift the flour and salt into a large mixing bowl and create a well in the centre. Tip the yeast mixture into the centre of the well, then work the flour into it using a fork.
  2. Once the ingredients have combined to form a rough dough, tip the contents of the bowl onto a clean dry work surface. Knead by hand for 5-7 minutes, until all of the flour is incorporated and you have a soft, springy dough. Place the dough into a large oiled bowl, cover with clingfilm and leave in a warm place for one hour, until doubled in size.
  3. Whilst the dough is proving, prepare your filling. Slice the ham into strips and grate the cheese. Leave these to one side until ready to use.
  4. Tip the dough out onto a lightly floured surface and knock back, then split into 8 equally sized balls. 
  5. Making one at a time, roll each ball out until around 5mm thick then spread a thin layer of pickle over the top, making sure to leave a space around the edges. Sprinkle on your other filling ingredients, then begin to roll the dough up Swiss roll style. Tuck the ends of the roll underneath to create and oval bun shape. Please the rolls on a floured baking tray and leave to prove for a further 30 minutes. Preheat the oven to gas mark 6.
  6. Once doubled in size, glaze the rolls with a little beaten egg, and sprinkle a little grated cheese on top of each one. Bake for 25 - 30 minutes until golden brown all over, then remove and leave to cool.

Happy Thoughts
x

Wednesday, 7 August 2013

Cake'n'Bake Wednesday: Peanut Butter Fudge

In August 2012 the Cake'n'Bake Club decided to brave the British summertime and take our meeting outdoors for a picnic month. We also decided to invite along as many family and friends as possible, and ended up raising a nifty £105 for Marie Curie Cancer Care in the process! This peanut butter fudge is based on Sophie Dahl's recipe, which I stumbled across one day and have loved ever since! It is a very naughty, but very nice treat!


Time taken: 15-20 minutes for preparation plus 2 hours to set.

Makes 15-20 pieces

Ingredients
65g butter
250g brown sugar
65ml milk
150g crunchy peanut butter
1tsp vanilla extract
150g icing sugar

Process
  1. Line a small tray with cling film, so that the cling film hangs over the sides. I used one of those plastic tubs that you often get take-away food in as they are the perfect size!
  2. Cut the butter into cubes, then melt in a saucepan over a medium heat.
  3. Once the butter has melted, stir in the sugar and the milk until all of the sugar has dissolved. Bring the mixture to the boil without stirring. Once the mixture is bubbling leave it on the heat for a further 3 minutes and then remove from heat.
  4. Add the peanut butter and the vanilla extract to the mixture and stir until all of the peanut butter has melted. Leave to cool for a few minutes, then tip the icing sugar into the pan. Stir until the ingredients have combined to form a smooth paste.
  5. Pour the mixture into the prepared tray and leave to cool to room temperature before placing the fudge in the fridge to set (this usually takes at least two hours).
  6. Once the fudge has set, use the cling film to help remove the fudge from the tray and cut into squares. Store the fudge in an airtight container.

Happy Thoughts
x

Wednesday, 3 July 2013

Cake'n'Bake Wednesday: Olymp-bic Gold Medals


The theme for our July 2012 meeting ended up being a little tongue in cheek. You see, the Olympics were just around the corner and as they were being hosted in London it was a really big deal, so we were planning to have an Olympic themed meeting in July. However, shortly before our July meeting, we came across an article about the Olympics' special copyright laws, and a certain cake decorating competition that was threatened with court action for breaching that copyright law by having an Olympic theme for their 2012 competition.


Now, we law-abiding bakers at the Cake'n'Bake Club didn't want to breach any copyright, so we decided to change our theme to "not-the Olympics". We ended up with some really creative bakes, such as a Wimbledon cake, and some non-Olympic ring donuts. My take on the non-Olympic theme was to make some gold medal biscuits to give to people for non-sport related achievements, like this:


Prep time: 15 minutes
Cook time: 12-15 minutes
Makes 16 medals


Ingredients:
100g margarine
85g caster sugar
Almond flavouring, to taste
4-5 cherry drops, crushed
170g plain flour
100g white chocolate
Gold edible shimmer spray (I LOVE this stuff!)
Writing icing, to decorate (optional)

  1. Preheat the oven to gas mark 4 and line a baking tray with greaseproof paper.
  2. Beat the margarine and sugar together until pale and creamy, then stir in the almond flavouring, crushed cherry drops and flour until the mixture comes together to form a dough.
  3. Lightly flour the work surface, then roll the dough out to 1 cm thick. Cut circles out and place these onto the prepared baking tray, leaving at least a cm gap between each. cut out a small circle at the top of each cookie for the ribbon, then bake for 12-15 minutes until golden brown. Leave to cool on a wire rack.
  4. Once the cookies are cool, thread a little bit of ribbon through each. Melt the white chocolate and then spread generously over the top of each cookie, then leave to one side to set.
  5. Once the chocolate has set, spray the cookies gold by following the directions on the can of edible spray. Use your writing icing pen to write on each medal why the receiver deserve this Olymp-bic medal - favourites of mine were "champion eater" and "best helper" :-)

Happy Thoughts
x

Wednesday, 5 June 2013

Cake'n'Bake Wednesday: Champagne Victoria Sponge

Our June 2012 meeting was the day after the double bank holiday for the Queen's Diamond Jubilee, so we thought it was only fair to thank our ma'am for the extra day off work by paying homage to her in baked form. When tasked with baking a cake to celebrate Britishness and the Queen's Diamond Jubilee, for me it could only ever have been a Victoria Sponge. A special, spruced up for a party kind of Victoria Sponge. So I decided to sandwich some home made strawberry and champagne jam with some champagne flavoured butter cream in between two layers of deliciously light almond sponge.

I also entered this recipe into a couple of Jubilee baking competitions, and whilst I wasn't a prize winner in the Times' Jubilee Bake Off, I did get 1st prize in the Natural Selection Foods Jubilee Baking Competition


Strawberry and Champagne Jam

Ideally the jam should be made at least a day in advance so that it has time to set, however to save time it can be made in advance. The jam will keep in the fridge for 6-8 weeks (if it lasts that long!)

Prep time: 10 minutes
Cook time: 45 minutes to 1 hour
Makes two medium sized jars (around 400g)

Ingredients:
300g fresh British strawberries
250g jam-making sugar (sugar with added pectin)
1 tbsp unsalted butter
100ml pink champagne
1 tsp lemon juice


  1. Place a heavy-based saucepan on the hob on the lowest heat. Wash, hull and chop the strawberries into small pieces, then add these to the pan with the sugar, butter and champagne. Gently stir until the butter has melted and the sugar has dissolved, then leave the jam to cook on the lowest heat for a while, stirring regularly.
  2. Meanwhile, place a saucer into the freezer to use later when it come to test whether or not the jam will set.
  3. Once the jam begins to bubble and simmer, add the lemon juice. The liquid should have reduced and thickened slightly. After around 45 minutes, test the jam for set by taking your saucer from the freezer and dropping a teaspoon of jam onto it. After 30 seconds on the saucer the jam should be set - if not add a little more lemon juice and cook for a little longer.
  4. Once the jam is ready, remove from heat and pour into sterilised jars. Leave to cool completely before placing in the fridge to set overnight. Removed from the fridge 30 minutes before serving to allow the jam to return to room temperature.

Champagne Victoria Sponge

Prep time: 20 minutes
Cook time: 30-35 minutes
Makes 18 slices

Ingredients:
600g margarine
600g caster sugar
6 large free range eggs
50ml milk
A few drops of natural vanilla extract
600g self raising flour
1tsp baking powder


For the filling:
250g unsalted butter
500g icing sugar
1 tbsp milk
A few drops of champagne flavouring (to taste)
4-5 tbsp strawberry and champagne jam
Extra icing sugar for dusting.

  1. Preheat the oven to Gas Mark 5 / 190 Degrees, and grease and line two 9" springform cake tins
  2. Beat the butter and sugar together in a large bowl until light and fluffy. In a small bowl or jug, beat together the eggs, milk and vanilla extract and put to one side. Sift the flour, almonds and baking powder together into another bowl. Beat a third of the wet mixture into the butter and sugar, then fold in a third of the dry mixture. Continue in the order until all of the ingredients have combined to form a smooth batter. 
  3. Divide the batter between the two prepared cake-tins and level with the back of a spoon. Bake for 30-35 minutes until golden brown and springy to the touch. Allow the cakes to cool in their tins for 5 minutes before turning out onto a wire rack to cool completely.
  4. Whilst the cakes are cooling, prepare the butter cream. Beat the butter, icing sugar and milk together until smooth and creamy, then add a little champagne flavouring at a time until you reach your desired taste. Put the butter cream into a piping bag fitted with a large star shaped nozzle, and place in the fridge until ready to use.
  5. Once the cakes have completely cooled, assemble the sponge. Place one of the sponge layers onto a serving plate, and spread the jam over this. Pipe the butter cream on top of the jam in swirls, and then place the second sponge gently on top of this. Dust the cake with icing sugar to finish.

Happy Thoughts
x

Wednesday, 15 May 2013

National AIDS Trust and the Cambridge Cake'n'Bake Club Bake Sale!

Happy Wednesday, folks! Whilst this isn't strictly a recipe from my Cake'n;Bake Club antics, I do think it's important and so wanted to share this post on my persoanl blog too...

We at the Cambridge Cake’n’Bake Club were recently contacted by the National AIDS Trust to ask for our help in raising funds and awareness through their Bake Aware initiative – a very exciting, and very tasty, initiative to encourage people to talk about the Birds and the Bees, and HIV awareness.


There are 100,000 people living with HIV in the UK, and 1 in 4 people don’t know they have it. Those who do have it still face discrimination in school and in the workplace, and this is what NAT are trying to stop.

On Sunday 19th May, Cake’n’Bake Club will be holding a Birds Vs Bees bake sale at the Cambridge Nursing Centre, 5 High Street , Chesterton , from 10am – 2pm. We’d love it if you could come along, treat yourself to some of our baked goods (and they are good!) and help us to raise funds for this very worthy cause. We’ve split into two teams, Teams Birds and Team Bees, and each team will be competing to raise the maximum funds for the charity. We’re going to put in all the hard work in our kitchens – for you; it’s going to be a piece of cake :-)

I'm part of Team Birds, and I'm planning to make some little birdy cake pops, some bird themed jam tarts, and some chicken "sausage" rolls :-) If you're in or around Cambridge on Sunday, feel free to pop along and say hello, and get yourself a little treat!

Happy Thoughts
x

Wednesday, 1 May 2013

Cake'n'Bake Wednesday: Singapore Spiral Mooncakes

In May 2012 the Cake'n'Bake theme of the month was "Around the World in 80 Bakes". Each member entered an electronic draw to get a random country, and had to bake something from that country. It was a really great month, and a theme we hope to repeat in the future (there are a lot of countries we haven't baked yet!)


The country I pulled from the electronic hat was Singapore, and for a little while I was at a loss as it seems that rather than having it's own cuisine, Singaporean food is based on a mixture of Chinese, Malai and Indian cuisine. However, I was very lucky to stumble upon a fellow baking blogger who just so happened to be from Singapore, and this is where I was first introduced to the mooncake.

I looked at as many recipes I could find for many different kinds of mooncakes, but in the end I settled on an adaptation of a recipe found on the original blog I came across: Happy Home Baking.

Thankfully there are a number of East-Asian supermarkets in my area, so I found it quite easy to get hold of some red bean paste to use for my filling, however, I was advised by a friend that this was an "acquired taste", and I really disliked it - so just go in with an open mind!


Prep time: 45 minutes
Cook time: 20 minutes
Makes 20 mooncakes

For the filling:
400g red bean paste

For the "water" dough:
140g plain flour
10g icing sugar
50g vegetable shortening
70ml water

For the "oil" dough:
150g plain flour
80g vegetable shortening
Red, yellow and green food colouring

Flour, for dusting.


  1. Start by preparing the filling: measure the red bean paste into 20g portions and roll these into balls in your hands. Place on a lined baking sheet in the fridge until ready to use.
  2. Next prepare the water dough. Sieve the flour and icing sugar into a mixing bowl then rub in the shortening until the mixture resembles fine breadcrumbs. Stir in enough of the water to form a soft, pliable dough and then cover this with clingfilm and put in the fridge to set slightly, whilst you prepare the oil dough.
  3. For the oil dough, sieve the flour into a bowl and then mix the shortening into it by hand, until you get a soft dough (which I found to be similar in texture to a soft playdough!). Divide this dough into 3 equal pieces, and colour these red, yellow and green (respectively). Note: you could use any combination of colours you like here. Roll each dough out into a roughly equal sized rectangle and place to one side.
  4. Take the water dough from the fridge and knead on a lightly floured surface until it too resembles playdough in texture and pliability.  This is where the instructions get a bit confusing, so bear with me! I've posted a step-by-step photo collage below should you need it! Roll this out into a large rectangle and then place the three coloured doughs in the centre of this, overlapping each colour slightly. Fold the edges of the water dough (the white dough) over the coloured dough, then cover with cling film and place in the fridge to rest for 20 minutes.
  5. After 20 minutes, place the dough onto a lightly floured surface and roll out until completely flat. Starting at one of the shorter ends, roll the dough into a tight "Swiss roll" style log, and trim the ends. (I hope you're still following!) Cut the dough into 20 slices.
  6. Preheat the oven to gas mark 4 and line a flat baking sheet with greaseproof paper.
  7. For each mooncake, take a slice of the spiral dough (which looks super pretty at this stage, might I add!)  and flatten it into a circular disk with your fingers. Place one of the red bean paste balls into the centre of the disk and wrap the dough around it, gently pinching the ends to seal. Place the mooncakes seam side down onto a lined baking sheet and repeat the process until all 20 mooncakes have been made.
  8. Bake the mooncakes for 10 minutes, then removed from the oven and leave to rest for 10 minutes before returning to the oven to bake for a final 10 minutes. The mooncakes will be fairly squidgy when they leave the oven, so allow them to cool on the baking tray for 5-10 minutes before transferring to a wire rack to cool completely.


Happy Thoughts
x

Tuesday, 16 April 2013

The Massive Rainbow Birthday Cake (of doom!!)

Cake'n'Bake Recipe? But it's a Tuesday! Well, yes. But I ran out of time to post this one last November, and today is actually my birthday, so I thought it would be a good idea to post it today.


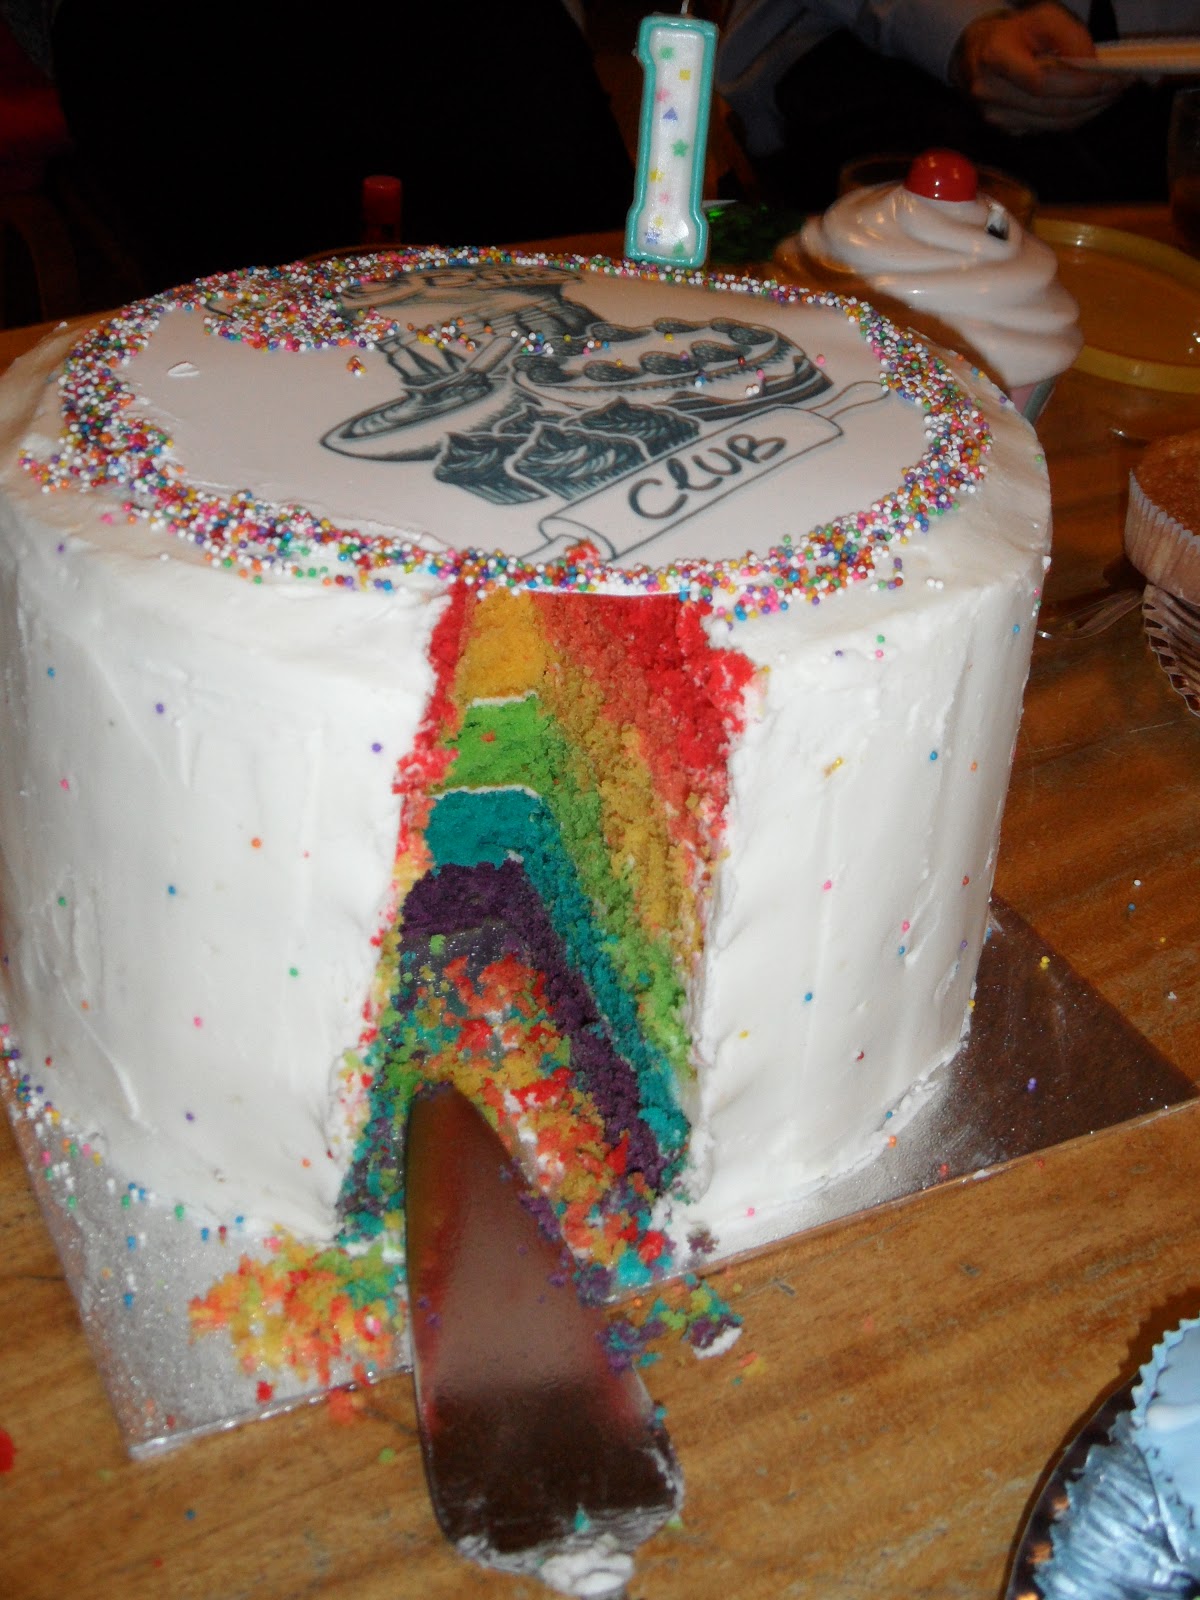
I made this birthday cake for Cake'n'Bake Club's first birthday party in November 2012 - the theme being "Birthday Party". I knew I wanted to do a rainbow cake, mostly because I love making rainbow cake and hadn't done one in ages, but also because I'd made a rainbow cake for our first ever meeting a year before, and it seemed fitting. So I had my heart set on making a rainbow cake, but this time with the Cake'n'Bake Club logo on the top. That's kind of where it all went a bit wrong. You see, the topper I ordered was too wide to fit on top of a cake in the 6" cake pan I was planning to use. (Schoolboy error!) So I had the use a bigger cake tin. Normally, this wouldn't be a problem, as I'd just make the cake shorter by doing less layers to compensate for it being wider. But this was a RAINBOW cake, so I couldn't get rid of a layer, because then it wouldn't be a rainbow. I mean I already merged Indigo and Violet into simply "purple" - I don't think I could get away with loosing more colours!

So I made 6 layers of cake in my 9" cake tine, and covered it all in frosting, and sprinkles, and my edible icing with the Cake'n'Bake logo on it.

This one slice fed 5 people. Not joking.
In the end it was 8" tall, 9" wide, and weighed 9lbs. If you fancy making a 9lb giant birthday cake of doom, the recipe and quantities are below. If you'd like to make a smaller one (the 6" pan) use 100g of margarine, sugar and flour and 1 egg per layer.

Ingredients:

for the cake:
900g margarine (no joke)
900g caster sugar
9 medium sized eggs
150ml milk
900g self raising flour
3 tbsp vanilla extract
Food colouring in red, orange, yellow, green, blue and purple

for the icing:
500g vegetable shortening (Trex)
1kg icing sugar (still not joking!!)
2 tbsp vanilla extract

to decorate:
hundreds and thousands of hundred and thousands
an edible cake topper of your choice (optional)

  1.  Preheat the oven to gas mark 5, and grease and line two baking tins. 
  2. Unless you're using your kitchen sink as a mixing bowl, you're probably going to want to make this in batches. I made my batter in three batches, splitting each batch into two layers of cake. 
  3. Start off by beating 300g margarine with 300g caster sugar in a large mixing bowl until light and creamy. Beat in three of the eggs, one at a time, followed by 50mls of the milk and 1tbsp of the vanilla extract. By the time you've beat all that in, your mixture should be light and fluffy.
  4. Measure out 300g of the flour, then fold this into the cake batter a little at a time, until the ingredients combine to form a smooth batter. Scoop half of the batter into a separate bowl, and use the food colourings to create a red batter and an orange batter. I always start with red as it's the worst colour to mix. If you don't use enough blue or green colouring, you just end up with light blue or light green. If you don't use enough red food colouring, you don't get light red. Oh no, my friend. You get pink. So you need to use a fair amount of red food colouring to get a red sponge. Don't forget though, that the colours will be more vibrant and a little darker once baked.
  5. Pour the batters into the prepared cake tins, and bake for 25-30 minutes until firm but spongy to touch. Allow the cakes to cool in their tins for 5 minutes before turning out onto a wire rack to cool completely.
  6. Repeat steps 4 and 5 to create your yellow, green, blue and purple layers. (Optional extra: make yourself a cup of tea and try to figure out how you're going to get this massive hunk of cakey goodness from your kitchen to the venue!!)
  7. Once all the layers are baked and cooled, mix up your frosting by beating the shortening and icing sugar together. I used an electric mixer for this to save time.
  8. Place your purple layer onto your serving plate, and spread a thin layer (roughly 1 tbsp) of the frosting over the top of this. Place your blue layer on top of this and repeat. Repeat also with the green, yellow, orange and red layers.
  9. Once all of your layers are stacked, crumb coat the cake. A crumb coat is a thin layer of icing that goes onto your cake and is left to set before you put your actual icing on. It's like cake underpants. Crumb coating is a very good idea when making rainbow cake, as one of the purposes of a crumb coat is to stick the crumbs to the cake so they don't get into your outer layer of frosting. Rainbow cake crumbs stand out against white icing, so crumb coating is good. Plus it's fun to say: crumb coat. Anyways... once you've covered your cake in a thin layer of frosting, pop it into the fridge for an hour or so to allow the crumb coat to set completely.
  10. Once the crumb coat has set, ice your cake with the remaining white icing. Top your cake with the edible topper, and use sprinkles to hide the seam between the cake topper and your frosting. I also poked sprinkles into the side of my cake to look like polka dots. I'm not really sure why I did that, it was just a whim. I thought it looked pretty at any rate.
  11. Invite that guy from Man VS Food over, promising him a t-shirt and eternal glory if he can eat the whole thing in 45 minutes. Alternatively, share the cake with lots of friends and family, and lots of tea! 


Happy Thoughts
x

Wednesday, 10 April 2013

Cake'n'Bake Wednesday: Carrot Cake

Back in April 2012 Baking Mad got in touch about an Easter baking competition they were running: Bakers had to create an Easter recipe and post it on their blog with pictures, and then email Baking Mad with the link. Baking Mad would choose their favourite to win a half day workshop with Eric Lanlard. (Que Oooooooooohs!) Unfortunately, as we all share a blog for Cake'n'Bake Club, we were only allowed one entry, so we ran an in-club competition to see who would be our entry to the Baking Mad competition (...still following!?)

Anyway, this was my entry to the Easter Competition. Originally I attempted to make some stuffed bread rolls in the shape of bunnies, but unfortunately they didn't turn out too well so I ended up with only 2 hours to make whatever I could using ingredients I had in the house. Luckily for me I had an abundance of carrots in! My Easter bake is a deliciously moist carrot cake covered in a sweet yet tangy cream cheese frosting.


Ingredients:

For the cake:
2 large carrots (roughly 200g grated weight)
200g self raising flour
150g soft light brown sugar
50g chopped macadamia nuts
2 large eggs
1tbsp lemon curd
1tsp mixed spice
100ml vegetable oil

For the icing:
100g soft cream cheese
50g unsalted butter
50g vegetable shortening
300g icing sugar
1tbsp lemon curd

Prep Time: 10 minutes
Cook time: 45-50 minutes
Makes 12 slices

  1. Preheat the oven to gas mark 4 and grease and line a 7" baking tin.
  2. Grate the carrot into a large bowl, then add in all of the other ingredients and stir until combined. Pour into the prepared tin and bake for 45-50 minutes, until a skewer inserted into the centre comes out clean. Leave the cake to cool in the tin for a few minutes before turning out onto a wire wrack to cool completely.
  3. To make the icing, beat together to cream cheese, butter and shortening until smooth, then stir in the icing sugar and lemon curd until just mixed in - over beating here will make the icing too runny.
  4. Once the cake has completely cooled, spread the icing over the top and sides using a pallet knife. 


Happy Thoughts
x

Wednesday, 3 April 2013

Cake'n'Bake Wednesday: Lamb and Apple Pie

April 2012 was Easter themed for Cake'n'Bake Club, and I wanted to have a bash at something savoury.  I've always been a bit rubbish at pastry, so thought I'd take the opportunity to get in some practise with a yummy pie. The recipe is based on The Hairy Bikers' Gloucester Squab Pie


Ingredients:

For the filling:

450g diced lamb
2tbsp plain flour
1-2 tbsp vegetable oil
1 medium onion
650ml hot lamb stock
1/2 tsp mixed spice
salt and pepper to taste
2 sprigs of fresh mint
2 bramley apples

For the pastry:

300g plain flour (plus extra for dusting)
pinch of salt
75g vegetable shortening, cut into cubes
75g butter, cut into cubes
1 medium sized egg
1 tbsp cold water

Prep Time: 45-60 minutes
Cook time: 120-150 minutes
Makes 8-10 slices


  1. The filling is cooked for at least an hour and a half before the pastry lid is added, so best to start with that. Preheat the oven to gas mark 5. 
  2. Coat the diced lamb with the plain flour. Heat a little oil in a frying pan and stir fry the lamb until just golden, then place the lamb to one side in a casserole dish.
  3. Peel and chop the onion, then return the pan to the heat and fry the onions until they start to turn translucent. Add the onions, lamb stock, mixed spice, salt and pepper to the lamb in the casserole dish, then roughly tear the mint leaves and add these. Stir well, cover, then place in the oven for 1.5-2 hours, stirring occasionally,  until the meat has cooked and the sauce has thickened. (Don't add the apples at this stage - we will come back to them!)
  4. Whilst the casserole is cooking, prepare your pastry. Tip the flour and salt into a large bowl, then rub in the shortening and butter with your fingertips until the mixture resembles fine breadcrumbs. Make a well in the centre.
  5. Lightly whisk the egg and water, then pour most of this into the well made in the flour and fat mixture - you'll want to reserve a little bit of this to use as a glaze. Stir the mixture until it comes together to form a dough, then knead the dough for a few minutes on a lightly floured surface. Shape the dough into a round, wrap in clingfilm and place in the fridge until ready to use (make sure this is at least 30 minutes so the pastry is nicely chilled!)
  6. Once the casserole is cooked, remove from the oven and leave to cool whilst you peel, core and slice the apples. Carefully pour half of the casserole into a large pie dish, then layer the slice apples on top of this. Pour the remaining casserole on top of the apple layer and set to one side whilst you roll out you pastry. Increase the heat of the oven to gas mark 6.
  7. Unwrap the pastry and roll out to around 3 inches large than the dish you are using. Cut a 1 inch circle from the edge of this, and place the around the rim of your pie dish to use as a support. Cover this in egg wash, then place the pastry over the whole dish. Trim and flute the edges, then glaze the top of the pie with the remaining egg mixture. Cut a small cross in the middle of the pastry to allow the steam to escape, then bake in the centre of the oven for 25 - 30 minutes until golden brown all over.

Happy Thoughts
x

Wednesday, 13 March 2013

Cake'n'Bake Wednesday: Sweet Red Onion Relish

This is the recipe for the Sweet Red Onion Relish I served with my Flowerpot Bread at the March 2012 Cake'n'Bake Club meeting. I know this isn't a baking recipe, nor does it have anything to do with flowers (which was the theme for March 2012) but I really wanted to have a go at baking bread that month, and didn't relish the thought of serving plain bread. I'd also decided that I'd quite like to have a go at jam-making/preserving in 2012, so the most sensible solution seemed to be to make some sort of savoury jam to serve with my Flowerpot Bread.

I scoured the net and read various recipes, and then decided to attempt my own sticky-sweet onion relish, based on the knowledge gained in my research. One thing that did stick out was that most of the recipes I found said to leave the relish sealed in a cool dark place for 1 month to mature before serving. I only had 10 days to allow mine to mature... but it tasted yummy all the same. (To be honest, I'd have happily started eating it as soon as it was ready!)


Prep time: 30 minutes
Cook time: 75-90 minutes
Makes around 650g relish (3 and a bit medium jars)

You will also need 4 medium sized jars

Ingredients:
1kg red onions
3tbsp Extra Virgin Olive Oil
Pinch of salt
Pick of black pepper
75g golden brown granulated Sugar
75g soft light brown Sugar
186ml red wine (one of the mini/one person bottles available in supermarkets)
30ml balsamic vinegar
30ml red wine vinegar


  1. Peel, halve and finely chop the onions. Place them in a large saucepan with the onions over a low heat. It's important to keep the temperature low so that the onions go soft and gooey, rather than brown and crispy. Heat the onions for 15 minutes, stirring occasionally to prevent them from burning.
  2. After 15 minutes, add the salt, pepper and both kinds of sugar to the pan and stir until all the sugar has melted. Cook for another 15 minutes, maintaining the low heat.
  3. Once the onions are soft, translucent and sticky, stir in the red wine and both vinegars. Increase the heat slightly and simmer the mixture, stirring occasionally for 45-60 minutes until the liquid has reduced.
  4. Whilst the relish is simmering, sterilise your jars. Pre-heat the oven to gas mark 1, and place a wire rack on the middle shelf. Wash the jars and lids in warm soapy water, then rinse under the hot tap. Place upside down (lids too!) on the wire wrack in the oven to dry whilst your relish cooks. 
  5. Once your relish is ready, remove the jars from the oven being careful not to touch the inside of the jar/lid. Carefully spoon the relish into the jars and place some greaseproof paper over the top. Place the lid on whilst still hot and make sure to seal the jar tightly. Once cooled, leave the relish to mature in a cool dry place until you need it.
  6. Serve with Flower-pot bread and lots of cheese! Yum yum yum!

Happy Thoughts
x

Wednesday, 6 March 2013

Cake'n'Bake Wednesday: Flowerpot Bread

Cake'n'Bake Club had a theme of "Baking in Bloom" in March 2012, the rule of these theme was that whatever you baked had to have something to do with flowers! Around this time I had been thinking about the types of things I baked, and one of the main reasons I had started the Cake'n'Bake Club was to branch out and try new things. I had never really tried baking bread before, so I wanted to take the opportunity to do so in March, and that's how I ended up baking bread in clay flowerpots.


It was great fun - although if it's the first time you're using the clay pots they need to be "seasoned" - and that can take a fair amount of time! I did mine whilst my dough was proving, but in hindsight I'd probably do them the day before. For that reason, I'm going to start by telling you how to season your clay pots.

You will need:
5 11cm clay flowerpots
a pastry brush
a LOT of vegetable oil

Preheat the oven to gas mark 3. Brush each clay pot with oil, inside and out, (and paying special care not to miss the rim!) then place your pot in the oven for 25-30 minutes, or until the oil has baked dry. Carefully remove the pots from the oven and leave until cool enough to handle, then repeat the process 5 or 6 times to create a smooth, non-stick surface.
Once you've used the pots, if they are rinsed with warm water (rather than washed with soapy water) they will retain the "non-stick" layer and can be re-used without seasoning again.


As I was quite new to bread-baking, I turned to Mary Berry's Baking Bible for assistance. The recipe below is based on The White Cottage Loaf recipe on page 285 - I chose this one because it seemed nice and simple, and Mary Berry said it was good.

Prep time: 10 minutes
Proving time: 2-3 hours
Bake time: 20-25 minutes
Makes 5 flowerpot loaves

Ingredients:

650g strong white bread flour
10g yeast
1.5 tsp salt
60g melted butter or margarine
450ml warm water
1 large egg (to glaze)
50g poppy seeds
Vegetable oil (to grease the bakeware)

  1. Measure all of the ingredients into a large mixing bowl, and beat until combined to a sticky-ish dough.
  2. Tip the dough out onto a well floured surface, and knead for 10-12 minutes until the dough is soft, pliable and still a little sticky. Place the dough in a large oiled bowl and cover tightly with cling film. Leave the dough to rise in a warm place for 1 to 1.5 hours, or until the dough has doubled in size.
  3. Tip the dough back out onto a well floured surface, and knock it back by hand. Once the dough is smooth split it into 5 equal portions. Tuck the ends of the dough underneath itself and drop each piece into a greased flowerpot.
  4. Place each flower pot inside a large plastic food bag and seal the end. Put the flowerpots in their bags back into the warm place to rise for around 45 minutes, again until it has doubled in size.
  5. Preheat the oven to gas mark 7. Beat the egg, and brush a little of this over the top of each loaf, then sprinkle with poppy seeds. Bake in the preheated oven for 20-25 minutes, or until golden brown on top and baked through.
  6. Serve with lots of cheese and red onion marmalade! 


Happy Thoughts
x

Wednesday, 20 February 2013

Cake'n'Bake Wednesday: MBS&V Brownies

MBS&V = Mars Bar, Salt and Vinegar. Bear with me.


When we decided that the theme for February 2013 would be "guilty pleasures", I knew exactly what mine would be based on: a delightfully disgusting habit I discovered as a young teenager. See I was a young teenager in the early 2000's, in the time before Jamie Oliver launched his attack on Turkey Twizzlers and before anyone even considered sending their kids to school with a healthy, nutritious packed-lunch. So my packed lunch usually consisted of a soggy sandwich, a packet of crisps (Salt and Vinegar, naturally) and a chocolate bar. I've never been overly fond of sandwiches, so that usually got binned, and I spent my later school years (without my mother's knowledge or consent, I should add!) lunching on mars bars and salt and vinegar crisps. But boy did I know how to make the most of it! I would break the mars bar up into chunks, and put these INSIDE the bag of salt and vinegar crisps. I would then take a chunk of mars bar out of the crisp bag, sandwich it between two crisps, and shove the whole lot in my mouth in one bite. I know, it sounds disgusting, but trust me, the combination of crispy, crunchy, salty crisps, with sweet, gooey mars bar is the tastiest contradiction ones tongue could ever know.

As I got older and wiser I started eating healthy lunches, but ever so often I'd treat myself to my tasty guilty pleasure... so that's why we ended up with Mars Bar and Salt & Vinegar brownies! I found it quite amusing actually, that the last time I made brownies I did my best to strip back the fat and the sugar to make them has healthy as possible, but this time I added three chocolate bars and two packets of crisps, making them possibly the least healthy thing you could eat!

Prep time: 20 mins
Cook time: 40 minutes
Makes 12 brownies

Ingredients:
225g margarine
100g cocoa powder
3 mars bars
4 eggs
450g caster sugar
1 tsp vanilla extract
150g self raising flour
2 packets of salt and vinegar crisps

  1. Preheat the oven to gas mark 4 (180) and line a square cake tin with greaseproof paper.
  2. Melt the margarine in a saucepan over a low heat. Once completely melted, remove from the heat and stir in the cocoa powder until a thick, smooth mixture forms. Leave this to one side to cool.
  3. Whilst the chocolate mixture is cooling, chop your mars bars into bite-sized chunks.
  4. Tip the eggs, sugar and vanilla extract into a large mixing bowl and whisk at a high speed until the sugar has dissolved and the mixture is thick, pale and creamy. Fold in the cooled chocolate mixture and the chunks of mars bar until the chocolate is all stirred through.
  5. Add the flour to the bowl and fold in until just combined, then transfer the mixture into the prepare baking tin.
  6. Crush the crisps into small chunks and sprinkle these over the top of the brownie mixture. Bake for 40 minutes, until firm to touch. Allow the brownie to cool in the tin before cutting into chunks.

Happy Thoughts
x

Wednesday, 13 February 2013

Cake'n'Bake Wednesday: Quick Sugar Roses

Here's another post from our Valentine's themed Cake'n'Bake meeting in February 2012. A few of the other members seemed keen to learn how to make the little roses that featured on some of my cake pops (posted last week), so I wrote this quick and (hopefully) easy tutorial.

If you want to make large, fantastically detailed realistic looking roses, there are loads of really good tutorials on youtube, (like this, for instance!) However, if you're short on time and equipment but want some small roses to go on top of cupcakes or cakepops, and aren't too fussed about them looking perfect, then this is for you!


You will need some ready to roll/fondant icing in a colour of your choice, plus some icing sugar to powder your hands and prevent the roses from becoming too sticky.


  1. Roll your fondant into a sausage shape around 75mm in thickness. 
  2. Cut your sausage into 6 pieces, 5 of which are around 1cm long and the other which is 1.5cm long. place any remaining fondant to one side and use this to make other roses.
  3. Roll your smaller pieces into balls, and then flatten each into a petal shape with you fingers, paying special attention to the edges, making sure these are as flat as possible. (It's probably best to put some icing sugar on your fingers for this to prevent the petals getting too sticky) The larger piece should also be flattened, but this is better as a long shape.
  4. Take your long flat petal and roll this back on itself to make a small spiral. (You can finish here is you just want a rosebud!)
  5. Take the smallest of your remaining petals, and press this onto your rosebud at the bottom and sides, but leave the top loose. You want to make sure that each petal overlaps, so place you petals in such a way that the "end" of the last petal you placed is in the centre of each new petal you place. 
  6. Use your fingers to roll back the top of each petal, then add the next and repeat the process until all 5 petals are used.
  7. You'll find that you have quite a large "handle" of icing where you've been adding/holding each petal. to remove this (and ensure your rose has a flat base so it's easier to stick to your cakes and pops) place a small sharp knife where you'd like to trim the base, then gently apply pressure whilst you turn the rose. You should be left with a pretty rose with a flat base perfect for adding to small cakes!
I hope you find that helpful...

Happy Thoughts
x