Showing posts with label jam. Show all posts

Thursday, 14 November 2013

Pudsey's Spotty Sponge

Well hello there! I know I said I wouldn't be posting regular content until December, and that's still the plan, but last night I baked this cake for a Children in Need bake sale and I thought it would be a shame not to share it!

It's a quick and simple Victoria sponge with a spotty surprise... I hope you like it! If you're feeling generous, text DONATE to 70705 to donate £5 to Children in Need :-)

Ingredients:
200g margarine
200g caster sugar
2 eggs
1 tbsp milk
1 tsp vanilla extract
200g self raising flour
40g colourful sprinkles (I used some multicoloured sugar pearls)
3 tbsp raspberry jam
150g trex
300g icing sugar
100g white chocolate
1 tube smarties

1) pre-heat the oven to 180 and grease and line two cake tins.
2) beat together the margarine and sugar until light and fluffy. Beat in the eggs, followed by the milk and vanilla extract.
3) fold in the flour until the mixture comes together to form a smooth batter. Tip the coloured sprinkles into the mixture and stir in - but be careful not to overmix as you don't want the colours to run!
4) split the mixture evenly between the two tins and bake for 20 minutes,  or until golden and springy to touch. Remove the cakes from the oven and put to one side to cool.
5) whilst the cakes are cooling, prepare the icing. Melt the white chocolate and put this to one side to cool. Beat together the trex and icing sugar until smooth and creamy, then fold in the cooled white chocolate. Put half of the icing into a piping bag fitted with a star nozzle.
6) Once the cakes have cooled, place one of them on to a serving plate. Spread the jam over this, then pipe on the icing. Gently place the second cake on top of the frosted layer, then spread the remaining icing over the top of this. Decorate with the smarties, serve and enjoy!
Until December, happy thoughts x

Friday, 14 December 2012

Cranberry Jam

I've never made cranberry sauce or cranberry jam or cranberry jelly before, but I decided to make home-made Christmas hampers for my friends and family this year and thought that some sort of cranberry preserve deserved to be included. I'm calling it a cranberry jam, as it has a thick, jam-like consistency.


I used the recipe on the punnet of cranberry, with the addition of a couple of tangerines to make it even more Christmassy!

Ingredients:
2 tangerines
100 ml water
100g sugar with added pectin
350g fresh cranberries

Prep time: 5 minutes
Cook time: 30 minutes
Makes 2 medium (200gish) jars

  1. Grate the zest of the tangerines into a saucepan, and then squeeze in the juice. Add the water and the sugar and turn on the heat, stirring until the sugar has dissolved.
  2. Add the cranberries to the pan and allow the jam to simmer for around 30 minutes, stirring occasionally to prevent the jam from catching on the bottom. 
  3. Meanwhile, sterilise the jars and lids by washing them in warm soapy water, rinsing in hot water and then baking on a low heat until completely dry.
  4. After 30 minutes, the jam should have reduced to a nice, thick mixture. It will continue to thicken as it cools.
  5. Carefully remove the jars from the oven, and spoon the cranberry jam into them - it's really important to be careful here as both the jar and the jam will be very, very hot! Place the lids on the jars and leave to cool to room temperature before placing in the fridge.
  6. Keep refrigerated and consume within 6 weeks.


Happy Thoughts
x

Friday, 19 October 2012

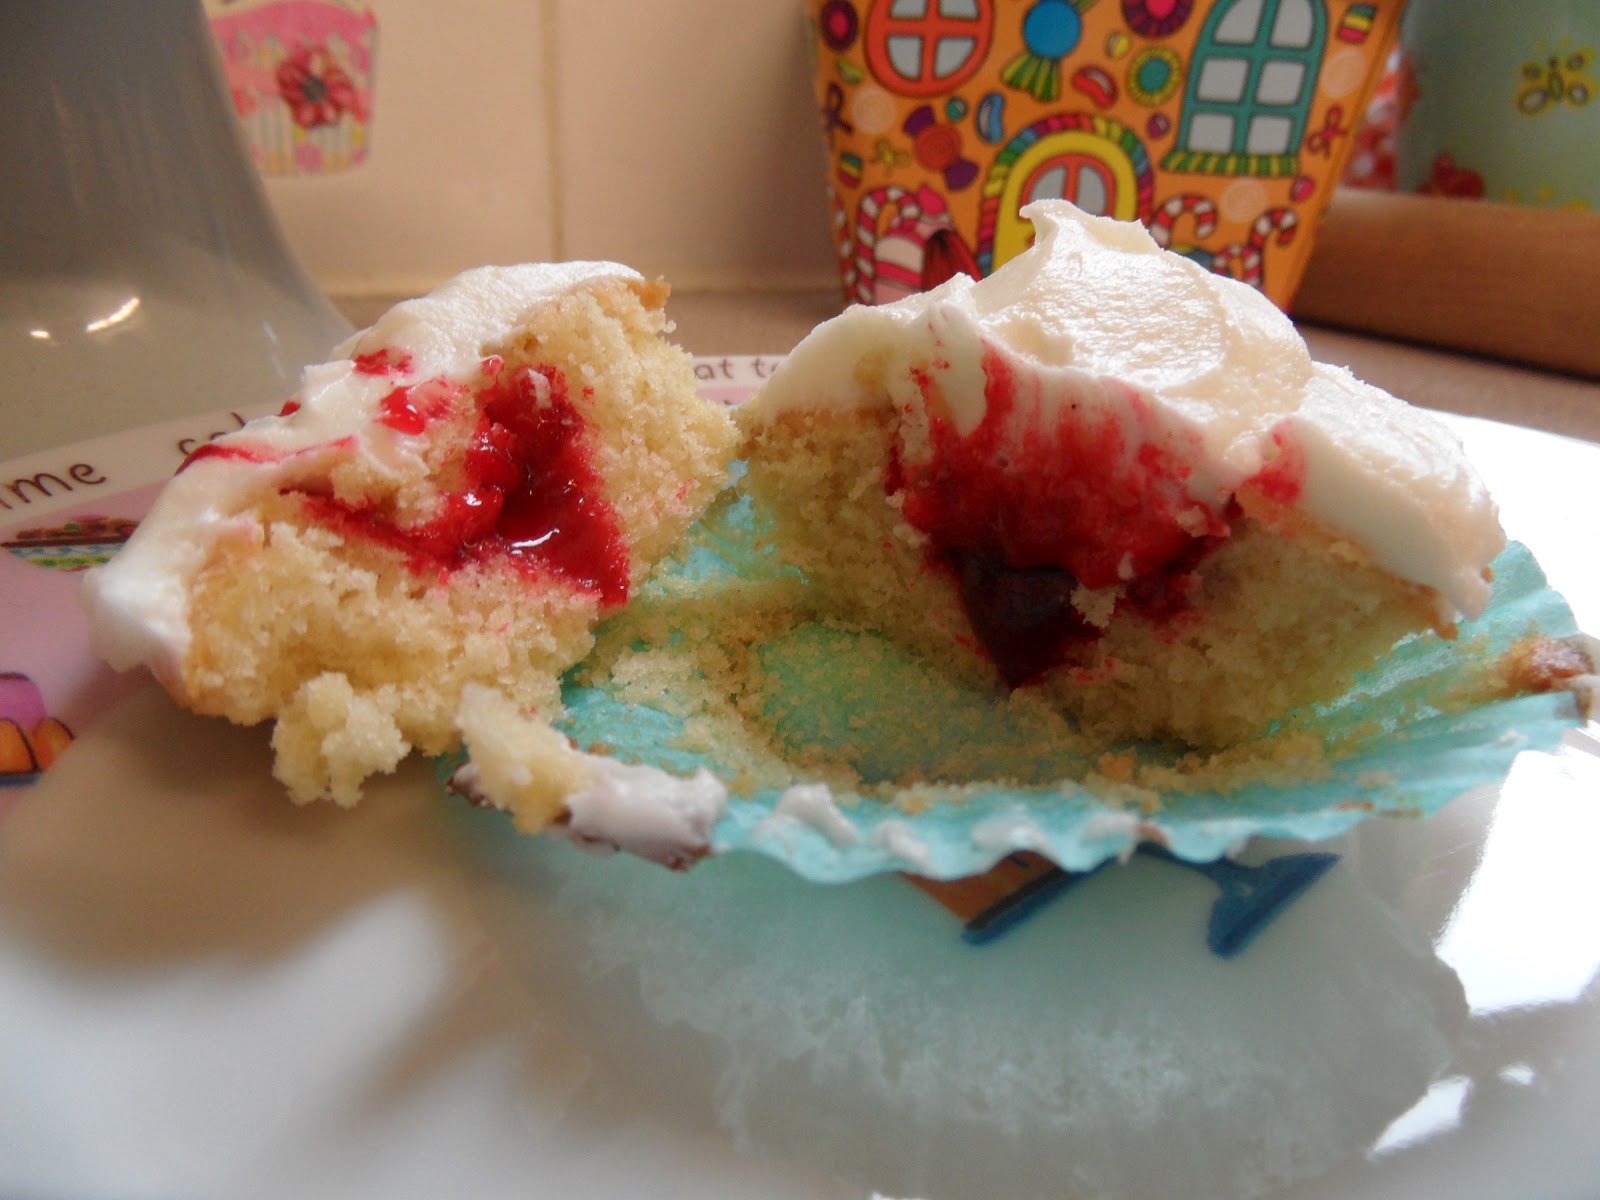
Vampire Bitten Cupcakes

Oh no! It looks like there's a vampire on the loose - and they have an incredibly sweet tooth!!


These vampire bitten cupcakes were another treat I created for Hoxton Street Monster Supplies' Monster Speed Dating event for Valentines this year, but, similar to the eyeball pops, they work just as well as a Halloween treat for humans! The gorgeous vanilla cupcakes are topped with a tasty, tangy cream cheese frosting, and filled with lots of yummy blood!


Just kidding - they're filled with strawberry jam. Honest.

Ingredients:

For the cupcakes:
100g margarine
100g caster sugar
1 medium egg
1tsp vanilla extract
1tbsp milk
100g self raising flour

For the frosting:
75g vegetable shortening (Trex)
100g cream cheese
350g icing sugar
A few drops of lemon juice or lemon flavouring

For the "blood":
60g strawberry jam
a few drops of red food colouring

Prep time: 20 minutes
Cook time: 15 - 20 minutes
Makes 12 cupcakes


  1. Preheat the oven to gas mark 5 and line a bun tray with cupcake cases.
  2. Beat together the margarine and caster sugar until smooth and creamy, then beat in the egg, vanilla extract and milk. Fold in the flour, the spoon the batter into the cupcake cases, filling each around 3/4 full.
  3. Bake for 15 - 20 minutes until golden brown on top and springy to touch, then place on a wire rack to cool completely.
  4. Meanwhile, prepare the cream cheese frosting. Beat the vegetable shortening until smooth and creamy, then fold in the remaining ingredients until just combined (cream cheese frosting has a habit of going really runny if you over beat it!) Pu this in the fridge until you are ready to use it.
  5. Cut a "core" out of each cupcake. Slice off (and eat, if you like!) most of the core you've cut out, but keep the top for later. Stir the red food colouring into the jam, and then fill each cupcake with a teaspoon on the very red jam. Replace the "lid" of the cupcake, then spread cream cheese frosting over the top.
  6. To decorate, dip a cocktail stick in to the very red jam and make two "blood" trails along the top of each cupcake. Poke the cocktail stick all the way into each cupcake at the top of the blood trails, to make puncture marks.


Happy Thoughts
x

Sunday, 8 July 2012

I Smell Of Strawberries

Well, it's been a little quiet around Princess and the Cake HQ of late, so I thought I'd do a little bit of explaining. You see, when we first started the Disney Pixar collection, we were working under the presumption that Brave would be released on June 22nd, and so our plan was to squeeze in all of the Disney Pixar films before then, and have a trip to the cinema to see Brave as our big finale. So June came along and we found ourselves with only three films remaining in the collection: Up, Toy Story 3 and Cars 2. It became a little tricky to schedule them in around everyone's holidays, but we found that if we did all three withing a 10 day period we could squeeze them in before going to see Brave - how exciting! 


However, we then found out that whilst Brave was being released on the 22nd June pretty much everywhere else in the world, we in the UK would have to wait until the 17th August. Whilst this is a little bit annoying - we want to see Brave!! - it left us with MUCH more time for the final three films, so we spread them out a bit. Hence the lack of posts recently!


Anyways, I'll post the recipe and photos for Up as soon as I can, and I'm baking Toy Story 3 as we speak, but by way of apology for getting a bit slack, here's a little teaser recipe to tide you over - the strawberry jam I'm using in my Toy Story 3 cupcakes.

The BEST Home-made Strawberry Jam

Prep time: 5 mins
Cook time: 45 - 60 mins
Make a large (approx. 450g) jar

Ingredients:
350g strawberries (British are best!)
400g Jam Sugar (sugar with added pectin)
75ml cold water

  1. Wash and hull the strawberries, then tip them into a blender. Pulse until a mostly smooth puree has formed, then pour this into a large, heavy-based saucepan.
  2. Add the sugar and water to the saucepan, then put onto a very low heat. Stir until all of the sugar has dissolved, then leave on the low heat until the jam reaches rolling simmer. (It's a good idea now to place a saucer into the freezer to use to test the set later on!) Allow the jam to simmer away, stirring occasionally, until the jam starts to thicken (about 45 minutes). I find that slow and steady wins the race with jam - yes, you could turn up the heat and reach a rolling simmer much faster, but you risk burning the strawberries and in my experience, the jam just doesn't taste as good.
  3. After 45 minutes, remove your testing saucer from the freezer, and pour a teaspoon of jam onto it. After 30 seconds your jam should be set - if so, pour the hot jam into a sterilised jar and leave to cool before placing in the fridge to set completely. If the jam isn't quite set yet, leave it to simmer for a little longer, and test again in 5 minute intervals.
All done!


Next time I'll post the photos and recipe for the candyfloss-flavoured cupcakes I made for Up, but until then,

Happy Thoughts
x

Wednesday, 29 June 2011

I Have a Big Head and Little Arms

Disney Classic # 47 - Meet the Robinsons


Note: I apologise for the quality of the photographs on this and the next post. My camera died and was sent in for repair so I was using my phone/Angel's phone camera. Sorry!
Meet the Robinsons was another of the Disney films released in the 2000s which I hadn't seen before, so it's not surprising it ended up being the last movie I came up with an idea for. And to be honest, I didn't really come up with the idea. How it happened:

Scene: My living room, Fantasia 2000 Disney Night, sitting drinking tea before the film starts.
Me: OK guys, before I start the film I really need your help. I've now got ideas for all but one of the films, but I cannot for the life of me think of a cake to make for Meet The Robinsons
Craig: I've not seen it...
Me: Neither have I!
Mike: What about a T-Rex cake?
Me: Is there a T-Rex in the film?
Mike and Angel: Yup
Me: OK, fantastic, T-Rex cake it is!


So, with a lot of help from Angel, I set out to build a t-rex out of Rice Krispies, marshmallows and chocolate! We started off by building a skeleton out of cake dowels, which we were very pleased with!


Unfortunately, the day that we were making this cake was the hottest day since records began* so our marshmallow krispie Dino body wouldn't stick to the skeleton or set!

* Not based on any actual records, but on the fact that it was so hot that we almost forgot we were in the UK and wonder when and how we'd reached Africa. Seriously... it was THAT hot.

So we moved on to plan number two - truffle-rex! The truffle initially worked MUCH better than the krispies, until we added the torso, which was much too heavy for the frame and our poor Dino went extinct once more.


So we decided to have one last attempt - again we turned to the Rice Krispies, but this time we ditched the skeleton and decided to mould/model each body part, wrap it in cling film and leave it in the fridge to set. Once all of our Dino-parts were completely set we would just construct them using cake wire and cocktail sticks and hey presto... we'd have our T-Rex!


And this one almost, almost worked. Our only problem was that once the firm Dino-parts left the fridge for 30 seconds, they completely melted and were firm no more...


Angel didn't know whether to laugh or cry


So when watching Meet the Robinsons we ate chocolate Rice Krispies chunks and truffles and sighed at our lack of dinosaur. I let out another sigh when I realised that had I watched the film before I could and would have made a PBJ based dessert... considering that's Lewis' thing.

Anyways, when it came to writing the blog (the day after our Dino-disaster) I decided that I didn't work so damn hard to find a dessert for every Disney Classic so far to then churn out a dessert-less post for number 47... so I decided to make some PBJ sandwiches - cake style! (Which would be served when we met to watch Bolt... a bit of a peanut-butter overload but tasty nonetheless!)

I decided to make Angel food cake for the sponge, as the colour and consistency looks more like bread than normal vanilla sponge, and used a recipe found here. The "jelly" part of my sandwich was a simple layer of mixed fruit jam, and I made peanut-butter frosting by using my standard butter-cream recipe, but substituting the butter for 1/2 peanut-butter and 1/2 shortening. (My rational for this was that peanut-butter is runnier than normal butter, but shortening is stiffer, so combining the two in theory should leave me with a similar consistency the butter-cream... it made sense in my head and worked in practise so all good!)

Prep time: 20 minutes
Cook time: 30 minutes
Serves: 10
Ingredients:

60g plain flour
190g caster sugar
6 medium egg whites
half teaspoon of cream of tartar
half teaspoon of vanilla extract
half teaspoon of lemon juice
2 tbsp mixed fruit jam
50g shortening
100g crunchy peanut butter
250g icing sugar
Milk, as required

  1. Preheat the oven to gas mark 5 and line a square baking pan with greaseproof paper (but do not grease!)
  2. Sift the flour into a bowl and stir in half of the sugar, set to one side.
  3. Using an electric mixer, beat the egg whites and cream of tartar until thick and fluffy. Add the remaining sugar to the egg white a little at a time, beating continuously until the mixture is glossy.
  4. Fold in the lemon juice, vanilla and flour mixture, then pour the mixture into the cake tin. Bake for 30 to 35 minutes until springy. Place on a wire rack to cool.
  5. Whilst cooling, prepare the peanut butter frosting. In a large bowl, beat together the shortening and peanut butter. Add the icing sugar and beat until combined, adding as much milk as required to reach the desired consistency.
  6. Once cooled, cut the cake in half down the middle. Spread the jam over one of the halves and place the other sponge half on top. Spread a generous amount of peanut butter frosting over the top of the cake, cut into fingers slices and serve!


Next time we're watching Bolt, and I'll be making some doggy biscuits!

Happy Thoughts
x