Showing posts with label strawberry. Show all posts

Sunday, 30 June 2013

Strawberry Frozen Yogurt

Apparently, it's tennis season, and that means that all bloggers are obliged to post at least one recipe which uses strawberries and or cream - so here's mine :-) Strictly, that's not true. The only reason I even know it's tennis season is because all of the foodie blogs I follow are posting yummy strawberry recipes all over the place. This frozen yogurt was actually made for the following reasons:
  • I needed a recipe to post for Ice-Cream Sunday, and
  • I had some yogurt I needed to use up, and
  • My housemate bought a huge punnet of strawberries and asked me to help him devour them


So, here's a super simple recipe for strawberry frozen yogurt! I made this one in my ice-cream machine, but you could also pop in in the freezer, if you're willing to take it out and whisk it every half an hour until it is the right consistency! The merringue pieces are optional, but delicious. Embrace the merringue, people.

Ingredients:
100g fresh strawberries
200g Greek yogurt
3tbsp caster sugar
3 mini meringue shells (plus extra to serve)

Prep time: 30 minutes
Serves: 2


  1. Prepare your ice-cream machine as per manufacturers instructions.  For me, this involves popping it in the freezer overnight.
  2. Remove the stalks from the strawberries and pop these into a blender. Wizz them into a puree.
  3. Pour the strawberry puree, yogurt and sugar into a bowl and mix until combined. cover the bowl with clingfilm and pop in the freezer for 15 minutes to chill (this stops it from freezing to the sides of your ice-cream machine. )
  4. Once chilled, get your machine running and pour the chilled yogurt in. Leave it running for around 10 minutes.
  5. Crumble the meringue shells into the frozen yogurt,  and let it continue to stir for another minute or so.
  6. Serve immediately.  Tennis is optional. 


Happy Thoughts
x

Friday, 19 October 2012

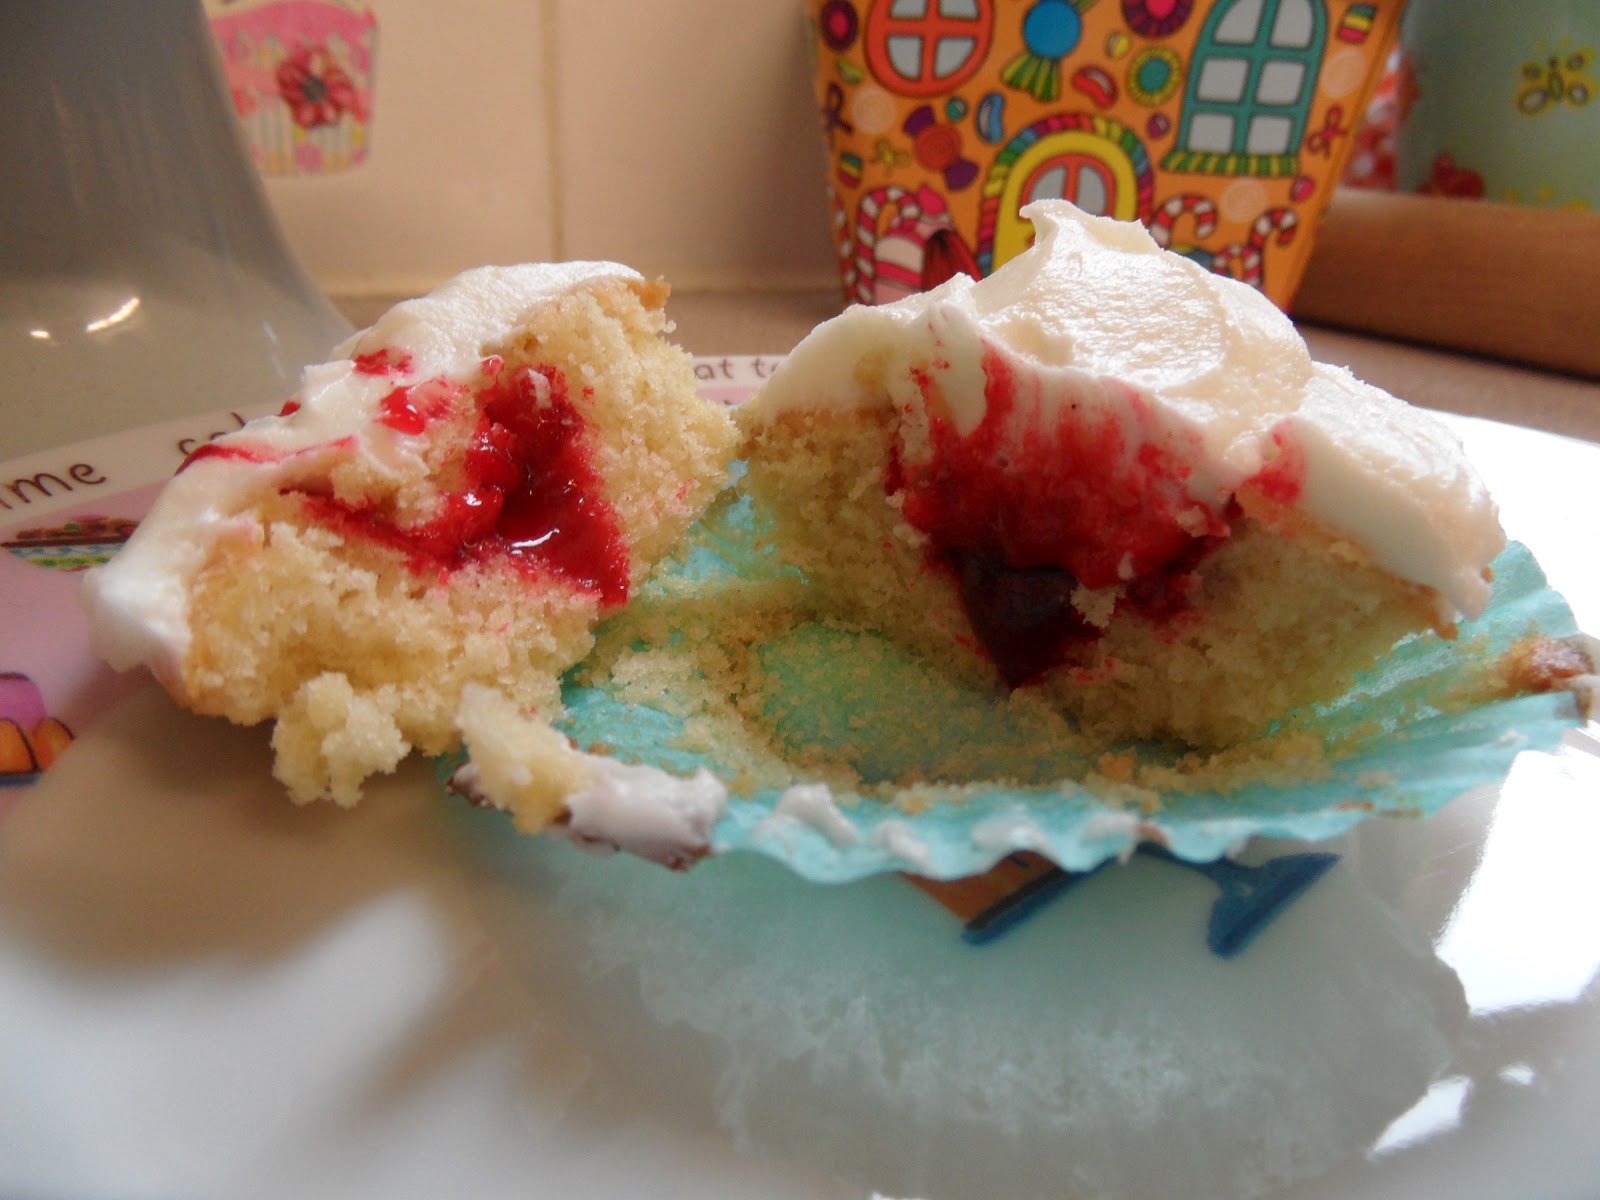
Vampire Bitten Cupcakes

Oh no! It looks like there's a vampire on the loose - and they have an incredibly sweet tooth!!


These vampire bitten cupcakes were another treat I created for Hoxton Street Monster Supplies' Monster Speed Dating event for Valentines this year, but, similar to the eyeball pops, they work just as well as a Halloween treat for humans! The gorgeous vanilla cupcakes are topped with a tasty, tangy cream cheese frosting, and filled with lots of yummy blood!


Just kidding - they're filled with strawberry jam. Honest.

Ingredients:

For the cupcakes:
100g margarine
100g caster sugar
1 medium egg
1tsp vanilla extract
1tbsp milk
100g self raising flour

For the frosting:
75g vegetable shortening (Trex)
100g cream cheese
350g icing sugar
A few drops of lemon juice or lemon flavouring

For the "blood":
60g strawberry jam
a few drops of red food colouring

Prep time: 20 minutes
Cook time: 15 - 20 minutes
Makes 12 cupcakes


  1. Preheat the oven to gas mark 5 and line a bun tray with cupcake cases.
  2. Beat together the margarine and caster sugar until smooth and creamy, then beat in the egg, vanilla extract and milk. Fold in the flour, the spoon the batter into the cupcake cases, filling each around 3/4 full.
  3. Bake for 15 - 20 minutes until golden brown on top and springy to touch, then place on a wire rack to cool completely.
  4. Meanwhile, prepare the cream cheese frosting. Beat the vegetable shortening until smooth and creamy, then fold in the remaining ingredients until just combined (cream cheese frosting has a habit of going really runny if you over beat it!) Pu this in the fridge until you are ready to use it.
  5. Cut a "core" out of each cupcake. Slice off (and eat, if you like!) most of the core you've cut out, but keep the top for later. Stir the red food colouring into the jam, and then fill each cupcake with a teaspoon on the very red jam. Replace the "lid" of the cupcake, then spread cream cheese frosting over the top.
  6. To decorate, dip a cocktail stick in to the very red jam and make two "blood" trails along the top of each cupcake. Poke the cocktail stick all the way into each cupcake at the top of the blood trails, to make puncture marks.


Happy Thoughts
x

Sunday, 29 July 2012

Spare Me Your Lies, Temptress! Your Emperor's Defeated, and I'm Immune to Your Bewitching Good Looks.

Disney Pixar # 11 - Toy Story 3


For the final instalment of the Toy Story Character Cupcakes, I was planning to make a whole bunch of the main crew... however, Angel suggested/requested that I make some strawberry flavoured Lotso cupcakes, and I couldn't very well say no! After all, everyone loves Lotso!


I actually have my own Lotso bear. He is over 2 years old now, but he stills smells like strawberries! I wanted to tap into that epic strawberry-ness, so I loaded my cupcakes full of them! Yum yum yum!

Prep time: 20 minutes
Cook time: 15-18 minutes
Makes 12 cupcakes

Ingredients:
For the cupcakes:
75g fresh strawberries
100g margarine
100g caster sugar
1 medium egg
100g self raising flour
1/2 tsp baking powder

For the filling:
150g home-made strawberry jam

For the icing:
150g butter
300g icing sugar
A few drops of strawberry flavouring
Pink and black food colouring


  1. Preheat the oven to gas mark 5 and line a bun tray with cupcake cases.
  2. Wash and hull the strawberries, then blend them into a puree.
  3. Beat together the margarine and the sugar until creamy. Beat in the egg and the strawberry puree until the mixture is light and fluffy, then fold in the flour and baking powder.
  4. Fill each cupcake case around 3/4 full, then bake for 15-18 minutes until the cakes are golden brown on top and springy to touch. Turn the cake out onto a wire rack to cool.
  5. One the cakes have cool, cut a circle out of each cupcake to create a well in the centre - keep the cut-out bits to one side. Fill each cupcake with 1tsp of strawberry jam, then place the "lids" back onto the cupcakes.
  6. To make the butter cream, beat together the butter and icing sugar until smooth and creamy. Add a few drops of strawberry flavouring, and a tiny bit of black food colouring and beat until you had a pale grey shade. Place the icing into a piping bag fitted with a star nozzle, then pipe a circle of grey into the middle of each cupcake. Pour all of the remaining icing back into the mixing bowl, then beat in a little pink food colouring, adding more until you reach the desired colour. Pipe this onto the cupcakes in a circle around the grey icing.
  7. Breathe in a big whiff of the strawberry goodness, then take a bite!


Next time it's the final instalment in the Disney Pixar collection so far: Cars 2!

Happy Thoughts
x

Sunday, 8 July 2012

I Smell Of Strawberries

Well, it's been a little quiet around Princess and the Cake HQ of late, so I thought I'd do a little bit of explaining. You see, when we first started the Disney Pixar collection, we were working under the presumption that Brave would be released on June 22nd, and so our plan was to squeeze in all of the Disney Pixar films before then, and have a trip to the cinema to see Brave as our big finale. So June came along and we found ourselves with only three films remaining in the collection: Up, Toy Story 3 and Cars 2. It became a little tricky to schedule them in around everyone's holidays, but we found that if we did all three withing a 10 day period we could squeeze them in before going to see Brave - how exciting! 


However, we then found out that whilst Brave was being released on the 22nd June pretty much everywhere else in the world, we in the UK would have to wait until the 17th August. Whilst this is a little bit annoying - we want to see Brave!! - it left us with MUCH more time for the final three films, so we spread them out a bit. Hence the lack of posts recently!


Anyways, I'll post the recipe and photos for Up as soon as I can, and I'm baking Toy Story 3 as we speak, but by way of apology for getting a bit slack, here's a little teaser recipe to tide you over - the strawberry jam I'm using in my Toy Story 3 cupcakes.

The BEST Home-made Strawberry Jam

Prep time: 5 mins
Cook time: 45 - 60 mins
Make a large (approx. 450g) jar

Ingredients:
350g strawberries (British are best!)
400g Jam Sugar (sugar with added pectin)
75ml cold water

  1. Wash and hull the strawberries, then tip them into a blender. Pulse until a mostly smooth puree has formed, then pour this into a large, heavy-based saucepan.
  2. Add the sugar and water to the saucepan, then put onto a very low heat. Stir until all of the sugar has dissolved, then leave on the low heat until the jam reaches rolling simmer. (It's a good idea now to place a saucer into the freezer to use to test the set later on!) Allow the jam to simmer away, stirring occasionally, until the jam starts to thicken (about 45 minutes). I find that slow and steady wins the race with jam - yes, you could turn up the heat and reach a rolling simmer much faster, but you risk burning the strawberries and in my experience, the jam just doesn't taste as good.
  3. After 45 minutes, remove your testing saucer from the freezer, and pour a teaspoon of jam onto it. After 30 seconds your jam should be set - if so, pour the hot jam into a sterilised jar and leave to cool before placing in the fridge to set completely. If the jam isn't quite set yet, leave it to simmer for a little longer, and test again in 5 minute intervals.
All done!


Next time I'll post the photos and recipe for the candyfloss-flavoured cupcakes I made for Up, but until then,

Happy Thoughts
x

Wednesday, 11 May 2011

I Didn't Even Eat Carrots!

Disney Classic # 40 - Atlantis


The idea for this cake came from the memory that I had of this film (which I hadn't watched in the years since it first came out!) and that memory was BLUE. I recalled the film having very blue-tones (not surprising considering it's based under water) but I also remembered the bright brilliant blue of the magic crystals that protected the Atlantians. So it was these bright blue magic crystals, the Heart of Atlantis, that I decided to recreate in cake form.


I decided that as I was basing the only decoration of these cakes on the Heart of Atlantis, that I'd let my friends decide on what flavour the cupcakes would be underneath all of the blue icing and glitter. They decided on strawberry, possibly the least "blue" flavour they could have come up with, but it sounded tasty all the same. I had a vague idea in my head of wanting to bake fresh strawberries into the middle of the cupcakes, but wasn't sure if this would work so I set to researching my recipe books. the recipe I ended up using was an amalgamation of the "Strawberry Jam Fairy Cakes" recipe in Peyton and Byrne's British Baking and the "Strawberry Cheesecake Muffins" recipe in BBC Good Food's 101 Cakes and Bakes. 


Prep time: 45 mins                  Cook time: 15 - 20 mins
Makes 12 cupcakes

Ingredients:

For the cupcakes:

100g margarine
125g caster sugar
2 medium eggs
150g self-raising flour
1 tsp vanilla extract
2 tbsp natural yogurt
50g strawberry jam
6 fresh strawberries

For the frosting:

200g unsalted butter
450g icing sugar
1 tsp milk
1 tsp vanilla extract
blue food colouring

For the decoration:

Black or brown liquorice laces
150g Fondant icing (white or blue)
Blue food colouring (if using white icing)
2 tbsp icing sugar
1 tbsp water
Blue edible glitter

Note: As these cupcakes contain fresh fruit they do not keep very well and are best eaten on the day of baking.
Tip: to save time you could make the decorations a few days in advance

  1. Preheat the oven to gas mark 3 and line a bun tray with cupcake cases
  2. Cream the butter and sugar together until pale and fluffy. Add the eggs one at a time, beating well after each addition. Sift in the flour and continue to beat until smooth and fluffy. Add the vanilla, yogurt and jam to the mixture and mix until just incorporated.
  3. Hull and halve the strawberries. Spoon 1 teaspoon of cake mixture into each cupcake case, and then place half a strawberry on each, pushing it down slightly. Cover each strawberry with another half teaspoon of cake mixture, until all of the mixture has been used up.
  4. Bake for 15-20 minutes, until the cakes are golden brown and springy to touch. Allow to cool on a wire rack.
  5. Meanwhile, prepare the butter cream and the decorations for the top of the cupcakes. To make the "Heart of Atlantis" gemstones: colour the fondant icing blue, and mould into the required shape (I made various different shapes and sizes... whatever you feel like!) Mix 2 tbsp of icing sugar with 1tbsp water to make an edible "glue". Tip the blue glitter onto a plate. Roll each gemstone into the "glue" then immediately roll it in the glitter. Leave to dry. Once they have dried, place them on the middle of a liquorice lace.
  6. To make the butter cream: beat together the butter, icing sugar and milk until soft and creamy. Add the vanilla extract and mix well. Separate the icing into three bowls. Leave one bowl of icing un-coloured, colour one a pale blue and colour the third a darker shade of blue. When putting the icing into your piping bag, put one colour down one side, one colour on the other side and the third colour in the middle.
  7. Once the cupcakes have sufficiently cooled, pipe icing onto them and then place the "Heart of Atlantis" decorations on top.
  8. Serve and enjoy!


Next time it's Lilo and Stitch - my favourite from this period, and I'll be making a pineapple upside-down pudding!

Happy Thoughts
x

Wednesday, 6 October 2010

15 Layers with Pink and Blue Forget-Me-Nots!

Disney Classic # 16 -  Sleeping Beauty


Ah me. So I had another disaster - but thankfully managed to avert this one!! Originally (and up until the day before baking/serving the cake) I had planned to try out my icing techniques and create a beautifully detailed cake. It was going to be vanilla sponge, covered in white fondant icing, and topped with an image of Sleeping Beauty and Prince Phillip. Around the sides of the cake I was going to ice and/or paint images of the three good fairies, of rose bushes and thorn bushes, and a fiery silhouette of Maleficent. It would have been lovely. However - I knew that I do not posses the drawing skills required to ice a picture of Aurora/Phillip straight onto the top of the cake (the ones on the side would be fine, as they are much smaller and require less detail) - so instead I decided to create a sort of topper, by tracing the image in royal icing. I traced two of these, as I couldn't decide whether I wanted Phillip in the picture, and also just in case one of them went wrong.


Well they both went wrong. The idea was that the royal icing would set, and I would be able to remove the greaseproof paper from underneath and gently place the applique/topper on top of my iced cake. However, after I finished tracing them it soon dawned on me that I had used a very very thin icing nozzle, and that would probably cause issues. I realised that the royal icing would be too long and thin to hold together, and that my toppers would probably crumble at my touch.

Whereas the fairies decide to use their magic to fix their wreck of a cake - for me that wasn't an option, so I decided to come up with a couple of back up plans. I'm clutching at straws ever so slightly, but I decided to base the cake around the scene where Briar Rose/Aurora goes out into the woods to collect berries - brilliant! Black forest gateaux!! Except that as it was very last minute I was unable to get hold of any cherries (my local shop doesn't sell them, the grocers is closed on Sundays and I didn't have time to go up to the major supermarket) so I used strawberries and raspberries instead. So it's sort of a forest berry cake - ish.

Originally I had hoped to stick to plan A and make the vanilla sponge iced lovely thing, but then I realised that I should try to handle the toppers as little as possible, which meant waiting until the cake was baked and iced before moving them, which meant I wouldn't know whether to make vanilla sponge or chocolate sponge until it was too late. Gah!! So plan B was to make the chocolate sponge, go out and buy the cherries (which ended up being strawberries and raspberries), and to place the topper on top of that (given that the topper worked...) Plan C was the same as plan B, but without the topper.

Well, coming to the end of my very long story about how we arrived at the cake we did - when I lifted the greaseproof paper from the baking sheet this happened:


So here's the recipe for plan C! Briar Rose's woodland berry* cake.

*do strawberries and raspberries even grow in woodlands? I don't know - but for the purpose of this cake, let's just pretend that when Briar Rose went out into the woods to pick berries, she picked up some strawberries and raspberries.

I've yet to come across the perfect recipe for chocolate cake. Don't get me wrong, I've never found a bad recipe for chocolate cake, I've just not come across a perfect one yet... so I'm still looking! This time round I based my cake on a recipe found here. The flavour of the chocolate cake was delicious - not too rich as some can be, but by no means not chocolate-y enough, as I've also come across before. However, the sponge was a little too crumbly for my liking, I would have preferred it to be much more moist, and the mixture did not seem to rise in the pan at all! Hence my search for the perfect chocolate cake recipe goes on... nevertheless this was a pretty tasty cake! (I'm just being extremely picky here - there were no complaints for the finished product, and everyone [except me, I was trying to be good] went back for a second slice!)

Prep time: 20mins Cook time: 25-30mins Serves: 14

Ingredients:

150g dark chocolate
30ml milk
150g margarine
150g caster sugar
3 medium eggs
150g plain flour
50g self raising flour
1 tsp baking powder
1/4 tsp bicarbonate of soda
2 tbsp cocoa powder
half a punnet of strawberries
half a punnet of raspberries
50g icing sugar
200ml double cream
white and milk chocolate, for decorating

  1. Preheat the oven to gas mark 4 and grease and line two baking tins (of the same size!)
  2. Break the chocolate into chunks and place this and the milk into a heatproof bowl over a pan of gently simmering water. Stir until the chocolate has completely melted and then place to one side to cool slightly.
  3. In a large bowl, beat together the margarine and caster sugar until pale and fluffy. Beat in the eggs, one at a time, and then fold in the chocolate mixture.
  4. Sift in the flour, cocoa powder, baking powder and bicarbonate of soda and continue to fold until all of the ingredients combine.
  5. Divide the mixture between the two tins and bake for around 25-30mins, until a skewer inserted into the centre of the cake comes out clean. Allow the cakes to rest for 5 minutes before removing them from their tins and leaving them to cool on a wire rack.
  6. Once the cakes have completely cooled, prepare the filling and topping. Set aside 2 strawberries and 3 raspberries for decoration. Hull and slice the the strawberries, and half the raspberries. Arrange the fruit on the bottom layer of the cake, completely covering.
  7. Whip together the double cream and icing sugar until it is thick and pillowy. Carefully spread this over the berries then place the second layer of cake on top of this.
  8. Melt a little white and a little milk chocolate and drizzle this over the cake to decorate. Place the strawberries and raspberries that were set to one side earlier in the centre of the cake.
  9. Cut into chunky slices and enjoy! (Due to the fruit/fresh cream in this cake it is best kept refrigerated and eaten the same day.)


Next time it's 101 Dalmatians, and I'll be making some chocolate chip cookies :-)

Happy Thoughts
x