Showing posts with label vanilla. Show all posts

Wednesday, 31 October 2012

Witches Hat Cake Pops

Happy Halloween! 


I know my usual blog-post-date is Friday, but as I couldn't let Halloween pass by without sharing my recipe for these cute little cake pops! Besides... a little bird could be heard to say that there will be a new regular(ish) Wednesday blog post coming your way in addition to the weekly Friday posts :-)


It may seem like I've been bitten with the Cake Pop bug (and there's probably some truth in that!), but I absolutely LOVE these Halloween Cake Pops. They are a simple vanilla cake with vanilla icing style cake pop, dipped in dark chocolate. The trickiest part of this recipe was getting the colour of the cakes to match the colour of the fondant icing! The witches hats can also be made a few days in advance, if that helps!


Ingredients:
For the witches hats:
30g orange coloured fondant
30g purple coloured fondant
30g green coloured fondant
A little edible glue

For the cake:
100g margarine
100g caster sugar
1 medium egg
1tsp vanilla extract
100g self raising flour
Orange, purple and green food colouring

For the icing:
75g butter
150g icing sugar
a few drops of vanilla extract
Milk, if required.

To decorate:
200g dark chocolate (you may end up with a little left over)
1tsp vegetable oil

Prep time: 40 minutes
Cook time: 15-20 minutes
Makes 15 cake pops

  1. Start by making your little witches hats, as you'll need to give these a little bit of time to dry. Starting with the orange icing, roll out to around 3mm thick and cut out five small circles (I used the wrong side on and icing nozzle for this). Gather the icing back together into a ball, and then tear chunks off to mould five small cones with your hands. Use a little of the edible glue to stick the cone to the circular base, and put to one side to dry. Repeat this step with the purple and green icing. Put the hats to one side to dry.
  2. Meanwhile, move on to the cake. Preheat the oven to gas mark 5 and line a bun tray with cupcakes cases.
  3. Cream together the margarine and sugar until light and fluffy, then beat in the egg and vanilla extract. Fold in the flour until the ingredients combined to create a smooth batter. Split the batter evenly between 3 bowls, and use the food colouring to create an orange, purple and green batter.
  4. Spoon the batter into the prepared cupcake cases and bake for 15-20 minutes,  until golden brown on top and springy to the touch. Allow the cakes to cool completely on a wire rack.
  5. Whilst the cakes are cooling, prepare your butter cream. Beat the butter, icing sugar and vanilla extract together until smooth and creamy, adding a little milk if necessary to achieve the desired consistency.
  6. Using one colour sponge at a time, take the cooled cupcakes out of their wrappers and break them into a blender. Pulse the cakes on a high speed to break them into fine crumbs. Once the cake is sufficiently crumbed, pour the crumbs into a bowl, then mix in a tbsp of the butter cream. Add more butter cream a little at a time until you get a mixture that holds together well without crumbling, but isn't too sloppy. 
  7. Now its time to get your hands dirty! First of all, line a baking tray with greaseproof paper, and make some space for that tray in your fridge or freezer. Measure out 30g portions of the cake mixture, then shape it into a ball with you hands and place this on the baking tray. Repeat steps 7 and 8 with the other two colour sponges. 
  8. Once you've turned all of your mixture into balls put these into the freezer for 20 minutes to set. You'll probably find that you have a small chunk of each different colour left over. You could mash this together to make a multicoloured cake pop, however, it's always best to just eat any leftover mixture :-)
  9. Melt your chocolate, either in the microwave or in a bowl over a pan of hot water. Once the chocolate has completely melted, stir in a teaspoon of vegetable oil to "thin down" the chocolate. Don't worry - you won't be able to taste the oil! 
  10. Take your tray of cake balls out of the freezer and place on your work surface next to the melted chocolate and your decorations. The cold cake will set the chocolate very quickly, so it's important to have everything you need to hand here as you will need to work fast!
  11. Dip a lollipop stick around 1cm into the chocolate and then push this into one of the cakey balls. The theory behind this is that the chocolate will help to stick the cake pop to the stick! Stick each cake pop with a lollipop stick in this way. By the time you've stuck all of the sticks, the first one you did should be set. 
  12. Dip each cake pop into the melted chocolate and give it a quick spin to coat evenly. Take the tap the cake pop on the side of the bowl to remove any excess chocolate, then put the cake pop, stick side first, into a polystyrene block. Whilst the chocolate is still sticky, press one of the fondant hats in the corresponding colour onto the cake pop. Repeat with all the pops and then leave to set. 

Cake pop tips:
Use a tall, thin receptacle for melting your chocolate, such as a mug or small bowl. If you use a wide bowl your chocolate will be too shallow for dipping!

When dipping, it's best to get your cake pop in and out of the warm chocolate as quickly as possible, as the temperature of the chocolate and the bowl/mug will melt your cake pop and make it fall off of it's stick. Don't worry too much about doing it, just go for it and it will work.

Line a baking tray with clingfilm, then pour any leftover chocolate onto it and put it in the fridge. Once set, you can break the chocolate into chunks and store in a food bag until next time. Note - this doesn't work so well if you drop cake in the chocolate or keep dipping your fingers/a spoon in!

Finally: Practise makes perfect!

Funny story - I put the 3 less fortunate looking pops (one in each colour) to one side to use as the ones I would slice into to show you the cross section. It didn't cross my mind at the time that the purple one with chocolate down the stick would still have chocolate down the stick after I'd chopped into it! So this, ladies and gents, is why it's important to tap off the excess chocolate! :-)


Happy Thoughts
x

Friday, 19 October 2012

Vampire Bitten Cupcakes

Oh no! It looks like there's a vampire on the loose - and they have an incredibly sweet tooth!!


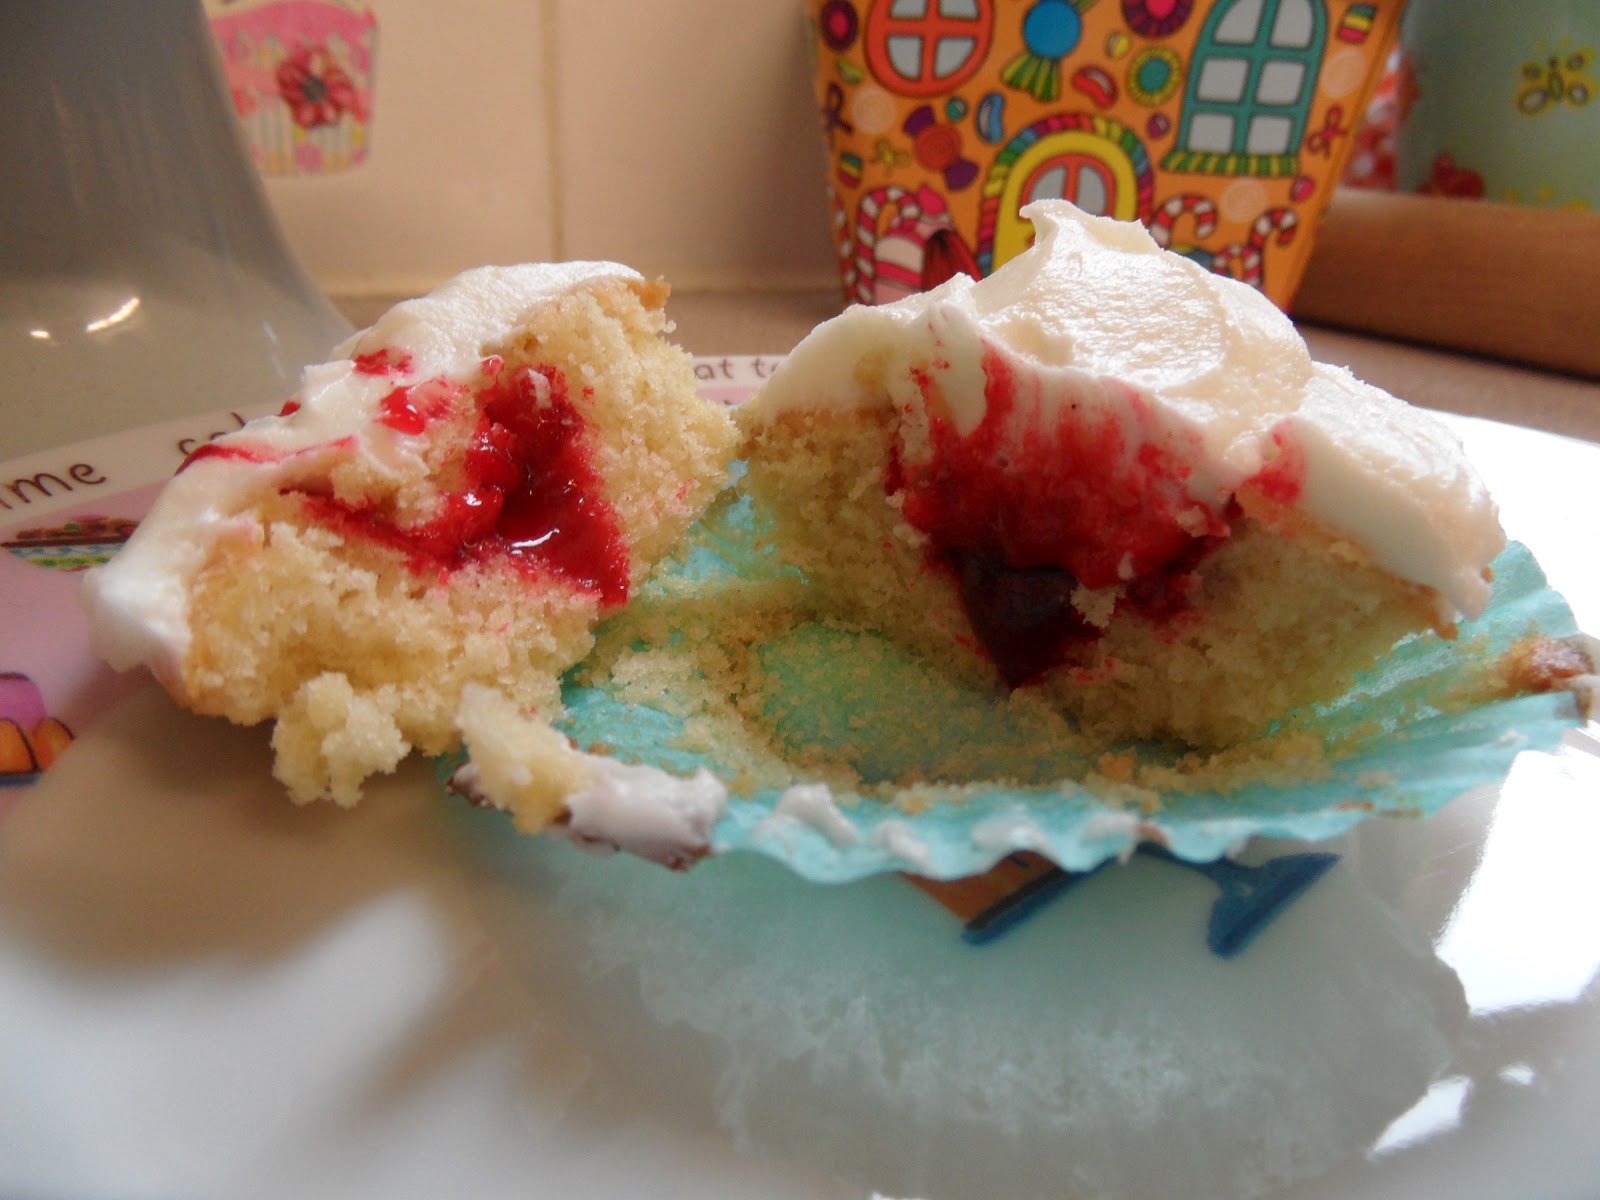
These vampire bitten cupcakes were another treat I created for Hoxton Street Monster Supplies' Monster Speed Dating event for Valentines this year, but, similar to the eyeball pops, they work just as well as a Halloween treat for humans! The gorgeous vanilla cupcakes are topped with a tasty, tangy cream cheese frosting, and filled with lots of yummy blood!


Just kidding - they're filled with strawberry jam. Honest.

Ingredients:

For the cupcakes:
100g margarine
100g caster sugar
1 medium egg
1tsp vanilla extract
1tbsp milk
100g self raising flour

For the frosting:
75g vegetable shortening (Trex)
100g cream cheese
350g icing sugar
A few drops of lemon juice or lemon flavouring

For the "blood":
60g strawberry jam
a few drops of red food colouring

Prep time: 20 minutes
Cook time: 15 - 20 minutes
Makes 12 cupcakes


  1. Preheat the oven to gas mark 5 and line a bun tray with cupcake cases.
  2. Beat together the margarine and caster sugar until smooth and creamy, then beat in the egg, vanilla extract and milk. Fold in the flour, the spoon the batter into the cupcake cases, filling each around 3/4 full.
  3. Bake for 15 - 20 minutes until golden brown on top and springy to touch, then place on a wire rack to cool completely.
  4. Meanwhile, prepare the cream cheese frosting. Beat the vegetable shortening until smooth and creamy, then fold in the remaining ingredients until just combined (cream cheese frosting has a habit of going really runny if you over beat it!) Pu this in the fridge until you are ready to use it.
  5. Cut a "core" out of each cupcake. Slice off (and eat, if you like!) most of the core you've cut out, but keep the top for later. Stir the red food colouring into the jam, and then fill each cupcake with a teaspoon on the very red jam. Replace the "lid" of the cupcake, then spread cream cheese frosting over the top.
  6. To decorate, dip a cocktail stick in to the very red jam and make two "blood" trails along the top of each cupcake. Poke the cocktail stick all the way into each cupcake at the top of the blood trails, to make puncture marks.


Happy Thoughts
x

Sunday, 14 October 2012

Eyeball Cakepops

I LOVE Halloween, it's one of my favourite times of year! My mum usually has a big Halloween party where we put up a gazebo in her back garden, spend a whole day turning it into a haunted house, spend another whole day making "scary" food, and then gather our weird and wonderful family and friends round in the costumes to enjoy it! Anyway, it's now mid-October, so I wanted the rest of the recipes I post in October to be Halloween themed - hopefully lots of treats and very few tricks!


The first of my Halloween inspired recipes is these eyeball cake pops, which weren't originally Halloween themed at all, in fact, they were made for Valentines Day. You see, one of my friends was doing an internship at the Hoxton Street Monster Supplies - London's only purveyor of quality goods for monsters of every kind. Part of Helen's responsibilities at HSMS was to look after the volunteers, and so she often put on social events for them to help them get to know one another better, but also to improve the human volunteers understanding of monsters, and vice verse. So, for Valentine's Day this year, Helen, another of the interns, Dee, and their monster colleague the Yeti decided to host a Monster Speed Dating event, and I was called in to do the catering. Below is the recipe for my "Eyes for You" cake pops, suitable for humans at Halloween, or for monsters at Valentines!

Ingredients:
For the cake:
100g margarine
100g caster sugar
1 medium egg
1tsp vanilla extract
100g self raising flour

For the icing:
50g butter
100g icing sugar
a few drops of vanilla extract
Milk, if required.

To decorate:
200g white chocolate
1tsp vegetable oil
50g coloured fondant (in the colour of your choice - I used half green and half blue, but it might look fun with more spooky colours!)
Black food colouring or a black edible ink pen

Prep time: 40 minutes
Cook time: 12-15 minutes
Makes 15 cake pops


  1. Start by making the cake. I usually bake cupcakes if I'm baking specifically for cake pops, as they tend to cook and cool faster than a large cake would. However, cake pops are also a great way to use any leftover cake or cake scraps, so just use whichever cake tin is your favourite - your cake will end up in crumbs anyway!
  2. Preheat the oven to gas mark 5 and line a bun tray with cupcakes cases.
  3. Cream together the margarine and sugar until light and fluffy, then beat in the egg and vanilla extract. Fold in the flour until the ingredients combined to create a smooth batter. Spoon the batter into the prepared cupcake cases and bake for 15-20 minutes,  until golden brown and springy to the touch. Allow the cakes to cool completely on a wire rack.
  4. Whilst the cakes are cooling, prepare your butter cream. Beat the butter, icing sugar and vanilla extract together until smooth and creamy, adding a little milk if necessary to achieve the desired consistency.
  5. Take the cooled cupcakes out of their wrappers and break them into a blender. Pulse the cakes on a high speed to break them into fine crumbs. One the cake is sufficiently crumbed, pour the crumbs into a large mixing bowl, then mix in half of the butter cream. Add more butter cream one tablespoon at a time until you get a mixture that holds together well without crumbling, but isn't too sloppy - you might not need to use all of the butter cream for this!
  6. Now its time to get your hands dirty! First of all, line a baking tray with greaseproof paper, and make some space for that tray in your fridge or freezer. Measure out 30g portions of the cake mixture, then shape it into a ball with you hands and place this on the baking tray. Once you've turned all of your mixture into balls put these into the freezer for 20 minutes to set. Eat any leftover mixture (a 15g cake ball is no good to anybody!)
  7. Meanwhile, prepare the decorations for the cake pops. Roll out the coloured fondant and cut out circles - I used the "wrong" side of a Wilton icing nozzle which seemed to be around the perfect size. Use the black food colouring / food colouring pen to draw on the pupil of the eye in the centre of your coloured fondant then put these to one side to dry.
  8. Melt your white chocolate, either in the microwave or in a bowl over a pan of hot water. Once the chocolate has completely melted, stir in a teaspoon of vegetable oil to "thin down" the chocolate. Don't worry - you won't be able to taste the oil! My tip here is to use a tall, thin receptacle for melting your chocolate, such as a mug or small bowl. If you use a wide bowl your chocolate will be too shallow for dipping!
  9. Take your tray of cake balls out of the freezer and place on your work surface next to the melted chocolate and your decorations. The cold cake will set the chocolate very quickly, so it's important to have everything you need to hand here as you will need to work fast!
  10. Dip a cocktail stick around 1.5cm into the chocolate and then push this into one of the cakey balls. The theory behind this is that the chocolate will help to stick the cake pop to the stick! Stick each cake pop with a cocktail stick in this way. By the time you've stuck all of the sticks, the first one you did should be set. 
  11. Dip each cake pop into the melted chocolate and give it a quick spin to coat evenly. Take the tap the cake pop on the side of the bowl to remove any excess chocolate, then put the cake pop, stick side first, into a polystyrene block. Whilst the chocolate is still sticky, press one of the fondant irises onto the cake pop. Repeat with all the pops and then leave to set. My tip for dipping is to get your cake pop in and out of the warm chocolate as quickly as possible, as the temperature of the chocolate and the bowl/mug will melt you r cake pop and make it fall off of it's stick. Don't worry too much about doing it, just go for it and it will work. And don't forget: Practise makes perfect!


Happy Thoughts
x

Wednesday, 13 June 2012

B is for Buy N Large, Your Very Best Friend

Disney Pixar # 9 - Wall-E


I think I mentioned in the last post that I'd found it particularly tricky to come up with an idea for Wall-E, but once I had that idea, it was a bloody good one! When struggling to come up with ideas for the films, I usually fall back on one of the following three options:
  1. Does any food feature in the film that could be replicated?
  2. Are there and themes or images in the film that can be played on?
  3. Where is it set?
Looking for food that featured in the film, I initially brushed this off - Wall-E is set in an almost post-apocalyptic future where the entire human race lives on a massive spaceship and takes all of their food in liquid form, how was I supposed to bake a liquid cake? When I later came back to this idea, I did a random google search for "cupcake shake" and found out that this was an ACTUAL THING THAT BURGER KING DID IN THE US! Cupcake flavoured milkshakes... now there's an idea.


I wasn't able to find a recipe for the Burger King cupcake shake, so I just made up my own. They were really, really tasty, but I don't even want to think about the sugar/fat/calorie content!

For the Cupcakes


Prep time: 15 minutes
Cook time: 12 - 15 minutes
Makes 10-12 cupcakes (in my usual cake pan I can get 12 cupcakes from this mixture, but in a new one I used this time which is smaller but deeper I only got 10!)

Ingredients:
100g margarine
100g caster sugar
1 egg
A few drops of vanilla essence (to taste)
1 tbsp milk
A few drops of yellow food colouring (optional)
100g self-raising flour

For the frosting:
75g butter
150g icing sugar
Vanilla essence (to taste)
Up to 2tbsp milk, as necessary
Multi-coloured sprinkles, to decorate


  1. Preheat the oven to gas mark 5 and line a bun tray with cupcake cases.
  2. Beat the butter and sugar together until creamy, then add the egg, vanilla essence, milk and food colouring (if using) and beat until combined. Fold the flour into the mixture, then divide the mixture amongst the prepared cupcakes cases.
  3. Bake for 12-15 minutes until golden brown and springy to touch. Transfer to a wire rack and allow to cool completely before frosting.
  4. Prepare the frosting by beating the butter, icing sugar and vanilla essence together in a large bowl until creamy. If you find your frosting is too stiff, add a little milk at a time until the desired consistency has been reached. 
  5. Once the cakes have cooled, place the frosting into a piping bag fitted with a star tip nozzle and pipe a large swirl onto the top of each cupcake. Decorate with sprinkles then serve. Tip: I LOVE!!! the Wilton 1M nozzle for piping cupcake swirls. Placing even pressure on the piping bag, start your swirl in the centre of the cupcake and pipe almost to the edge, then  - without releasing the pressure - bring your swirl back over itself and into the centre. (I'm not articulating this particularly well, so one day I may venture into video tutorials and post it here...!) 


For the Cupcake Shakes


Prep time: Less then 5 minutes
Cook time: None
Makes 1 Shake!

Ingredients:
2 cupcakes, frosting and all
100mls milk
3 scoops of vanilla ice cream
Sprinkles, to decorate


  1. Put the cupcakes, milk and 2 scoops of ice cream into the blender and whizz until smooth. Pour into a  cup and plop the final scoop of ice cream on top. Decorate with sprinkles and enjoy!


Next time it's Up!

Happy Thoughts
x

Friday, 30 March 2012

You Have Saved Our Lives, We Are Eternally Grateful!

Disney/Pixar # 3 - Toy Story 2


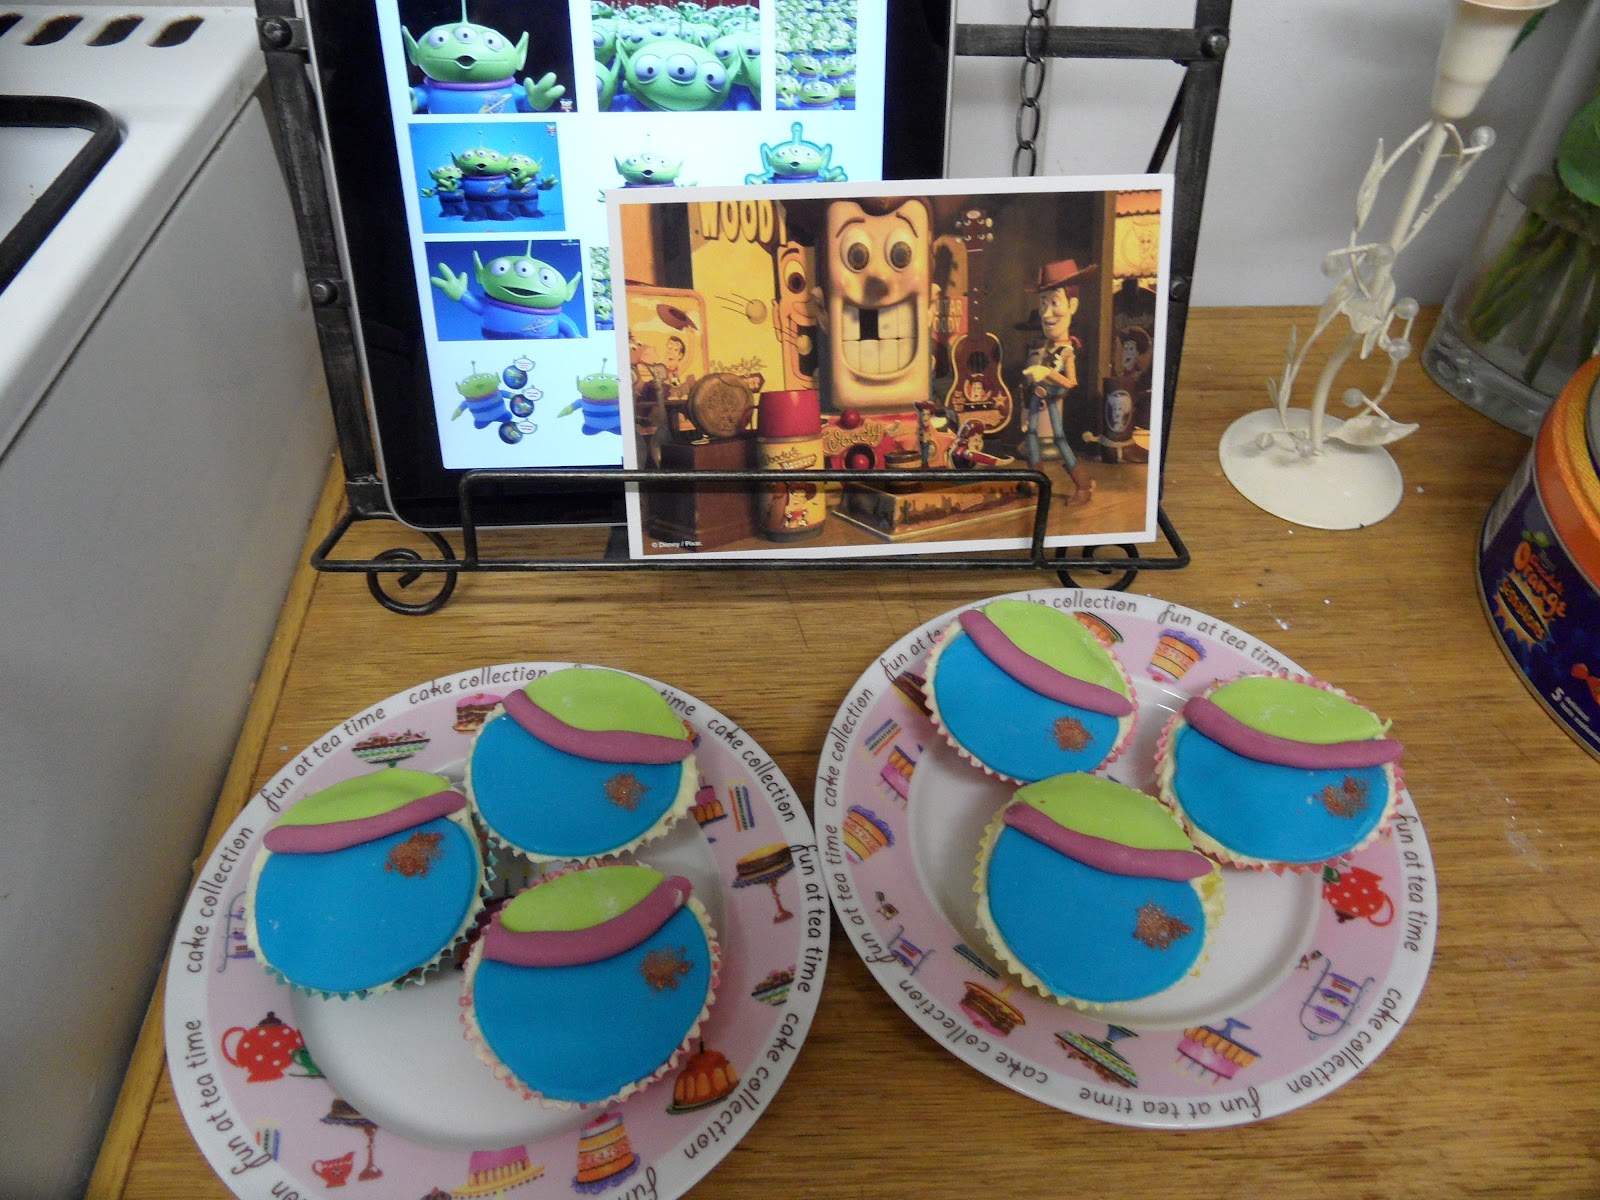
OK, so it's character costume cupcakes round 2! I was planning to make a couple of other characters this time, but unfortunately I ended up working late, running completely out of time and rushing to get these finished before everyone arrived; so I just made the little alien dudes. What I would say though, is if you're having a Toy Story themed party, these cupcakes are really quick and easy to make and go down a treat!

Image courtesy of FUCKYEAHTOYSTORY


Similar to Toy Story, I just made a vanilla cupcake with vanilla frosting as the base for these, putting the focus solely on the "costume" decoration.


Prep time: 15 minutes
Cook time: 12-15 minutes
Decoration time: 30 minutes
Makes 12 cupcakes (6 Woody and 6 Buzz)

Ingredients:

For the cupcakes:
100g margarine
100g caster sugar
1 medium egg
100g self raising flour
1tbsp milk
1tsp vanilla essence

For the butter cream:
50g margarine
100g icing sugar
a few drop of vanilla essence

For the decoration:
Some edible glue, or simple sugar syrup
Bronze shimmer dust
200g of fondant icing, coloured as per the photo below:


  • Preheat the oven to gas mark 5 and line a bun tray with cupcake cases. 
  • Beat the margarine and sugar together in a large bowl until creamy, then beat in the egg. Add in the flour and vanilla essence, then place a heaped teaspoon of the mixture into each cupcake case. Bake for 15-20 minutes, until golden brown and firm to touch.
  • Whilst the cupcakes are cooling, whip up your butter cream by placing the margarine, icing sugar and vanilla essence in a large bowl and beating until a smooth and creamy icing has formed. Place this to one side whilst you cut out your shapes.
  • Similar to Toy Story, I thought it would be easier to show you the shapes and assembly, rather than describe it, so here's a photo:


  • These ones were really quick and easy to put together, simple shapes to cut out and assemble, and to finish just a blob of bronze shimmer dust. (I didn't have time or patience to try to make the Saturn logo, and this seemed to do the trick!)
So there you have it, part two of the Toy Story trilogy - oooo0000000000000ooooooooooo.


Next up: Monsters, Inc.!

Happy Thoughts
x

Thursday, 12 August 2010

Make Mine Whoopies - Part 2

This is the recipe for the Vanilla Whoopie Pies I made for Make Mine Music. You can find my natter, ideas and reasoning for choosing whoopie pies, and the recipe for the Salted Peanut variety on the original post here. The recipe for the chocolate variety can be found here. I had originally posted all three together, but it made a mega long blogpost of doom which was not useful in any way, shape or form, so I decided to split them.


Besides, Make Mine Music is an anthology of shorts, so it makes sense for there to be an anthology of recipes for this Disney Classic. I couldn't have planned it better!


Note: this recipe called for 250ml Buttermilk. Unfortunately I couldn't get my hands on any buttermilk, so I made my own substitute using 250ml milk and 2 tbsp lemon juice. If you can get buttermilk it's probably best to use that! Also, I followed the recipe and decorated my vanilla whoopies with pink icing/sprinkles, but any colour would look just as well!

Ingredients:

For the cakes:

125g margarine
200g caster sugar
1 large egg
Few drops vanilla essence
450g plain flour
1/4 tsp bicarbonate of soda
1/2 tsp salt
250 ml buttermilk (or 250ml milk and 2 tbsp lemon juice)

For the Filling:

150g unsalted butter
250g icing sugar
pink food colouring
drop of vanilla essence

For the Topping:

150g icing sugar
warm water
Pink sprinkles/ hundreds and thousands to decorate
  1. If you are making the buttermilk substitute, start by preparing this, as it will take 30 minutes to 1 hour for the milk to curdle. Add the lemon juice to the milk and put to one side for at least 30 mins to thicken.
  2. Preheat the oven to gas mark 4 and line a baking tray with grease proof paper.
  3. In a large mixing bowl, cream together the margarine and sugar until light and fluffy. Add the beaten egg and the vanilla essence and beat until combined.
  4. Sift the flour, bicarbonate of soda and salt into a separate bowl. Gradually add spoonfuls of the flour mixture and spoonfuls of the buttermilk to the margarine mixture, mixing well each time to create a thick batter.
  5. Using two teaspoons to shape the batter into rough balls, dollop balls of the mixture onto the baking tray, leaving adequate space for the to expand. Bake in the preheated oven for around 10-12 minutes, until firm to touch.
  6. Leave the cake rounds on the baking tray to cool for 5 minutes before transferring to a wire wrack to cool completely. (Note: I couldn't fit all 24 rounds on one baking tray, so I did them 12 at a time.)
  7. Whilst the cake rounds are cooling, prepare the buttercream filling by placing the butter into a bowl and beating until soft. Add the icing sugar to this and continue to beat until combined. Mix in the vanilla essence and food colouring, until you reach the desired colour.
  8. Once the rounds are completely cooled, prepare your topping. Sift the icing sugar into a bowl and add a few drops of warm water. Keep adding warm water a few drops at a time until the icing reaches a thick but spreadable consistency. Spread the icing over the peaked side of half of the cake rounds and decorate with your sprinkles. (Tip: work quickly with the icing and the sprinkles, the icing dries quite quickly!)
  9. Spread a generous amount of the pink buttercream filling on the flat side of the other half of the cake rounds, then sandwich the rounds together to make your whoopies!

Happy Thoughts
x

Thursday, 20 May 2010

Dum da-dum da-dum da-dum-dum-dum-dum

Disney Classic # 3 – Fantasia


I drew inspiration from the concept of Fantasia for these cupcakes, rather than from any specific part in the film. I took the idea of combining sounds, colours and textures and tried to incorporate that into the cupcakes; using edible glitter, rainbow sprinkles and popping candy inside the cake! It was brilliant to watch the delight/surprise/horror on my friends’ faces as their cake started to make popping noises as they ate it – I wish I had filmed their expressions!

When facing the prospect of making Fantasia cupcakes I knew I just HAD to find a way to make my cupcakes musical (or at the very least noisy!), because quite frankly I’m certain that had he the capacity to do so, Walt Disney would have made Fantasia taste great.


Now this is where I normally cite my sources, but for these I don’t really have any! This recipe for vanilla cupcakes with vanilla butter-cream is ingrained into my brain – it’s the recipe my Mum taught me when we used to bake together back when I was a little Princess. Where it came from before that, I don’t know! For the “sorcerer’s apprentice” hat toppers, I used the recipe on the back of a pack of Tate and Lyle Royal Icing Sugar, but I’m sure any old royal icing recipe will do just as well!

 Prep time: Overnight        
Cook time: 15-20 mins           
Makes 12 cupcakes

 Ingredients:

For the hat toppers:
200g Royal Icing Sugar
10ml cool water
Navy food colouring
Black food colouring
White star shaped sprinkles

For the cupcakes:
200g Margarine
200g caster sugar
200g self raising flour
2 medium eggs
1 tsp vanilla essence
2tbsp multi-coloured sprinkles

For the buttercream:
150g unsalted butter
350g icing sugar
1 tbsp milk
drop of vanilla essence

To decorate:
30g popping candy
Edible glitter (I used Rainbow Dust in White Hologram)

TIP: It’s best to make the royal icing toppers the day before to give them plenty of time to set! Popping candy starts to pop on contact with moisture, so it’s best to finish the cupcakes as close to serving time as possible – the longer you leave the cupcakes between putting the popping candy in them and serving them, the less poppy they will be! I finished my cupcakes around 30 minutes before my guests arrived, and they were still very poppy. The cupcake that was leftover the next day only had very little “pop” left!
  1. Draw the outline of your toppers onto a sheet of greaseproof paper to create a template (I drew 16 Mickey Mouse hats). Turn the paper upside down and secure this (pen side down) onto a flat baking sheet. 
  2. In a large mixing bowl, whisk the royal icing sugar and the water with an electric mixer for 10-15 minutes, until it forms soft peaks. (When you lift the mixer out of the mixture this should like a peak which stands for at least 5 seconds.) Once the royal icing is ready, put 1/3 of it into a smaller bowl and colour this black. The remaining 2/3 of the icing should be coloured navy 
  3. Using the smallest nozzle on your piping bag, and using the templates you created earlier as a guide, pipe the royal icing onto the greaseproof paper, allowing each colour to set slightly before moving on to the next. Gently press the star sprinkles into place, and then put to one side to set, uncovered. 
  4. Nex, move on to the cupcakes. Preheat the oven to gas mark 5, and place some cupcake cases into a bun tray.
  5. Mix the margarine and the caster sugar in a bowl until creamy, then sift roughly half of the flour into the bowl, and fold this into the mixture. Add 1 egg to the mixture and beat until combined, then sift the remaining flour into the mixture and fold in. Add the final egg and beat until the mixture is well combined, then stir the vanilla essence and the sprinkles into the mixture. 
  6. Spoon the mixture into the cupcake cases (around 1 tbsp per cupcake) and bake until firm to touch. (approx 15 – 20 mins) Allow cupcakes to cool on a wire rack before decorating.
  7. Once the cupcakes are cool, carefully cut a circle out of the top of the cake (as if you were making butterfly cakes) and leave the cake and the top on the side to dry out a little whilst you make the buttercream. (The cupcake as a whole will still be very moist – it’s just that you need to dry out the parts that will be in contact with the popping candy, in the end you will have a moist sponge with a crunchy layer of popping candy and deliciously creamy buttercream!) 
  8. To make the buttercream; beat the butter, icing sugar, milk and vanilla essence in a large mixing bowl until smooth and creamy. Keep this in the fridge until it is needed. 
  9. Place about 1tsp of popping candy into the hole you made in each cupcake, and the put the top back on. 
  10. Cover the cupcakes with the buttercream, trying to disguise the raised centre. Place a topper onto each cupcake and sprinkle with a bit of edible glitter. Magic! 


Next time: Dumbo! I’ll be making some marshmallow krispie cakes inspired by the Pink Elephant sequence.

Happy thoughts
x