Showing posts with label lemon. Show all posts

Sunday, 16 March 2014

Lemon and Raspberry Loaf

The sun is shining, and my garden is filled with daffodils, so I wanted to make something light and delicious to celebrate the start of Spring: a lemon and raspberry tea loaf. The cake is light and fluffy with a subtle lemon flavour, topped with juicy, zingy raspberries. Perfect for a sunny afternoon tea!


Based on this recipe I found on Pinterest. I love Pinterest far too much. It has ALL the things.

Ingredients:
135ml sunflower oil
135ml milk
1 tsp vanilla exract
75ml lemon juice
2 eggs
250g self-raising flour
200g caster sugar
50g raspberries

Prep time: 5 minutes
Cook time: 1 hour
Serves: 10
  1.  Preheat the oven to 160 and line a loaf tin with baking paper.
  2. Pop all of the ingredients except the raspberries into a large mixing bowl and whisk until they come together to form a smooth batter.
  3. Pour the batter into the prepared loaf tin and pop into the oven, make sure to set a timer for 15 minutes. 
  4. After 15 minutes, quickly open the oven door and sprinkle the raspberries of the top of the loaf. This should mean that they don't sink too far into the cake, but instead rest nicely on the top where they will go soft and leave lots of yummy juices.
  5. Bake for a further 45 minutes, until golden brown on top (between the raspberries) and a skewer inserted into the centre of the cake comes out clean.
  6. Remove from the oven and allow to cool in the tin. Once cooled, cut into slices and serve with a cup of tea! (You could also serve with a dollop of clotted cream, if you're after a really indulgent spring-time treat!)

Happy Thoughts
x

Wednesday, 1 August 2012

Do Not Try the Free Pistachio Ice Cream!

Disney Pixar # 12 - Cars 2


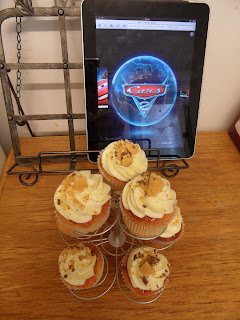
I struggled to find an idea I liked for Cars, and so finding an idea for Cars 2 - which I hadn't previously seen - was even harder. Except, in a way, it wasn't. When plotting what to bake, I kept coming back to the idea of making "lightning" flavoured cupcakes. But that was ridiculous - lightning doesn't even have a flavour! So for Cars I ended up using the lightning image to decorate the cupcakes, which was fine, but if I COULD make them taste like lightning, that would be amazing. So this time round I decided to just go with it. Let's be honest, since Cars things around Princess and the Cake HQ have hit new levels of ridiculous - from baking ratatouille ingredients into some cupcakes, to sticking other cupcakes in a blender after icing them with perfect swirls - and they turned out to be, put frankly, AWESOME. And that's how my lightning flavoured cupcakes were born.


I imagined lightning to taste mostly tangy, with a hint of spice and a hint of smokiness. I also asked my Facebook friends and Twitter followers what they thought. One friend suggested that lightning would be sour, like limes, whilst another suggested it would taste just like sherbet. So that's what I went to work with. I decided the tanginess and spiciness would come from lemon and sweet chili cupcakes. The lime and sherbet would form a fizzy, sour (but still tasty!) frosting, and that some crumbled up cinder-toffee would provide the right hint of smokey-ness as a topping. This edible experiment had massive potential to go wrong, but hey - this was the last Disney Pixar movie in the collection so far, so it was a case of now or never, really!

There a scene in the film where Mater goes up to a food stall and sees what he thinks is some really tasty looking pistachio ice-cream, only to taste it and have his bonnet blown off because it's actually wasabi. That's a little bit like eating these cupcakes; they look amazingly tasty, and then you take a bite... and it's not at all what you were expecting. I think this montage of Alex trying the first cupcake best relays how they tasted:


They weren't disgusting. They weren't even horrible. They just weren't quite right. we all spoke about it, and we think the sweet chili sauce is what contributes to the not right-ness of these cupcakes, and the couple I made without chili were actually quite tasty as lemon and lime cupcakes. My advice, if you're going to try this - leave out the sweet chili! Even though they didn't taste great, my lightning cupcakes were definitely shocking! hehehe...

Prep time: 15 minutes
Cook time: 15-18 minutes
Makes 18 cupcakes

Ingredients:

For the cupcakes:
200g margarine
200g caster sugar
2 large eggs
200g self raising flour
1tsp baking powder
zest and juice of 1 lemon

For the Chili Glaze (omit if you'd like these to taste good!)
4tbsp Sweet Chili Sauce

For the Icing:
200g butter
350g icing sugar
50g powdered sherbet (I used dib-dabs!)
Zest and juice of half a lime

Crushed cinder toffee to decorate


  1. Preheat the oven to gas mark 4 and line a bun tray with cupcake cases.
  2. Beat the margarine and sugar together until creamy, then beat in the eggs one at a time until the mixture is smooth and fluffy. Add the flour, baking powder, lemon zest and lemon juice to the bowl, and fold in until all the ingredients have combined to form a smooth batter.
  3. Fill each cupcakes case 3/4 full with batter, then bake for 15-18 minutes until golden brown and springy to touch. Remove from the tray and leave to cool on a wire wrack.
  4. Whilst the cupcakes are cooling, warm up the sweet chili sauce until it is runny, then spread a little over each cupcake. 
  5. Once the cake are completely cool, prepare your butter cream. Place the butter, icing sugar, sherbet, lime zest and lime juice into a bowl and beat until smooth and creamy. Pipe the icing onto the cupcakes in swirls, then sprinkle a little crushed cinder toffee on top.
  6. If you made yours cupcakes sans chili sauce, take a big bite and enjoy the citrussy goodness. If you decided to brave it and include the chili sauce, I'd suggest letting your friends try them first, and have a camera ready when you do ;-)


So, that's the end of the Disney Pixar Collection... for the time being! Brave is released later this month, so you'll only have a short wait between now and then to see what we do for it. Until then, my friends,


Happy Thoughts
x

Wednesday, 22 December 2010

Thank You, Dawson.

Disney Classic # 26 - Basil the Great Mouse Detective


I think my rationale for choosing to make a cheesecake for this movie is fairly obvious; Basil is a Mouse, and mice like cheese... Besides, it's nice to try different kinds of dessert rather than making a sponge cake each week. Plus I absolutely love cheesecake, and have gotten pretty good at making it over the years. You'll have to forgive my dodgy photos of this cake... for some reason I just couldn't get a good shot! We also didn't have the DVD case as I borrowed this from a friend who bought it round on USB, so I think once I own Basil on DVD I'll make another cheesecake and replace these photos.


I first came across this cheesecake recipe in school, when I did a project on incorporating more fruit into the diet for my GCSE Food Technology. Suffice it to say that was many years ago, (and my mini-apple cheesecakes did not go down so well...) but I've now perfected the recipe to produce a delicious lemon cheesecake. Unfortunately I no longer have the original hand out the recipe was given to me on, nor my own notes from my trials when using the recipe in the project. In fact, I generally just guestimate when I'm making cheesecake so I wasn't even sure on the measurements!! For the purpose of the blog, I weighed everything 1 used this time... I figured that would be more helpful than saying "a packet of biscuits" and "a bit of butter". ^_^
Prep time: 30 mins    Cook time: No cook but needs at least 2 hours to set     Serves: 8-10

Ingredients:
300g ginger biscuits
50g margarine
400ml double cream
400g cream cheese
200g icing sugar
2 tbsp lemon curd

  1. Line a loose based cake tin with greaseproof paper.
  2. Break the biscuits into a food processor and blend until fine crumbs. Melt the margarine in a saucepan over a low heat, then mix this into the biscuit crumbs. Tip the crumb mixture into the lined cake tin, and press down firmly with the back of a spoon, until all of the crumbs are compressed and completely flat. Place this base into the fridge to set whilst you prepare the cheese filling.
  3. In a large bowl, whisk the double cream to soft peak stage. Add the cream cheese, icing sugar and lemon curd and continue to whisk until the ingredients are well combined.
  4. Spoon the filling mixture onto the biscuit base and smooth the top. Place in the fridge to set for at least two hours - the longer the better though!
  5. To serve, carefully remove the cheesecake from the cake tin and cut into slices. 


Next time it's Oliver and Company, and I'll be making a yummy ginger cake for our little ginger protagonist.
Happy Thoughts
x


Wednesday, 22 September 2010

Second Star to the Right and Straight on 'Til Morning

Disney Classic # 14 - Peter Pan


Peter Pan was my littlest sister's favourite when she was littler - so I've been toying with the idea of making a Neverland Cake for some time. However, I figured a cakey model of Disney's Neverland complete with mountains and all might be a bit much for a Disney movie night (it would be huge and would take me days to make, and there would be far too much cake to be consumed by the 6-8 of us that are usually present!) However, I knew I wanted Neverland to be the basis of this week's cake, so after throwing a few ideas around I decided to make a map of Neverland. I also decided that I was getting a bit fed up of vanilla sponge, so Neverland would be lemon flavoured.


Again no references for this one, I just sort of made it up as I went along.

Ingredients:

300g ready to roll fondant icing
Various food colourings (especially blue, brown and yellow)
3 ice cream cornets
25g white chocolate
chocolate sprinkles
500g self-raising flour
500g margarine
500g caster sugar
4 large eggs
4tbsp lemon curd
2 tsp lemon juice
200g soft cheese
50g unsalted butter
250g icing sugar
star shaped sprinkles

  1. Preheat the oven to gas mark 4 and grease and line a large baking pan
  2. Cream together the margarine and sugar in a large bowl.  Sift in roughly 1/4 of the flour and fold this into the mixture. Add one egg and beat until combined. Repeat this process, adding a little flour and then an egg, until all of the flour and all of the eggs have been added to the mixture. Mix in 4tbsp of lemon curd and 2tsp lemon juice.
  3. Pour the mixture into the baking pan, being sure to spread it to the edges, and bake in the oven for 50 minutes, or until a skewer inserted into the centre of the cake comes out clean and dry.
  4. Whilst the cake is baking, prepare the decorations for the top of it (I've posted a close up picture of all of the fondant bits below, for reference):
    • For the map: colour 200g of the ready to roll icing with a little yellow and a little brown food colouring, to give the impression of old withered paper. Roll this out to be slightly smaller than the cake, and tear and curl the edges a little. Using brown and blue food colouring, paint on the details of the map (brown for land, blue for water.)
    • For the pirate's ship: colour a little of the fondant icing brown, and mold this into a "ship" shape (I did an oblong curled up at both ends). Using a cocktail stick dipped in brown food colouring, poke windows into the sides of the ship. Carefully trim down three cocktail sticks, and press a little white fondant onto each. Insert these into the ship to look like sails. (be sure to take the cocktail sticks out before serving!)
    • For the lost boys' tree house: colour a little fondant brown, and a little green, and mold these to look like a tree. Use a small amount of flesh coloured fondant to model two heads, and stick these to the tree with water.
    • For the mermaids: model a rock and two mermaids from various colours of fondant - using water to stick the pieces together. (My mermaids had no arms as they were so small they kept breaking! Wendy says "Those mermaids just tried to drowned me!" Peter laughs, and says, "Don't worry Wendy, they're armless!!" Haha!)
    • For skull rock: model the skull and two smaller rocks out of grey fondant. Paint the skull details on using black food colouring.
    • For the Indian village: trim the ends off of the three ice cream cornets. Melt the chocolate and use this to cover the cornets. Before the chocolate sets, stick chocolate sprinkles to the cornets to look like entrances to the teepee's. Flatten a tiny piece of brown fondant and dip this in water and then into the chocolate sprinkles, allow this to dry (these are the logs for the camp-fire). Using a little orange and a little yellow fondant, mold a flame shape and stick this to the "logs".
  5. When the cake is cooked, remove this from the oven and leave to cool in the pan for at last ten minutes. Remove from the pan and place on the serving board to continue to cool.
  6. Prepare the frosting. Melt the unsalted butter and set this to one side to cool. Place the soft cheese in a large bowl and sift in the icing sugar. Using an electric mixer and starting on a low speed, beat together the cheese and the sugar. Gradually increase the speed of the mixer. When the frosting has reached a smooth, thick consistency (after around 5 minutes) add the cooled melted butter and the remaining 2 tbsp lemon curd. Continue to beat for a further 2 minutes, then add enough blue food colouring to reach the desired colour. Store the frosting in the fridge until it is ready to use.
  7. Once the cake has completely cooled, spread the blue frosting all over it. Place the map on top, and arranged the "3D elements" on top of the map, using a little frosting to stick these into place if needed. Place the star sprinkles around the edges of the cake to give the impression of the night sky.
  8. Cut into slices and serve!


Next time we're watching Lady and the Tramp, and I'll be making some savory looking spaghetti and meatball cupcakes!

Happy Thoughts
x