Saturday, 27 April 2013

Nutella Ice Cream

It's ice cream Sunday! I'm going to start by apologising if there are a few more spelling,  grammatical and formatting errors than usual on this post. This is the first post I'm sending from my phone! Ironically, I'm currently away at a Fitness Fiesta weekend, and didn't have time to type this recipe before I left so I'm doing it on my phone between classes! 

My little sister bought me an ice cream maker for my birthday, and as means of thanks I told her I would make any flavour ice cream she wanted. Her favourite ever ice cream was a Nutella ice cream, complete with hazelnut pieces, which she had in Las Vegas a  year ago... so that's what I set out to recreate! Thank fully,  my version got the seal of approval from Ray - it was delicious, and very easy to make!
I've given the times below as an indication, but each machine is different so please refer to the instructions on your ice cream machine. 

Ingredients:
350g Nutella
410ml evaporated milk
3tbsp chopped hazlenuts

Prep time: 45 minutes
Serves: 6 - 8

1. Make sure your ice cream maker is ready in advance... for me this means putting the bowl in the freezer the night before.
2. Tip the Nutella and the evaporated milk  into a bowl and whisk until the  Nutella dissolves into the milk to form a smooth, silky mixture. Pop this in the fridge for 15 or so minutes to chill.
3. Get your ice cream machine ready, set it going then carefully pour your nutella milk into the machine. Leabe it going for around 10 minutes, then add the chopped hazlenuts. Allow the machine to run until the ice cream is at a soft serve consistency (for me this was around another 10 minutes)
4. Serve, smile, and try to convince your friends/family that they *really* wouldn't like it! (More for you!)

Happy thoughts x

Friday, 26 April 2013

Chicken, Bacon and Leek Pie

Just after I moved house and finished unpacking I had a real hankering for pie, so whipped up this tasty treat. I don't usually post savoury recipes to the blog, but this IS a bake so I thought it would be good to share.


This pie is fairly quick and very simple, and have I mentioned yet that it's really tasty? It's really tasty. The photos really don't do this justice! I cheated and used ready-to-roll pastry, but you guys already know that pastry is my baking weakness, right!? One day I will have a go at making my own puff pastry, and you'll be the first to know when I do, but for now, ready-to-roll works perfectly.

Ingredients: 
1 large chicken breast
2 rashers of bacon
half a leek
1 tbsp vegetable oil
3 tsps cornflour
150ml chicken stock
Pinch of black pepper
1/2 packet of ready to roll puff pastry

Prep time: 15 minutes
Cook time: 30 minutes
Serves: 2

  1. Pre-heat the oven to gas mark 5 (approx 190 degrees) and take your pastry out of the fridge.
  2. Chop the chicken and bacon into chunks, and finely slice the leek.
  3. Heat the vegetable oil in a frying pan and stir fry the chicken until slightly golden, add the bacon and leek to the frying pan, stirring until the bacon is cooked and the leek has softened. Add the cornflour to the pan and stir well to coat all of the pieces. Slowly stir in the chicken stock, then allow the mixture to simmer for 5 minute until it reduces and thickens. Season with the pepper then pour this into a pie dish.
  4. Roll out the pastry to around 6mm thick, then lay this over the top of the pie filling, tucking in the edges to seal. Cut two slits in the top to allow the steam to escape, then brush with a little milk.
  5. Bake for 30 minutes, until golden brown and crispy on top. All the pie to cool for a few minutes before serving (I had mine with mash, roast carrots and parsnips, and minted green beans. It was gooood!)


Happy Thoughts
x

Friday, 19 April 2013

Banoffee Blondies


I had some leftover caramel and some overripe bananas to use up, so decided to have a little go at making some banoffee blondies, and so glad I did!


Prep time: 15 minutes
Bake time: 40 minutes baking
Makes 16 slices


Ingredients

150g margarine
250g soft brown sugar
150g caramel (I used some left-over, but you could just use caramel from a tin!)
2 ripe bananas
2 medium eggs
200g self raising flour
Milk chocolate shapes, for decoration

  1. Preheat the oven to gas mark 4 and line a square baking pan with grease-proof paper.
  2. Place the margarine and sugar into a saucepan over a low heat, stirring continuously until the butter has melted and the sugar has dissolved. 
  3. Remove the pan from the heat then stir in 100g of the caramel until it has all melted. Leave the mixture to cool slightly whilst you peel and chop the bananas into small chunks.
  4. Add the eggs into the cooled mixture, then fold in the flour and bananas. Tip the mixture into the prepared baking tin and spread to the corners with the back of a spoon. Blob bits of the remaining caramel all over the top of the blondie, then sprinkle the milk chocolate shapes over the top. Bake for 40 minutes until golden brown and set.
  5. Remove from the oven and allow to cool slightly before cutting into slices. (Be sure to eat at least one slice whilst it's still warm!)
Happy Thoughts,
x

Tuesday, 16 April 2013

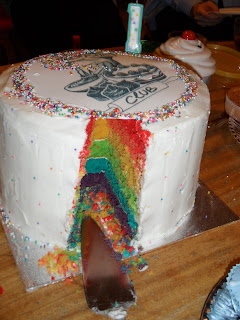
The Massive Rainbow Birthday Cake (of doom!!)

Cake'n'Bake Recipe? But it's a Tuesday! Well, yes. But I ran out of time to post this one last November, and today is actually my birthday, so I thought it would be a good idea to post it today.


I made this birthday cake for Cake'n'Bake Club's first birthday party in November 2012 - the theme being "Birthday Party". I knew I wanted to do a rainbow cake, mostly because I love making rainbow cake and hadn't done one in ages, but also because I'd made a rainbow cake for our first ever meeting a year before, and it seemed fitting. So I had my heart set on making a rainbow cake, but this time with the Cake'n'Bake Club logo on the top. That's kind of where it all went a bit wrong. You see, the topper I ordered was too wide to fit on top of a cake in the 6" cake pan I was planning to use. (Schoolboy error!) So I had the use a bigger cake tin. Normally, this wouldn't be a problem, as I'd just make the cake shorter by doing less layers to compensate for it being wider. But this was a RAINBOW cake, so I couldn't get rid of a layer, because then it wouldn't be a rainbow. I mean I already merged Indigo and Violet into simply "purple" - I don't think I could get away with loosing more colours!

So I made 6 layers of cake in my 9" cake tine, and covered it all in frosting, and sprinkles, and my edible icing with the Cake'n'Bake logo on it.

This one slice fed 5 people. Not joking.
In the end it was 8" tall, 9" wide, and weighed 9lbs. If you fancy making a 9lb giant birthday cake of doom, the recipe and quantities are below. If you'd like to make a smaller one (the 6" pan) use 100g of margarine, sugar and flour and 1 egg per layer.

Ingredients:

for the cake:
900g margarine (no joke)
900g caster sugar
9 medium sized eggs
150ml milk
900g self raising flour
3 tbsp vanilla extract
Food colouring in red, orange, yellow, green, blue and purple

for the icing:
500g vegetable shortening (Trex)
1kg icing sugar (still not joking!!)
2 tbsp vanilla extract

to decorate:
hundreds and thousands of hundred and thousands
an edible cake topper of your choice (optional)

  1.  Preheat the oven to gas mark 5, and grease and line two baking tins. 
  2. Unless you're using your kitchen sink as a mixing bowl, you're probably going to want to make this in batches. I made my batter in three batches, splitting each batch into two layers of cake. 
  3. Start off by beating 300g margarine with 300g caster sugar in a large mixing bowl until light and creamy. Beat in three of the eggs, one at a time, followed by 50mls of the milk and 1tbsp of the vanilla extract. By the time you've beat all that in, your mixture should be light and fluffy.
  4. Measure out 300g of the flour, then fold this into the cake batter a little at a time, until the ingredients combine to form a smooth batter. Scoop half of the batter into a separate bowl, and use the food colourings to create a red batter and an orange batter. I always start with red as it's the worst colour to mix. If you don't use enough blue or green colouring, you just end up with light blue or light green. If you don't use enough red food colouring, you don't get light red. Oh no, my friend. You get pink. So you need to use a fair amount of red food colouring to get a red sponge. Don't forget though, that the colours will be more vibrant and a little darker once baked.
  5. Pour the batters into the prepared cake tins, and bake for 25-30 minutes until firm but spongy to touch. Allow the cakes to cool in their tins for 5 minutes before turning out onto a wire rack to cool completely.
  6. Repeat steps 4 and 5 to create your yellow, green, blue and purple layers. (Optional extra: make yourself a cup of tea and try to figure out how you're going to get this massive hunk of cakey goodness from your kitchen to the venue!!)
  7. Once all the layers are baked and cooled, mix up your frosting by beating the shortening and icing sugar together. I used an electric mixer for this to save time.
  8. Place your purple layer onto your serving plate, and spread a thin layer (roughly 1 tbsp) of the frosting over the top of this. Place your blue layer on top of this and repeat. Repeat also with the green, yellow, orange and red layers.
  9. Once all of your layers are stacked, crumb coat the cake. A crumb coat is a thin layer of icing that goes onto your cake and is left to set before you put your actual icing on. It's like cake underpants. Crumb coating is a very good idea when making rainbow cake, as one of the purposes of a crumb coat is to stick the crumbs to the cake so they don't get into your outer layer of frosting. Rainbow cake crumbs stand out against white icing, so crumb coating is good. Plus it's fun to say: crumb coat. Anyways... once you've covered your cake in a thin layer of frosting, pop it into the fridge for an hour or so to allow the crumb coat to set completely.
  10. Once the crumb coat has set, ice your cake with the remaining white icing. Top your cake with the edible topper, and use sprinkles to hide the seam between the cake topper and your frosting. I also poked sprinkles into the side of my cake to look like polka dots. I'm not really sure why I did that, it was just a whim. I thought it looked pretty at any rate.
  11. Invite that guy from Man VS Food over, promising him a t-shirt and eternal glory if he can eat the whole thing in 45 minutes. Alternatively, share the cake with lots of friends and family, and lots of tea! 


Happy Thoughts
x

Friday, 12 April 2013

Spiced Tomato and Caramelised Onion Chutney

OK, so strictly speaking this isn't a cake, bake or dessert... but have you even known me to be particularly strict? Back in October 2012 I was visiting my parents, and as it was a nice day we decided to go have a look around some farm shops in Derbyshire. In one of these farm shops, we found a selection of THE most delicious chutneys I have ever tasted - my favourite being the Spicy Tomato and Caramelised Onion Chutney. Yum, yum, yum.

Anyway, the chutney soon ran into short supply, and we couldn't very well go all the way back to the farm shop in Derbyshire for some more, and since preserving was my "new thing to learn" in 2012, I decided to have a go at making my own based on the ingredients on the back of the jar of chutney.


I've got to be honest, it's not as easy as I thought it would be, especially when it came to working out the quantities (tomatoes, 44%...). I was also unable to get hold of all of the ingredients on the back of the jar, so some get left out, and I added in a few of my own! The tomato skins presented somewhat of a problem - I wasn't sure whether to peel the tomatoes first, or whether to leave the skins on. I decided to leave the skins on, as peeling 750g of small tomatoes really didn't appeal to me. What I found happened was that the skins floated off the tomatoes as they cooked, so I was able to fish most of the skins out. I maintain that fishing out the tomato skins is easier and less time consuming than peeling them beforehand, but if I ever find a more suitable method, I'll update this post!

Ingredients:
2 medium onions
1tbsp butter
2tbsp light brown sugar
2 cloves of garlic
1 tsp mustard seeds
2 tsp whole cumin seeds
1 tsp fennel seeds
250g on-the-vine cherry tomatatoes
500g baby plum tomatoes
350g distilled malt vinegar
250g preserving sugar
2tbsp tomato puree
6 cardamom pods
2 bay leaves


Prep time: 15 minutes
Cook time: 50 minutes
Makes 4 medium jars (approx 275g per jar)

  1. Slice the onions into very thin strips. 
  2. In a large, heavy-based saucepan, melt the butter and sugar on a low heat. Add the onions and stir to coat. Fry for 5 minutes until the onions are tender and starting to brown.
  3. Meanwhile, peel and finely slice the garlic. When the onion is brown, add the garlic, mustard seeds, cumin seeds and fennel seeds to the pan and stir fry for 1-2 minutes to release the fragrance of the spices.
  4. Halve the tomatoes and add these to the pan along with the vinegar and the sugar. Stir until the sugar has dissolved. 
  5. Stir in the tomato puree, cardamom pods and bay leaves, then allow the mixture to come slowly to a steady simmer for 30 minutes, stirring occasionally to prevent the chutney catching on the bottom. I always find with preserving it's better to cook your jam or chutney on a low heat for a longer amount of time than to cook it on a high heat for a short amount of time - it's probably just a preference, but it works for me!
  6. After 30 minutes, CAREFULLY remove any straggly tomato skins from the chutney with a pair of tongs. Stir the mixture well and then allow to simmer for a further 15 minutes.
  7. Meanwhile, sterilise your jars and lids by first washing them in warm soapy water, then rinsing them with hot water, and then baking them in a warm oven until all of the water has completely dried.
  8. The chutney is ready to jar when the mixture has thickened and most of the tomatoes have dissolved (don't worry if you still have a few tomato lumps - it adds texture!) Fish the cardamom and bay leaves out of your chutney, then carefully spoon the chutney into the sterilised jars. Put the lids on the jars tightly, then put to one side to cool. Once cool, store in the fridge for at least a week before eating to allow the flavours to infuse. Once opened, eat within 3 months.


Happy Thoughts
x

Wednesday, 10 April 2013

Cake'n'Bake Wednesday: Carrot Cake

Back in April 2012 Baking Mad got in touch about an Easter baking competition they were running: Bakers had to create an Easter recipe and post it on their blog with pictures, and then email Baking Mad with the link. Baking Mad would choose their favourite to win a half day workshop with Eric Lanlard. (Que Oooooooooohs!) Unfortunately, as we all share a blog for Cake'n'Bake Club, we were only allowed one entry, so we ran an in-club competition to see who would be our entry to the Baking Mad competition (...still following!?)

Anyway, this was my entry to the Easter Competition. Originally I attempted to make some stuffed bread rolls in the shape of bunnies, but unfortunately they didn't turn out too well so I ended up with only 2 hours to make whatever I could using ingredients I had in the house. Luckily for me I had an abundance of carrots in! My Easter bake is a deliciously moist carrot cake covered in a sweet yet tangy cream cheese frosting.


Ingredients:

For the cake:
2 large carrots (roughly 200g grated weight)
200g self raising flour
150g soft light brown sugar
50g chopped macadamia nuts
2 large eggs
1tbsp lemon curd
1tsp mixed spice
100ml vegetable oil

For the icing:
100g soft cream cheese
50g unsalted butter
50g vegetable shortening
300g icing sugar
1tbsp lemon curd

Prep Time: 10 minutes
Cook time: 45-50 minutes
Makes 12 slices

  1. Preheat the oven to gas mark 4 and grease and line a 7" baking tin.
  2. Grate the carrot into a large bowl, then add in all of the other ingredients and stir until combined. Pour into the prepared tin and bake for 45-50 minutes, until a skewer inserted into the centre comes out clean. Leave the cake to cool in the tin for a few minutes before turning out onto a wire wrack to cool completely.
  3. To make the icing, beat together to cream cheese, butter and shortening until smooth, then stir in the icing sugar and lemon curd until just mixed in - over beating here will make the icing too runny.
  4. Once the cake has completely cooled, spread the icing over the top and sides using a pallet knife. 


Happy Thoughts
x

Wednesday, 3 April 2013

Cake'n'Bake Wednesday: Lamb and Apple Pie

April 2012 was Easter themed for Cake'n'Bake Club, and I wanted to have a bash at something savoury.  I've always been a bit rubbish at pastry, so thought I'd take the opportunity to get in some practise with a yummy pie. The recipe is based on The Hairy Bikers' Gloucester Squab Pie


Ingredients:

For the filling:

450g diced lamb
2tbsp plain flour
1-2 tbsp vegetable oil
1 medium onion
650ml hot lamb stock
1/2 tsp mixed spice
salt and pepper to taste
2 sprigs of fresh mint
2 bramley apples

For the pastry:

300g plain flour (plus extra for dusting)
pinch of salt
75g vegetable shortening, cut into cubes
75g butter, cut into cubes
1 medium sized egg
1 tbsp cold water

Prep Time: 45-60 minutes
Cook time: 120-150 minutes
Makes 8-10 slices


  1. The filling is cooked for at least an hour and a half before the pastry lid is added, so best to start with that. Preheat the oven to gas mark 5. 
  2. Coat the diced lamb with the plain flour. Heat a little oil in a frying pan and stir fry the lamb until just golden, then place the lamb to one side in a casserole dish.
  3. Peel and chop the onion, then return the pan to the heat and fry the onions until they start to turn translucent. Add the onions, lamb stock, mixed spice, salt and pepper to the lamb in the casserole dish, then roughly tear the mint leaves and add these. Stir well, cover, then place in the oven for 1.5-2 hours, stirring occasionally,  until the meat has cooked and the sauce has thickened. (Don't add the apples at this stage - we will come back to them!)
  4. Whilst the casserole is cooking, prepare your pastry. Tip the flour and salt into a large bowl, then rub in the shortening and butter with your fingertips until the mixture resembles fine breadcrumbs. Make a well in the centre.
  5. Lightly whisk the egg and water, then pour most of this into the well made in the flour and fat mixture - you'll want to reserve a little bit of this to use as a glaze. Stir the mixture until it comes together to form a dough, then knead the dough for a few minutes on a lightly floured surface. Shape the dough into a round, wrap in clingfilm and place in the fridge until ready to use (make sure this is at least 30 minutes so the pastry is nicely chilled!)
  6. Once the casserole is cooked, remove from the oven and leave to cool whilst you peel, core and slice the apples. Carefully pour half of the casserole into a large pie dish, then layer the slice apples on top of this. Pour the remaining casserole on top of the apple layer and set to one side whilst you roll out you pastry. Increase the heat of the oven to gas mark 6.
  7. Unwrap the pastry and roll out to around 3 inches large than the dish you are using. Cut a 1 inch circle from the edge of this, and place the around the rim of your pie dish to use as a support. Cover this in egg wash, then place the pastry over the whole dish. Trim and flute the edges, then glaze the top of the pie with the remaining egg mixture. Cut a small cross in the middle of the pastry to allow the steam to escape, then bake in the centre of the oven for 25 - 30 minutes until golden brown all over.

Happy Thoughts
x