Sunday, 29 July 2012

Spare Me Your Lies, Temptress! Your Emperor's Defeated, and I'm Immune to Your Bewitching Good Looks.

Disney Pixar # 11 - Toy Story 3


For the final instalment of the Toy Story Character Cupcakes, I was planning to make a whole bunch of the main crew... however, Angel suggested/requested that I make some strawberry flavoured Lotso cupcakes, and I couldn't very well say no! After all, everyone loves Lotso!


I actually have my own Lotso bear. He is over 2 years old now, but he stills smells like strawberries! I wanted to tap into that epic strawberry-ness, so I loaded my cupcakes full of them! Yum yum yum!

Prep time: 20 minutes
Cook time: 15-18 minutes
Makes 12 cupcakes

Ingredients:
For the cupcakes:
75g fresh strawberries
100g margarine
100g caster sugar
1 medium egg
100g self raising flour
1/2 tsp baking powder

For the filling:
150g home-made strawberry jam

For the icing:
150g butter
300g icing sugar
A few drops of strawberry flavouring
Pink and black food colouring


  1. Preheat the oven to gas mark 5 and line a bun tray with cupcake cases.
  2. Wash and hull the strawberries, then blend them into a puree.
  3. Beat together the margarine and the sugar until creamy. Beat in the egg and the strawberry puree until the mixture is light and fluffy, then fold in the flour and baking powder.
  4. Fill each cupcake case around 3/4 full, then bake for 15-18 minutes until the cakes are golden brown on top and springy to touch. Turn the cake out onto a wire rack to cool.
  5. One the cakes have cool, cut a circle out of each cupcake to create a well in the centre - keep the cut-out bits to one side. Fill each cupcake with 1tsp of strawberry jam, then place the "lids" back onto the cupcakes.
  6. To make the butter cream, beat together the butter and icing sugar until smooth and creamy. Add a few drops of strawberry flavouring, and a tiny bit of black food colouring and beat until you had a pale grey shade. Place the icing into a piping bag fitted with a star nozzle, then pipe a circle of grey into the middle of each cupcake. Pour all of the remaining icing back into the mixing bowl, then beat in a little pink food colouring, adding more until you reach the desired colour. Pipe this onto the cupcakes in a circle around the grey icing.
  7. Breathe in a big whiff of the strawberry goodness, then take a bite!


Next time it's the final instalment in the Disney Pixar collection so far: Cars 2!

Happy Thoughts
x

Sunday, 15 July 2012

My Name is Dug. I Have Just Met You, and I Love You.

Disney Pixar # 10 - Up


Up is amazing. I remember being slightly disappointed by it the first time I watched it, but every time I've watched it since, I've wondered why. The first 10ish minutes of the film are so beautifully, heart-breakingly, cinematic-history-making-ly perfect that it's impossible not to fall in love with Up. The rest of the film is pretty good too.


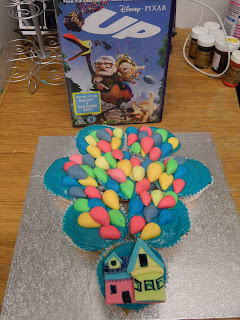
Aside from the opening sequence - which I didn't want to touch as I could never possibly hope to do justice to it - my favourite moment of the film is when Carl releases his balloons and the house floats up into the air; it has just the right mix of awe and magic to make you suspend disbelief and that's what I decided to create in cake form.


Now, being a veteran reader of Cake Wrecks, I was a little dubious about creating a cupcake-cake, however, I couldn't think of a better way to do this and stick to my remit of "all the Disney/Pixar films have to be made with cupcakes", so the cupcake-cake was made. I don't think it turned out too badly (at least I hope it's good enough not to be deemed a wreck!). I decided to go with a raspberry flavouring for these cupcakes, as I thought it would be reminiscent of candy-floss and bubble-gum and the manner of treats Carl might have enjoyed as a young balloon-seller. The recipe for the cupcakes is one I adapted from The Hummingbird Bakery's Cake Days, as it makes really fluffy light cupcakes.

These cupcakes have A LOT of icing on them, so this one is best saved for when you have a very, very sweet tooth.

Prep time: 45 minutes
Cook time: 15-18 minutes
Makes 12 cupcakes

Ingredients:

For the cupcakes:
40g butter
140g caster sugar
120g plain flour
1tsp baking powder
1 large egg
120ml milk
raspberry flavouring - to taste

For the butter cream:
100g butter
200g icing sugar
A few drop of raspberry flavouring
Blue food colouring
Milk (as required)

To decorate:
200g fondant icing
Pink, Green, Yellow, Ice Blue and Navy food colourings
Edible glue


  • Pre-heat the oven to gas mark 4 and line a bun tray with cupcake cases.
  • Beat the butter, sugar, flour and baking powder together in a bowl until the ingredients come together to resemble bread crumbs. Mix the egg, milk and raspberry flavouring together in a jug, then beat this wet mixture into the dry mixture a little bit at a time until you have a smooth batter. Spoon the batter into the cupcake cases, filling the around 3/4 of the way full.
  • Bake for 15-18 minute until golden brown and firm to touch. Leave to cool completely on a wire wrack before decorating.
  • Whilst the cupcakes are cooling, prepare your butter cream by beating the butter, icing sugar, raspberry flavouring and a little blue food colouring together until creamy. Add a little milk to achieve the desired consistency if necessary. Keep the butter-cream in the fridge until ready to use.
  • To prepare the decorations, split the fondant icing into 5 pieces, and colour each one with the colours listed above. I split my icing again so that I had a pale and a vibrant version of each colour. The pale colours were mostly used for the house, and the vibrant colours for the balloons. To make the house, cut out the pieces (see photo below for step-by-step) and assemble using the edible glue to stick the pieces together. Paint on the detail with a little blue food colouring. To make the balloons, roll a chunk of icing into a ball and cut this into two halves. Pinch one end of the circle into a teardrop shape, trying to keep the bottom flat. I ended up making around 100 balloons, but didn't use them all. 


  • When the cupcakes have cooled, spread a layer of blue butter-cream over them, then arrange 8 of the cupcakes onto a cake board in a 1, 2, 3, 2 formation (see the pictures for explanation!) Place the fondant house onto the bottom cupcake, then layer the balloons onto the other cupcakes, curving the edges to make the shape of a large balloon.
  • Now watch your friends get a little awkward as they really want to eat the cakes, but don't want to ruin your pretty mosaic ;-) 


Next time it's Toy Story 3, and I'll be paying homage with some cuddly cupcakes that smell (and taste) like strawberries!

Happy Thoughts
x

Sunday, 8 July 2012

I Smell Of Strawberries

Well, it's been a little quiet around Princess and the Cake HQ of late, so I thought I'd do a little bit of explaining. You see, when we first started the Disney Pixar collection, we were working under the presumption that Brave would be released on June 22nd, and so our plan was to squeeze in all of the Disney Pixar films before then, and have a trip to the cinema to see Brave as our big finale. So June came along and we found ourselves with only three films remaining in the collection: Up, Toy Story 3 and Cars 2. It became a little tricky to schedule them in around everyone's holidays, but we found that if we did all three withing a 10 day period we could squeeze them in before going to see Brave - how exciting! 


However, we then found out that whilst Brave was being released on the 22nd June pretty much everywhere else in the world, we in the UK would have to wait until the 17th August. Whilst this is a little bit annoying - we want to see Brave!! - it left us with MUCH more time for the final three films, so we spread them out a bit. Hence the lack of posts recently!


Anyways, I'll post the recipe and photos for Up as soon as I can, and I'm baking Toy Story 3 as we speak, but by way of apology for getting a bit slack, here's a little teaser recipe to tide you over - the strawberry jam I'm using in my Toy Story 3 cupcakes.

The BEST Home-made Strawberry Jam

Prep time: 5 mins
Cook time: 45 - 60 mins
Make a large (approx. 450g) jar

Ingredients:
350g strawberries (British are best!)
400g Jam Sugar (sugar with added pectin)
75ml cold water

  1. Wash and hull the strawberries, then tip them into a blender. Pulse until a mostly smooth puree has formed, then pour this into a large, heavy-based saucepan.
  2. Add the sugar and water to the saucepan, then put onto a very low heat. Stir until all of the sugar has dissolved, then leave on the low heat until the jam reaches rolling simmer. (It's a good idea now to place a saucer into the freezer to use to test the set later on!) Allow the jam to simmer away, stirring occasionally, until the jam starts to thicken (about 45 minutes). I find that slow and steady wins the race with jam - yes, you could turn up the heat and reach a rolling simmer much faster, but you risk burning the strawberries and in my experience, the jam just doesn't taste as good.
  3. After 45 minutes, remove your testing saucer from the freezer, and pour a teaspoon of jam onto it. After 30 seconds your jam should be set - if so, pour the hot jam into a sterilised jar and leave to cool before placing in the fridge to set completely. If the jam isn't quite set yet, leave it to simmer for a little longer, and test again in 5 minute intervals.
All done!


Next time I'll post the photos and recipe for the candyfloss-flavoured cupcakes I made for Up, but until then,

Happy Thoughts
x